
已刪除的檔案未顯示在資源回收筒中
您刪除了一份文件,開啟「資源回收桶」想將其還原,卻發現裡面什麼都沒有。如果您有 已刪除的檔案未顯示在資源回收桶中, 請先停止將新資料寫入受影響的磁碟。該檔案可能已繞過「回收筒」,但這並不一定代表其內容會立即從儲存裝置中消失。本指南將說明可能的成因、協助您選擇最安全的復原方法,並示範如何防止此問題再次發生。如需更全面的永久刪除情境概覽,請參閱我們的 已刪除檔案復原指南.
目錄
為什麼刪除的檔案不會出現在資源回收筒中?
Windows 通常會將從本機磁碟機刪除的檔案移至一個隱藏的 $Recycle.Bin 資料夾中。每個磁碟機都有自己的「資源回收筒」儲存空間,儘管 Windows 會將其內容顯示在同一個桌面視窗中。某些刪除方式、位置及設定會繞過這項安全機制。.
如果您看到 已刪除的檔案未出現在資源回收桶中, 通常會適用以下其中一種解釋。.
原因 | 發生了什麼事 | 最佳的下一步 |
已使用 Shift+Delete 鍵 | Windows 將此次刪除視為永久刪除 | 請停止使用該磁碟機,並檢查備份或對其進行掃描 |
已啟用「繞過資源回收桶」功能 | 選取的磁碟機會立即刪除項目 | 先還原,然後再變更其「內容」 |
檔案過大 | 這已超過該資料庫的設定容量 | 掃描原始磁碟機或還原備份 |
垃圾桶已被清空 | 該項目已透過手動清理或「儲存空間管理」功能移除 | 檢查「檔案歷史紀錄」、雲端備份或資料恢復軟體 |
該檔案來自可移除儲存媒體 | 某些 USB 隨身碟和 SD 卡會繞過電腦的「資源管理器」 | 讓裝置保持連線狀態,但不要向其寫入資料 |
該檔案來自一個網路位置 | 網路共用資料夾不會使用您的本機「資源回收筒」 | 請向系統管理員詢問有關伺服器快照或備份的事宜 |
某個程式刪除了該檔案 | 命令列工具和某些應用程式會跳過「Bin」資料夾 | 檢查該應用程式自身的垃圾桶或備份功能 |
「資源回收桶」已損毀 | 其資料庫或資料夾已無法正常運作 | 在重置 Bin 之前,請先恢復重要資料 |
按下 Shift+Delete 會直接刪除檔案,不經回收筒
按住 Shift 鍵並按下 Delete 鍵,可指示 Windows 直接刪除檔案,而不將其移至資源回收筒。腳本、清理工具及命令提示字元指令亦可達成相同效果。.
這是最常見的原因之一,因為 刪除的檔案不會送進資源回收筒. 如果您記得曾使用過該快捷方式,請不要浪費時間更改「資源回收桶」的設定;這些變更無法讓遺失的檔案恢復。請直接參閱下方的恢復方法,或閱讀這份專題指南以 還原按 Shift 鍵刪除的檔案.
該檔案的大小超過了資源回收筒的容量限制
Windows 會為每個磁碟機設定「資源回收筒」的最大容量。當檔案無法放入時,Windows 會警告該檔案將被永久刪除——在進行大規模清理時,這則訊息很容易讓人不假思索地點擊確認。.
這解釋了為什麼一份小文件會被移至垃圾桶,而一個大型影片資料夾卻不會。因此,如果只有大型 已刪除的檔案未出現在資源回收桶中 若資料遺失,請在恢復資料後檢查原始磁碟的容量設定。.
該檔案來自 USB 隨身碟、SD 卡或網路磁碟機
網路共用資料夾不會使用您電腦上的「資源回收筒」。USB 隨身碟或 SD 卡通常會繞過本機的「資源回收筒」,而外接硬碟則可能會保留其自身的隱藏資料夾「$Recycle.Bin」。.
如果來源裝置運作正常,請保持其連線狀態,但請勿將任何內容複製到該裝置上。當 已刪除的檔案未顯示在資源回收桶中 若檔案來自可移除儲存裝置,請掃描該裝置——而非 Windows 系統磁碟。.
「資源回收筒」的屬性已變更
右鍵點擊「資源回收桶」,然後選擇 屬性. Windows 會針對清單中的每個磁碟機分別顯示設定。如果 請勿將檔案移至「資源回收筒」。刪除檔案時請立即將其移除 若已針對受影響的磁碟機選取此設定,一般刪除操作將跳過「回收箱」。.
此設定說明了為何在……時,C: 可能仍能正常運作,而…… 刪除的檔案不會送進資源回收筒 來自 D: 磁碟機。變更此設定可保護未來的檔案,但無法還原先前已刪除的檔案。.
是「儲存空間管理」還是其他清理工具清空了它
「儲存空間管理」功能會在項目於「資源回收筒」中存放達指定天數後將其刪除。第三方清理工具可能也會執行類似的操作。OneDrive 及其他雲端服務亦設有獨立的線上資源回收筒,因此已同步的項目可能會出現在該處,而非您預期的位置。.
在嘗試任何解決方案之前該做些什麼
當 已刪除的檔案未顯示在資源回收桶中 對您而言,資料復原比修復更重要。重置雖能重建已損毀的 Bin,但無法恢復資料,且可能會刪除仍儲存於其中的項目。.
遵循這些預防措施:
- 請停止使用原有的硬碟。. 下載、更新、暫存檔及安裝程序可能會覆寫可恢復的空間。.
- 請勿在該磁碟機上安裝資料恢復軟體。. 請使用另一個分割區,或者(最好)使用另一顆實體硬碟。.
- 目前請勿執行 CHKDSK、格式化磁碟,或重設 $Recycle.Bin。. 這些操作會改變磁碟結構,並可能使資料恢復變得更加複雜。.
- 準備另一個目的地。. 請將恢復的檔案儲存至另一個實體磁碟,切勿存回原始位置。.
刪除操作通常會變更檔案系統記錄,並將已佔用的空間標記為可用。在新的資料覆寫該空間之前,通常仍有機會進行資料復原。由於 TRIM 可能會清除未使用的區塊,因此 SSD 的資料復原結果較難以預測,故沒有任何方法能提供絕對的保證。.
如何恢復已被刪除但未存於資源回收筒的檔案
請選擇與檔案原始位置相符的方法。備份是最安全的做法;若無備份,請立即使用還原工具。.
方法 1:檢查正確的「資源回收筒」和「雲端垃圾桶」
首先,排除地點混淆的可能性:
- 開啟「資源回收筒」,並依...排序 刪除日期. 搜尋檔案名稱的一部分。.
- 如果該檔案儲存於 OneDrive 中,請在網頁版登入並檢查其「資源回收筒」。.
- 請檢查 Dropbox、Google 雲端硬碟、相片應用程式或管理該檔案的程式中的「垃圾桶」或「已刪除項目」資料夾。.
- 若工作檔案位於 SharePoint、Teams 或網路共用資料夾中,請聯絡系統管理員。伺服器可能設有獨立的資源回收筒、快照或備份。.
此檢查通常會發現 已刪除的檔案未出現在資源回收桶中 該服務目前仍由另一項服務負責。.
方法 2:還原先前版本或檔案歷史紀錄備份
「檔案歷史紀錄」功能僅在刪除前已進行設定的情況下才會生效。若要確認:
- 開啟「檔案總管」,並瀏覽至先前存放該檔案的資料夾。.
- 用滑鼠右鍵按一下資料夾,然後選擇 還原先前版本.
- 請選擇刪除前的版本。.
- 選擇 開啟 在還原之前,請先確認其內容。.
微軟在其 「檔案歷史紀錄」還原說明. 同時也請檢查您目前正在使用的任何備份或磁碟映像軟體。.
方法 3:使用 Magic Data Recovery 恢復遺失的檔案
當沒有可用的備份時,且 已刪除的檔案未顯示在資源回收桶中, Magic Data Recovery 提供了一種以圖形化方式掃描原始儲存裝置的方法。它能解決當前問題——找出 Windows 不再顯示的檔案資料——且無需使用命令列語法。.
其涵蓋範圍包括「Shift+Delete」刪除的檔案、已清空的資源回收筒、超大檔案、硬碟、USB 隨身碟及記憶卡,以及格式化與檔案系統錯誤。透過快速掃描與深度掃描、篩選功能、預覽功能,以及對超過 5,000 種檔案格式的支援,可協助您精準篩選結果,並在儲存檔案前進行驗證。.
使用 Magic Data Recovery 的步驟
1. 請將 Magic Data Recovery 下載並安裝在與已刪除檔案所在磁碟機不同的磁碟機上。.
支援 Windows 7/8/10/11 和 Windows Server
2. 啟動程式,並選取原始分割區或可移除裝置。.
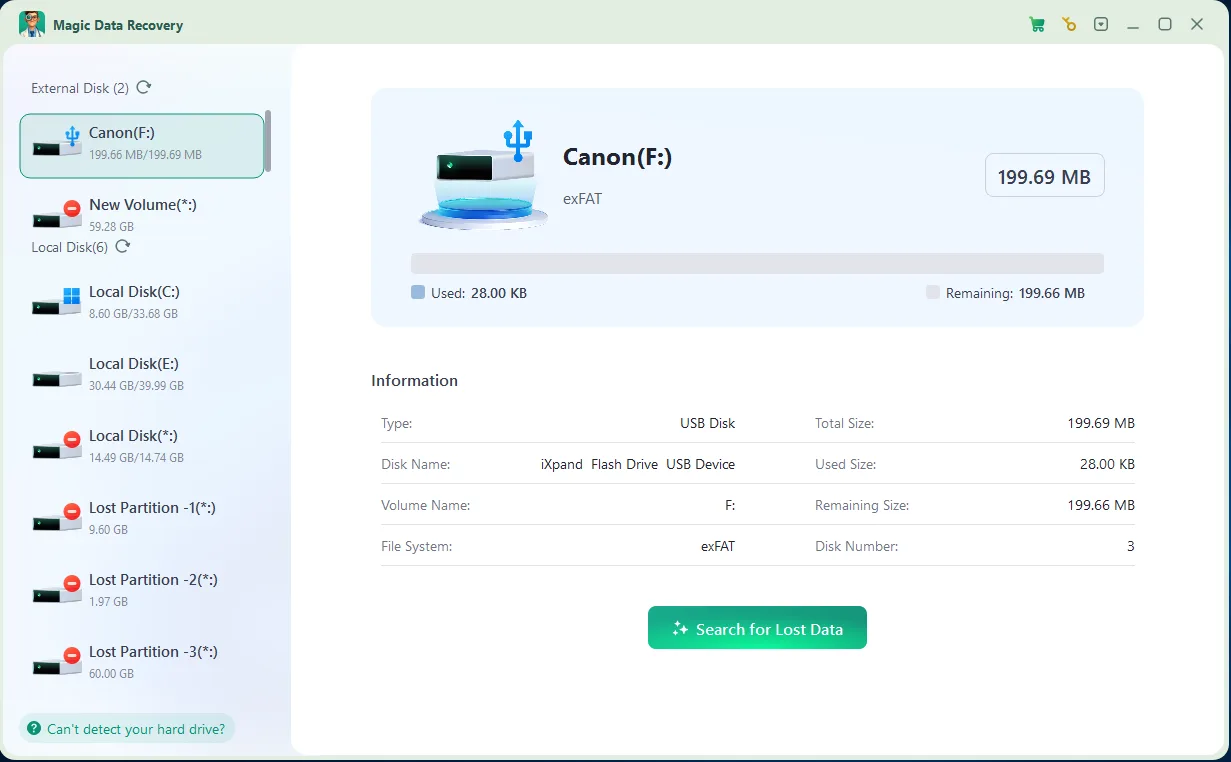
3. 請等待掃描完成。依路徑或檔案類型篩選,然後在可用的情況下搜尋已知的檔案名稱。.
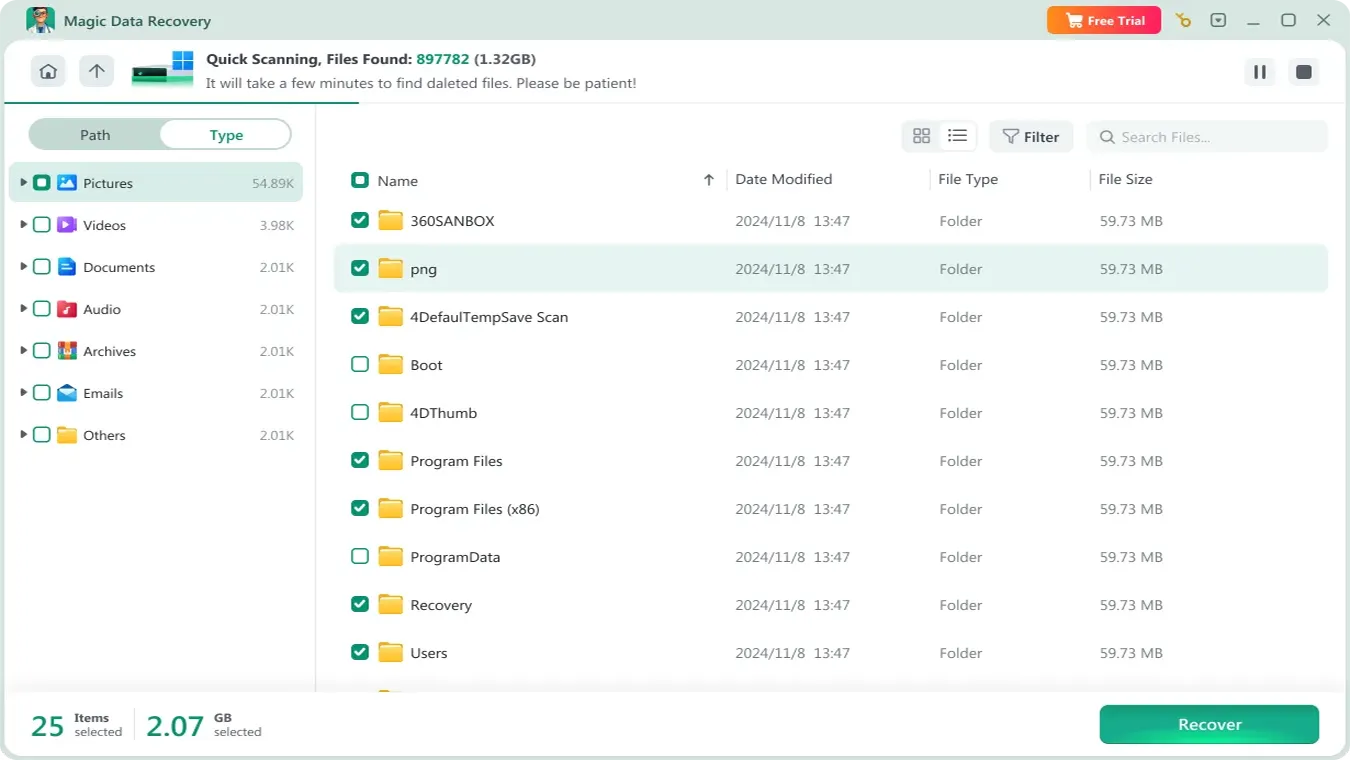
4. 預覽重要文件、照片或其他受支援的檔案,以確認它們能否正常開啟。.

5. 選取檔案,並將其還原至另一顆實體磁碟。.
此工作流程比命令列工具更為簡便,而預覽功能則增添了一個實用的驗證步驟。任何軟體都無法還原已被覆寫或透過 TRIM 清除的資料。. Magic Data Recovery 之所以值得推薦,是因為它能透過唯讀掃描處理簡單的刪除問題以及更複雜的儲存問題——而非因為能保證恢復成功。.
方法 4:嘗試使用 Windows 檔案還原
進階使用者可以嘗試微軟的「Windows 檔案回復」(Windows File Recovery),這是一款適用於本機內建硬碟、外接硬碟及 USB 隨身碟的命令列應用程式。它不支援雲端儲存或網路共用資料夾。其一般語法如下:
- winfr source-drive: destination-drive:[/mode] [/switches] [/switches
來源與目的地必須不同。請參閱 Microsoft 目前的 Windows 檔案恢復指南 在執行之前,請先確認,因為正確的模式取決於檔案系統及刪除的情況。.
如何解決已刪除檔案未進入資源回收桶的問題
在盡可能恢復資料後,請解決根本問題。在再次信任「資源回收筒」之前,請先使用一個不重要的文字檔案測試每項變更。.
解決方案 1:為每個磁碟機啟用「資源回收筒」
- 右鍵點擊「資源回收筒」圖示,然後選擇 屬性.
- 請選擇發生問題的磁碟機。.
- 選擇 自訂尺寸 而不是 請勿將檔案移至「資源回收筒」.
- 鍵點選 申請, 然後針對每個磁碟機重複進行檢查。.
由於這與特定磁碟機有關,若僅檢查 C: 磁碟機,可能會導致 刪除的檔案不會送進資源回收筒 在另一個分割區上。.
解決方案 2:增加其最大容量
在「內容」中,選取受影響的磁碟機,然後提交 最大大小(MB) 以配合您處理的檔案。此方法雖無法還原先前刪除的檔案,但可減少未來因檔案大小而導致的繞過情況。.
解決方案 3:檢視「儲存空間管理」
開啟 「設定」>「系統」>「儲存空間」>「儲存空間管理」. 檢視 Windows 保留「資源回收筒」項目多長時間,然後選擇較長的保留期間,或 從不 (如適用)。具體措辭會因 Windows 版本而略有不同。.
解決方案 4:重設已損毀的資源回收筒——僅限於復原後執行
如果一般的測試檔案仍然會消失,可能是「回收筒」已損壞。請以系統管理員身分開啟「命令提示字元」,並針對受影響的磁碟機執行以下指令:
- rd /s /q C:\$Recycle.bin
請將「C:」替換為確切的受影響磁碟機代號,然後重新啟動 Windows。系統會自動重新建立該資料夾。.
重要: 此指令會直接刪除該磁碟機上的現有「資源回收筒」資料夾,且不會再進行確認。請先恢復所需的檔案,確認磁碟機代號,並切勿將指令貼上至您尚未確認的磁碟機上。若您對此指令感到不確定,請向經驗豐富的技術人員尋求協助。.
如何避免再次發生同樣的問題
請使用一般的「刪除」功能,檢查各磁碟機的「資源回收筒」容量,並在設定好電腦後檢查「儲存空間管理」。更重要的是,請遵循 3-2-1 備份原則:將資料備份三份至兩種儲存媒介,其中一份存放於異地。應不時還原測試檔案,因為未經驗證的備份僅是假設。.
總結
當你發現 已刪除的檔案未顯示在資源回收桶中, 在變更 Windows 設定之前,請先確認原始位置及刪除方式。Shift+Delete、過大的檔案、可移除儲存裝置或網路儲存裝置、各磁碟機的屬性、自動清理功能,以及檔案損毀,都可能導致相同的症狀。請先嘗試從雲端垃圾桶或備份中還原。如果兩者都不存在,, Magic Data Recovery 這是一個明智的選擇,因為它能透過直觀的介面掃描已刪除、已格式化以及發生檔案系統錯誤的情況,並讓您在恢復前預覽結果。.
最重要的是,請停止使用來源磁碟,並將還原的資料儲存至其他位置。還原完成後,請修正相關設定,並使用一個可拋棄的檔案進行測試。您可以返回 刪除的檔案復原 如需更多針對特定情境的指引,請參閱。.
支援 Windows 7/8/10/11 和 Windows Server
關於刪除的檔案未顯示在資源回收筒中的常見問題
為什麼我刪除的檔案沒有出現在資源回收筒裡?
這些檔案可能是透過 Shift+Delete 鍵刪除、超過資源回收筒的容量限制、來自可移除儲存裝置或網路儲存裝置,或是因磁碟機設定而未被送入資源回收筒。此外,「儲存空間管理」功能、清理軟體,或是資源回收筒損壞,也可能是原因所在。 已刪除的檔案未顯示在資源回收桶中.
當檔案不在「資源回收筒」裡時,它們會去哪裡?
這些資料可能會進入雲端服務的垃圾桶、伺服器端的回收筒,或被視為已永久刪除。透過本機永久刪除,Windows 可以將該佔用空間標記為可用空間。在進行下一次寫入或 SSD 維護清除該資料之前,該資料仍可能可被恢復。.
如果檔案是直接刪除而沒有進入「資源回收筒」,還能恢復嗎?
有時可以。請先檢查雲端垃圾桶、檔案歷史紀錄、先前版本及其他備份。若無備份,請停止使用原始磁碟,並使用合適的資料恢復工具進行掃描。恢復結果取決於是否遭覆寫、儲存裝置類型、TRIM 功能、檔案狀態,以及刪除後經過的時間長短。.
為什麼從 USB 隨身碟刪除的檔案不會被移至資源回收筒?
許多可移除的 USB 裝置並不會使用電腦本地的「資源回收筒」,因此 Windows 會直接刪除其中的檔案。部分外接硬碟則會維持一個獨立的隱藏資料夾「$Recycle.Bin」。無論哪種情況,若您需要恢復檔案,請避免將新資料寫入該裝置。.
該如何讓已刪除的檔案再次移至「資源回收筒」?
右鍵點擊「資源回收筒」,開啟「內容」,選取受影響的磁碟機,選擇「自訂大小」,然後套用設定。由於 Windows 會分別儲存這些選項,請針對每個磁碟機重複此步驟。此外,若大型檔案持續繞過「資源回收筒」,請檢查「儲存空間管理」功能,並增加最大容量。.
按下 Shift+Delete 會立即將檔案永久刪除嗎?
按下 Shift+Delete 會繞過「資源回收筒」,並將檔案從 Windows 的正常存取範圍中移除。在許多磁碟機上,底層的儲存空間會立即釋出以供重新使用,而非立即被覆寫。雖然仍有機會恢復檔案,但 SSD 的 TRIM 功能以及後續的磁碟活動可能會迅速降低這種可能性。.
重置「資源回收筒」能恢復遺失的檔案嗎?
不。重置會重新建立受損的 $Recycle.Bin 結構;這是一項修復步驟,而非資料復原方法。重置指令可能會清除回收筒中的現有內容,因此請先備份重要資料。僅在較簡單的設定檢查失敗,且您已確認磁碟機代號正確後,才應使用此指令。.
為什麼在網路磁碟機上刪除的檔案不會出現在資源回收筒中?
網路共用資料夾通常不會使用 Windows 電腦上的「資源回收筒」。資料恢復取決於伺服器或雲端平台。請儘快聯絡系統管理員,了解快照、備份、保留政策或伺服器端的資源回收筒,以免已刪除的儲存區塊被重新利用。.

Jason 是一位擁有超過 15 年實務經驗的資料復原與技術支援專家。 他長期與第一線使用者密切合作,處理棘手的資料遺失案例,並針對誤刪資料、磁碟格式化、檔案系統損毀、分割區遺失、系統故障及其他緊急資料復原情況,提供實用的復原解決方案。其專業領域還涵蓋備份與還原、檔案修復及災難復原,並特別注重提供安全、可靠且技術上精準的指導。.