
리눅스에서 삭제된 파일을 복구하는 방법
An accidental rm command can remove a file without sending it to Trash. A deleted folder may also disappear from a desktop file manager before you realize what it contained. You may still be able to Linux에서 삭제된 파일 복구, but the next step depends on how the files were removed and whether another copy exists.
Trash, backups, and files still held open by an application offer direct recovery paths. Without those options, recovery depends on the file system, remaining metadata, subsequent writes, and whether an SSD has processed TRIM commands. Stopping new writes helps, but it does not guarantee recovery.
Stop writing to the affected drive. If the deleted file may still be open in an application, keep that application running and check Method 2 before restarting. Otherwise, start with Trash and existing backups. For related scenarios, see our 삭제된 파일 복구 가이드.
목차
Before You Start: Protect the Deleted Data
After checking for an open-file recovery opportunity, keep further activity off the source. For a system partition, use a recovery environment on a separate boot device. Prepare any downloads and tools on another computer or drive.
Avoid these actions until important files are safe:
- Running file system repairs such as
fsckon the source. - Formatting, initializing, or recreating a partition.
- 실행 중
fstrim, which discards blocks the file system considers unused. - Saving recovery output to the affected disk.
그리고 Linux fstrim manual explains the discard operation. On SSDs, discarded data may no longer be recoverable through software.
If the drive clicks, repeatedly disconnects, or becomes harder to read, stop scanning and consider professional recovery.
Quick Answer: Which Recovery Method Fits Your Case?
You do not need to try every method. Match your situation to the most direct recovery path.
귀하의 상황 | Start here | 주요 한계 |
데스크톱 파일 관리자를 통해 삭제됨 | Restore from Trash | Permanent deletion may bypass Trash |
Used | Check open handles and backups, then consider recovery tools | A directly restorable copy may no longer exist |
Deleted file may still be open | Check open file handles immediately | The process must retain an accessible handle |
A backup or earlier snapshot exists | Extract the required files | The copy must predate deletion and include the files |
No copy exists; the disk reads normally | Use a suitable Linux recovery tool | Results depend on file system state and remaining data |
You prefer a Windows interface | Scan a supported Linux drive with Magic Data Recovery | Requires Windows and a supported, accessible storage layout |
The partition disappeared or the drive is unstable | Diagnose the storage problem separately | Ordinary undelete steps may not apply |
Confirm the Files Were Deleted
Before scanning, check the original location, the relevant user account, and whether the expected external drive is mounted. A missing mount can make a directory look empty even though its files remain on another device.
For disk identification, use:
- lsblk -o NAME,SIZE,FSTYPE,LABEL,MOUNTPOINTS
Match the device by its size, label, file system, and mount point. Do not assume /dev/sdb1 is your source: device names can change between computers and boots.
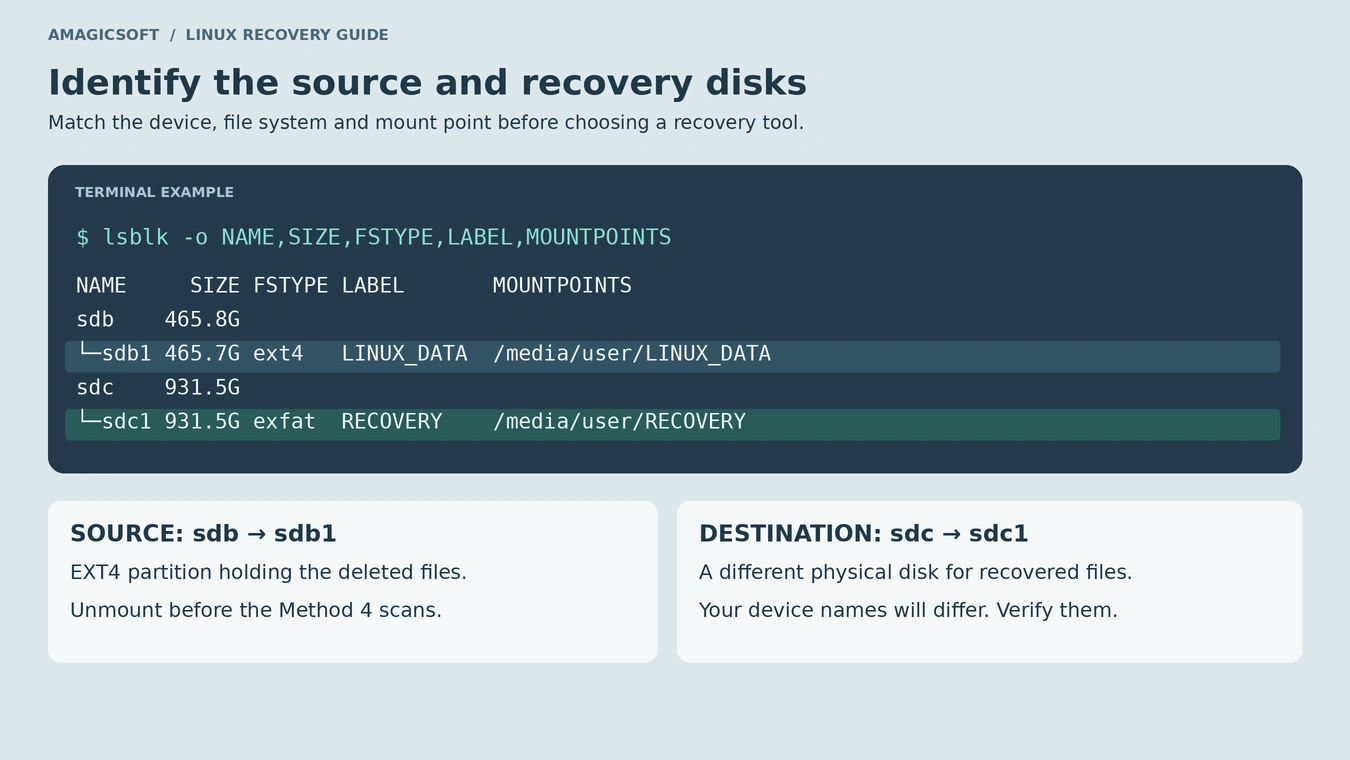
The file system matters. EXT4, XFS, and Btrfs do not share the same undelete workflow. If the output shows an encryption container or logical volume, identify the underlying storage arrangement before selecting a tool.
Avoid a lengthy whole-disk search on a busy source just to confirm a deletion you already know occurred. If the partition cannot be accessed at all, treat that as a separate storage problem rather than an ordinary deleted-file case.
리눅스에서 삭제된 파일을 복구하는 방법
Use an existing copy when possible. Check open handles immediately if that opportunity exists; otherwise, start with Trash and backups before scanning the disk. For valuable data, consider preserving a disk image first and using a tool that supports recovery from that image. Keep the image on separate storage.
Method 1: Restore Files from Trash
최적 대상: Files deleted through a desktop file manager without permanent deletion.
Open your file manager and select 휴지통. Locate the file, check that it is the correct item, and choose 복원. Then open it from its restored location and confirm its contents.
This usually returns the file to its original folder. If you also need to recover permanently deleted files from the same disk, minimize further writes and prioritize protecting that disk before restoring large amounts of data there.
An ordinary rm command does not move files to the desktop Trash. If the item is absent, check an existing backup or continue with an appropriate recovery method. Do not empty Trash while investigating.
Method 2: Recover a Deleted File That Is Still Open
최적 대상: A regular file that a running process still holds open.
Linux can retain an unlinked file until its final open file descriptor closes, as explained in the unlink manual. This makes the method time-sensitive: keep the relevant process running while checking.
만약 lsof is already available, run:
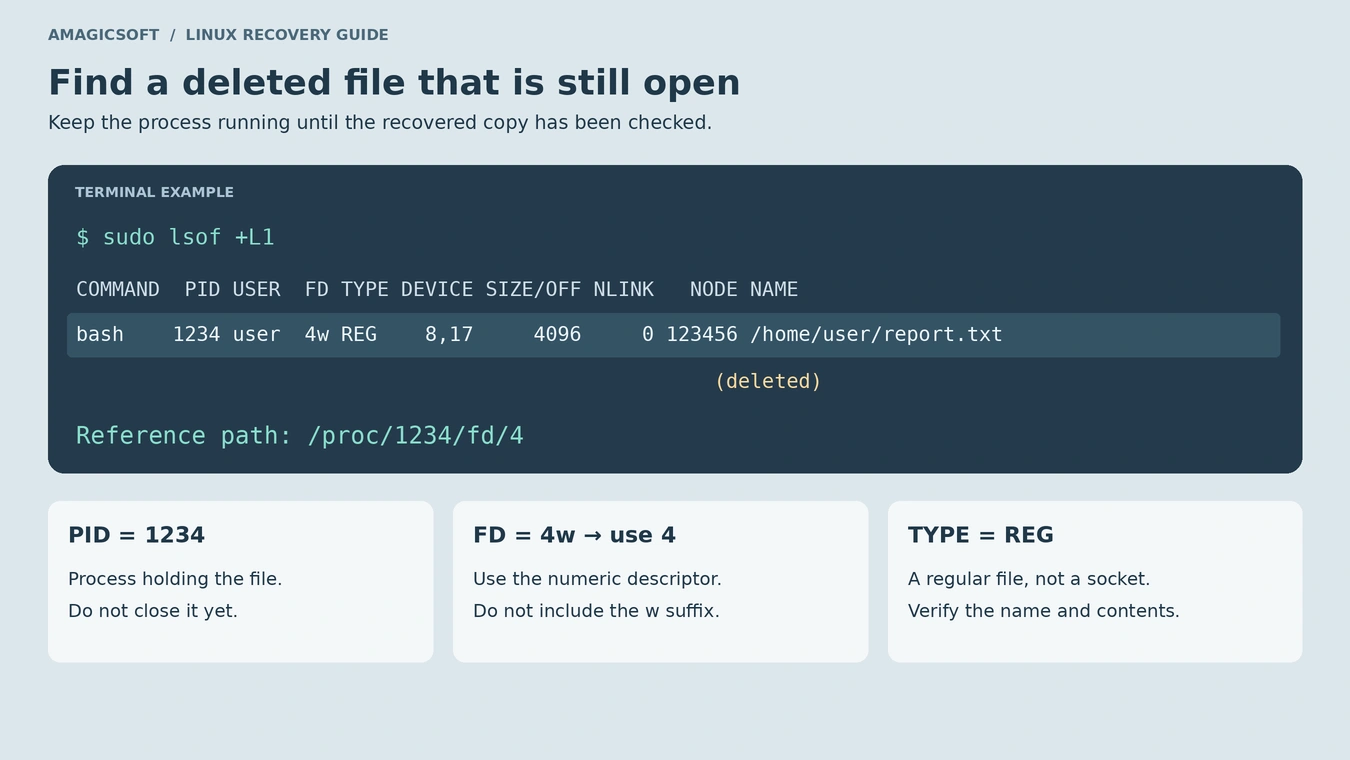
- sudo lsof +L1
그리고 lsof manual documents this selection of open files with a link count below one. Look for the expected name, a regular-file entry, the process ID, and a numeric file descriptor. If the FD column shows 4w, the descriptor number is 4.
Before copying, confirm that the destination is actually mounted:
- findmnt –mountpoint
/media/user/RECOVERY-o SOURCE,TARGET,FSTYPE,OPTIONS
Replace this path with your destination mount point. Expect the intended recovery device, the exact mount point, and rw among the options. Match that device to a separate physical disk in lsblk. If nothing is listed, the source is unexpected, or the volume is read-only, stop and correct the destination first.
Copy the appropriate file to that drive. For example:
- sudo cp
/proc/1234/fd/4/media/user/RECOVERY/recovered-report.txt
Replace the process ID, descriptor, and destination; choose a new output filename so you do not overwrite an existing copy.
Open the copy and check its contents. The proc file descriptor documentation explains these paths and access restrictions.
If the handle has closed, this route is no longer available. Do not install lsof onto the affected file system just to try it. Also, copying a database while it changes does not guarantee a consistent database backup.
Method 3: Restore from a Backup or Existing Snapshot
최적 대상: Files included in a backup, version history, or snapshot created before deletion.
A known-good copy is often more useful than a scan result. Check your backup application, external backup disk, cloud version history, or an existing snapshot that includes the affected folder.
- Open the backup source or its recovery interface.
- 삭제되기 전의 버전 중 하나를 선택하세요.
- Locate the specific files or folder.
- Extract them to separate storage where possible.
- Open the restored files and check that the required changes are present.
Prefer extracting individual files over rolling back an entire working system when that meets your needs. A full rollback may replace newer work unrelated to the deletion.
Do not assume every system snapshot includes personal files. Check the backup scope. Similarly, synchronization may propagate deletions, so inspect version history or the service’s deleted-items area rather than only its current folder.
If no suitable copy exists, preserve the source and choose a disk recovery method.
Method 4: Use Linux Recovery Tools
최적 대상: A readable drive with no usable copy, when you can identify the source and work from a separate recovery environment.
Run tools from a Live USB or another disk. The following checks apply to a simple, directly attached partition in a normal recovery session. If your storage involves encryption, RAID, LVM, containers, or multiple mount namespaces, get the layout assessed before proceeding.
Check the Source and Destination Before Scanning
1. Confirm the source partition. Match its size, label, and physical parent in lsblk. The example below uses /dev/sdb1; substitute your identified source:
- findmnt –source /dev/sdb1 -o SOURCE,TARGET,FSTYPE,OPTIONS
If a mount is listed, finish any open-file rescue first. For an ordinary data partition, unmount its listed mount point, for example:
- sudo umount
/media/user/LINUX_DATA
Run the source check again. There should be no matching mount in the recovery session; also confirm the source’s MOUNTPOINTS field is empty in lsblk. A command error is not a successful check. If you see additional mounts or an unfamiliar layout, stop.
Do not force or lazily unmount a busy source. If the affected partition is the running system’s root file system, boot from another device instead. Do not close a process holding your deleted file merely to make unmounting succeed. The umount manual explains busy mounts.
2. Verify the destination separately. Connect a known-good recovery drive and mount it through your recovery environment. Check its exact mount point:
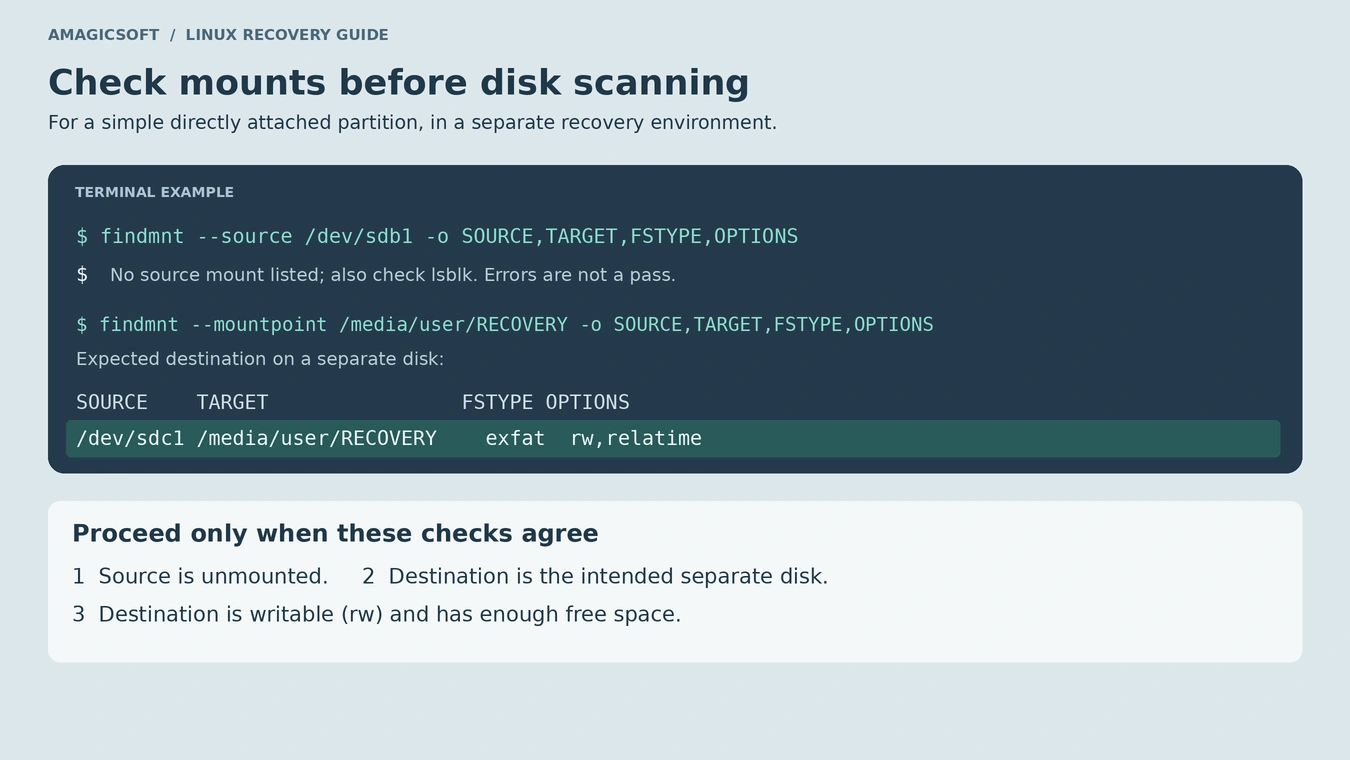
- findmnt –mountpoint
/media/user/RECOVERY-o SOURCE,TARGET,FSTYPE,OPTIONS
Proceed only if it identifies the intended separate drive and a writable mount (rw). Check available space with df -h /media/user/RECOVERY. . findmnt manual documents these mount checks.
Only after these checks, create a new output folder on that destination:
- mkdir
/media/user/RECOVERY/linux-recovery
If it already exists, choose a fresh folder name. Do not create the folder under an unmounted path: that could write to the file system containing the directory instead of your recovery drive.
Option A: extundelete for EXT3 or EXT4
삭제 attempts recovery using EXT3/EXT4 journal information. It is a conditional option, not a guaranteed solution for every EXT4 volume. Check compatibility with your recovery environment; if it reports unsupported features, do not alter the source to satisfy it.
Its output normally goes into RECOVERED_FILES beneath the current directory. Using the verified destination above, change directory and run recovery only if that succeeds:
- cd
/media/user/RECOVERY/linux-recovery&& sudo extundelete /dev/sdXN –restore-all
교체 /dev/sdXN with the source you verified, and adjust the destination path if needed. The && prevents the recovery command from running if the directory change fails.
Inspect the recovered output. If useful journal information or file content is unavailable, this method may fail. Do not respond by running a repair against the original disk. Consider content-based recovery or specialist assistance.
Option B: PhotoRec for Content-Based Recovery
PhotoRec searches for recognizable file signatures. It can help when metadata-based recovery fails, but it does not preserve the original directory structure or filenames.
From your recovery environment:
- Start PhotoRec, for example with
sudo photorec. - Select the correct source disk and partition.
- Choose the EXT2/EXT3/EXT4 file system option for an EXT source.
- For ordinary deletion on an intact supported file system, select the free-space scan when offered.
- Choose a recovery directory on a different physical drive.
- Inspect the files written to the
recup_dir.*folders.
Expect to sort the output by content and file type. Finding many files does not prove the specific file you need is intact.
Where does TestDisk fit? 그것의 official undelete documentation distinguishes EXT2 undelete from EXT3/EXT4 limitations. Do not treat its partition recovery features as a universal way to restore deleted EXT4 files. Partition repair is outside this guide’s scope.
Method 5: Scan a Linux Drive from Windows
최적 대상: Users who want a graphical interface and can connect a readable, supported Linux drive to a Windows computer.
Magic Data Recovery runs on Windows. Its official user guide lists EXT2, EXT3, and EXT4 support, making it an option for scanning supported Linux file systems from a Windows machine.
Windows 7/8/10/11 및 Windows Server 지원
This route suits a spare Windows computer and supported, readable storage. A graphical interface simplifies selection; it does not change whether the deleted content survives.
Step 1: Connect the source drive.
After checking for any open-file recovery opportunity, shut down the Linux computer if you need to remove an internal drive. Use an enclosure or adapter that matches its interface, such as SATA or NVMe. An existing external drive can be connected directly.
Step 2: Cancel initialization and formatting prompts.
Do not prepare the Linux disk for normal Windows use. A prompt to format does not mean formatting is required for recovery.
Step 3: Install the software on the Windows computer.
Keep the installation, downloads, and recovery output off the affected Linux disk. Prepare another drive with enough space for the files you need.
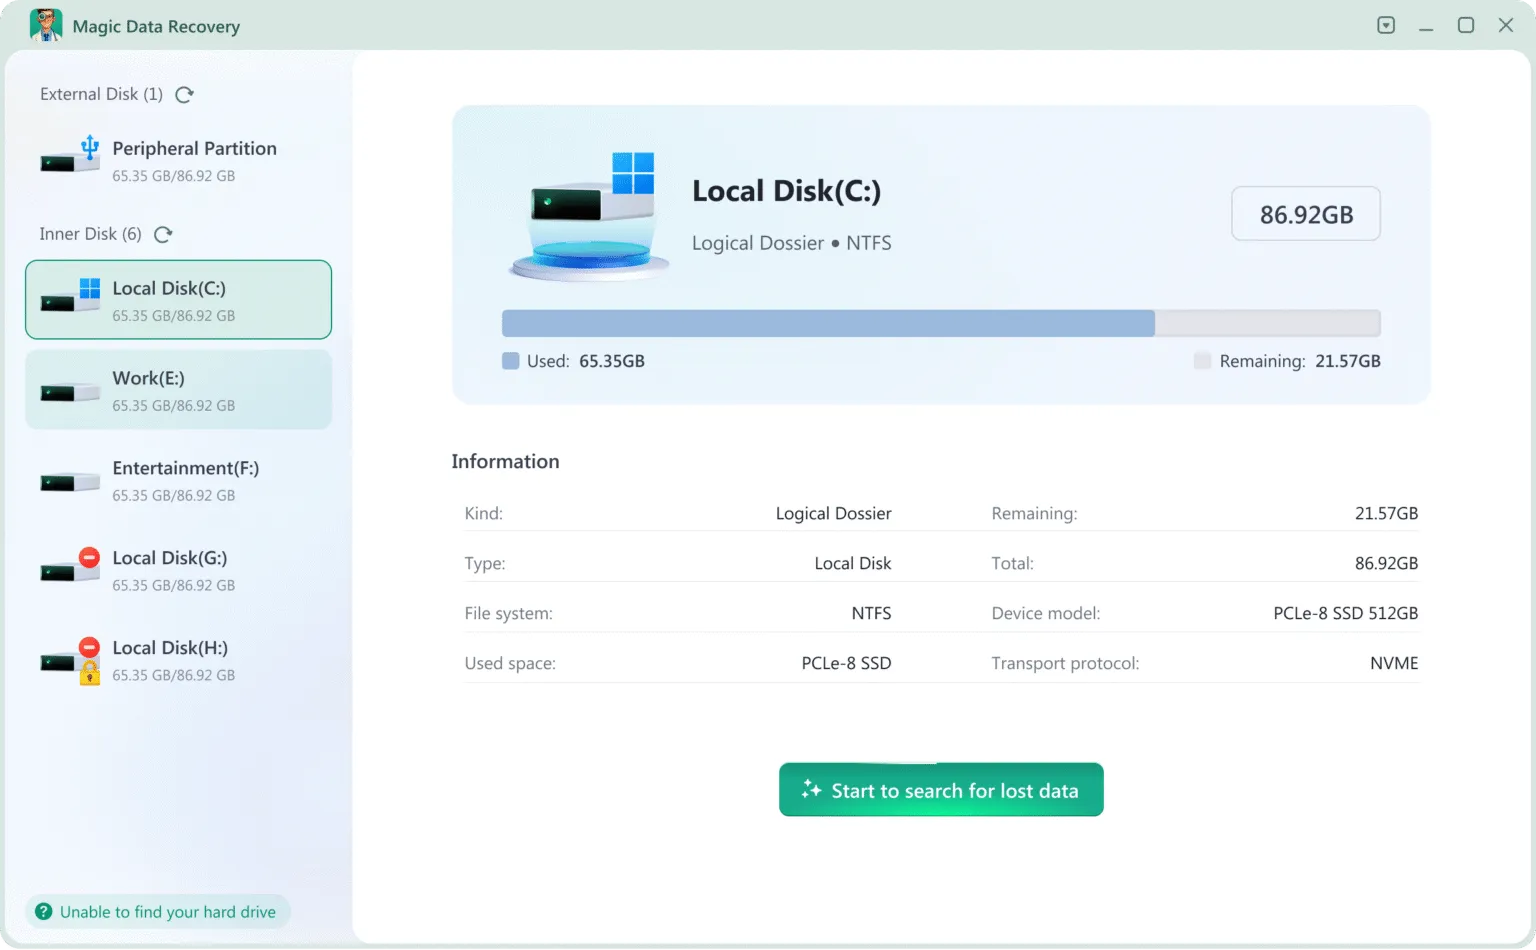
Step 4: Select and scan the correct source.
Match the disk or EXT partition by capacity and available identifying details. Review the scan results and use available filters to narrow down the relevant files.
Step 5: Preview and recover.
Where preview is available, check meaningful content rather than relying on the filename alone. Recover selected files to another physical drive, then verify them in their normal applications.

A supported EXT file system does not automatically mean every surrounding configuration is supported. LUKS encryption, LVM, RAID, or other storage layers require separate assessment. Do not initialize or rebuild an unfamiliar layout to make it appear in the program.
If the scan does not find usable content, check the recovery limits below before attempting another method.
Check Whether the Recovered Files Actually Work
A successful scan is only an intermediate result. Before reusing the source disk, check the files you recovered:
- 문서: Open them and inspect important pages, tables, and recent edits.
- Photos: View the full image, not just a thumbnail.
- 동영상: Play several sections, including near the end.
- 아카이브: Use the archive application’s integrity test or extract their contents.
- Project files: Open them in the original application and check linked assets.
Compare against a trusted original checksum if one exists. A newly calculated checksum alone cannot prove that recovery was correct.
Keep the source unchanged until the important results have been verified. Then make an additional backup of the recovered files.
When Linux Deleted File Recovery May Not Work
Recovery becomes less likely when new data replaces the deleted content, required metadata disappears, or the device no longer returns the original blocks. On SSDs, the TRIM 명령 can reduce recovery opportunities even without new files being copied. Treat the linked article as background; do not run its maintenance or enablement steps on a recovery source.
Stop DIY attempts if the device develops read errors, disconnects repeatedly, makes unusual mechanical noises, or contains a unique copy whose loss would be unacceptable. Professional assessment may be appropriate, although it cannot guarantee recovery of overwritten or discarded data.
If the real problem is a missing partition, an inaccessible encrypted volume, or a damaged storage array, use a workflow designed for that condition. Repeating ordinary undelete commands does not resolve those differences.
Reduce the Risk of Future File Loss
Once your files are safe, set up backups that keep previous versions. Store at least one copy on separate storage and periodically test whether you can restore an individual file.
Before running recursive deletion commands, check the current directory and the target path. For routine desktop cleanup, using Trash gives you an additional chance to catch a mistake.
Treat synchronization and backups as different functions. A synchronized folder can reflect an accidental deletion quickly; versioned backups provide a separate recovery point. Existing snapshots can also help, but a snapshot on the same physical disk does not protect against that disk failing.
결론
To Linux에서 삭제된 파일 복구, choose the method that matches the deletion. Check Trash for desktop deletions, preserve any useful open file handle before closing its process, and restore an existing backup before attempting a scan.
Without a usable copy, identify the file system and protect the source. Linux tools offer recovery options for specific conditions. Magic Data Recovery provides a Windows-based alternative for supported EXT drives when that setup suits you. In either case, recover to another disk and verify the actual contents before reusing the original storage.
For related scenarios, see our 삭제된 파일 복구 가이드. Start with the matching method above, save recovered files to another drive, and verify them before reusing the source disk.
Windows 7/8/10/11 및 Windows Server 지원
자주 묻는 질문
Can I undo an rm command in Linux?
rm does not provide an undo function or send files to the desktop Trash. Recovery depends on another available route, such as a backup, an existing snapshot, an open file handle, or recoverable data on the disk. Avoid further writes while checking which option applies to your situation.Can deleted files be recovered from a Linux SSD?
fstrim as part of a recovery attempt.Can I recover an entire folder deleted with rm -r?
Will recovered files keep their original names and folders?
Can I recover Linux files without installing software on the affected drive?
Does this process work with LUKS-encrypted drives?
Windows에서 Linux 드라이브를 포맷하라는 메시지가 표시되면 어떻게 해야 하나요?
Can files deleted weeks ago still be recovered?

Jason는 15년 이상의 실무 경험을 갖춘 데이터 복구 및 기술 지원 전문가입니다. 그는 현장 사용자와 폭넓게 협력하며, 까다로운 데이터 손실 사례를 해결하고, 실수로 인한 삭제, 드라이브 포맷, 파일 시스템 손상, 파티션 손실, 시스템 장애 및 기타 긴급 복구 상황에 대한 실용적인 복구 솔루션을 제공해 왔습니다. 또한 백업 및 복원, 파일 복구, 재해 복구 분야에서도 전문성을 갖추고 있으며, 안전하고 신뢰할 수 있으며 기술적으로 정확한 지침을 제공하는 데 중점을 두고 있습니다.