
How to Recover Photos from a Camera
A camera showing “No images” can mean a missing shoot, the wrong playback folder, or simply the wrong card slot. To recover photos from camera storage, first establish where the originals went. This guide focuses on digital cameras that use SD or microSD cards, with a separate note on internal memory.
Recovery may still work after deletion or a quick format, provided the card remains readable and the image data survives. New photos, overwrite formatting, and hardware failure can change that outcome. The time since deletion matters less than what has happened to the card afterward.
Stop shooting on that card. Start with the camera-specific checks below, then choose a recovery method only if the originals are genuinely missing. Our SD 카드 복구 가이드 covers related card problems. If no backup exists and Windows can read the card reliably, Magic Data Recovery is one software option for the next stage.
Windows 7/8/10/11 및 Windows Server 지원
목차
Before You Try to Recover Anything
Wait for the camera’s access light to stop, turn the camera off, and remove the card. Use a spare card if you must continue shooting.
- Cancel any request to format or initialize the affected card.
- Do not take test photos or copy files onto it.
- Install recovery software on your computer, never on the card.
- Save recovered pictures to a different drive.
If the card disconnects repeatedly, becomes unusually hot, or has visible damage, stop DIY attempts. A specialist assessment is the safer next step.
Can You Recover Photos from Camera Memory?
Yes, if accessible copies or readable image data survive. Check your situation before choosing software.
보시는 대로 | 그것이 의미하는 바는 무엇일까요? | 가장 좋은 다음 단계 |
Camera gallery is empty, but a computer shows the photos | Playback, folder, or compatibility issue | Copy the readable originals to another drive |
Photos disappeared after Delete All | Deleted directory entries; some image data may remain | Check copies, then scan a stable card |
Photos disappeared after formatting | Recovery depends on the format operation and later writes | Stop using the card; check backups before scanning |
Windows shows the expected capacity but asks to format the card | Possible logical file-system damage | Cancel; a stable card may support recovery scanning without formatting |
JPEGs appear, but RAW files are missing | Separate card recording or preview-only transfer | Check both cards and the original recording settings |
Reader appears, but the card shows “No Media” or 0 bytes | Windows may not have access to the storage | Try one known-good compatible reader, then seek help |
Choose the route that matches your card, rather than scanning every device immediately.
Check Whether the Photos Are Actually Missing
Look beyond the camera gallery
Connect the card through a compatible reader. If it opens normally, inspect the DCIM folder and its subfolders in File Explorer or Finder. Look for JPEGs, RAW files, and hidden items using the file manager’s view options.
If intact photos appear on the computer, copy them off before investigating the camera’s playback slot or folder settings. Do not rename folders or copy files back to the card just to make the gallery display them.
Check what the second card actually recorded
A second card does not automatically mean a second copy. Read each card separately with the correct reader, and keep the recovered collections in separate folders.
촬영 모드 | 확인해야 할 사항 | 회복에 있어 이것이 의미하는 바는 무엇인가 |
백업 | Look for the same frames on the second card | An intact duplicate may avoid a scan |
Overflow | Check the card used after the first one filled | Different parts of the shoot may occupy different cards |
RAW/JPEG separation | Search one card for RAW and the other for JPEG | Finding JPEGs does not establish that RAW originals are missing |
예를 들어, Nikon’s D850 manual distinguishes these three recording modes. Names and behavior vary by model. Also, some cameras let a deletion affect both copies: Nikon’s Z6III documentation explicitly describes that choice. Inspect the second card rather than assuming its backup survived.
If either card holds intact originals, copying them to a computer may be all you need to recover camera photos.
Use a card reader when USB transfer is insufficient
A camera’s portable-device connection may transfer existing pictures without exposing the disk access that recovery software needs.
To recover photos from a camera SD card, connect it directly through a compatible reader. In Windows, right-click Start, open Disk Management, and compare the listed device capacity with your card. A small difference from the printed capacity is normal; “No Media” or zero capacity is not.
If Windows shows the expected capacity but cannot open the volume, cancel formatting prompts. Recovery software may still scan a stable device. Do not initialize it or create a new volume. For persistent access errors, see our guide to recovering files from a corrupted SD card.
Separate internal memory from card storage
Some cameras also have internal memory. Scanning an SD card cannot recover pictures that the camera never stored there. Check your model’s manual for storage selection and access options. If the camera exposes only existing files through USB, ordinary disk recovery software may not reach deleted internal-memory data. Ask the manufacturer or a specialist about that model’s options.
Understand what formatting changed
Deletion often removes directory references and frees space for reuse. Recovery tools may recognize surviving photo data, but partial overwriting can leave incomplete pictures.
Formatting needs a more specific answer. The SD Association’s formatter documentation distinguishes Quick format, which resets file-system entries, from Overwrite format, which overwrites the user data area. Camera behavior varies; check your manual before assuming an in-camera format preserved the images. If formatting caused the loss, our 포맷된 SD 카드 사진 복구 가이드 covers that scenario in more detail.
Check copies first, scan stable cards next, and seek professional help for hardware problems.
Method 1: Recover Camera Photos from Existing Copies
최적 대상: Photos you previously imported, backed up, or transferred to another device.
An intact original is more dependable than a reconstructed file. This method cannot help with shots that never left the card.
- Check your computer’s Pictures folder and previous import destinations.
- Search external backup drives and any photo service you used for uploads.
- Inspect the camera companion app or phone gallery for transferred copies.
- Restore the matching files into a new folder on your computer.
For deleted imports, check the computer’s Recycle Bin, Trash, or enabled backup history. In-camera deletions normally bypass your computer’s Recycle Bin.
Check restored files’ dimensions. Companion apps sometimes transfer smaller JPEGs instead of full-resolution originals or RAW files.
If no suitable copy exists, scan the card using one of the methods below.
Method 2: Recover Deleted Camera Photos with Magic Data Recovery
최적 대상: Stable SD cards with deletion, formatting, or logical file-system problems and no usable backup.
Magic Data Recovery fits this situation because it supports SD cards and FAT/exFAT file systems on Windows. Its listed photo formats include JPEG, CR2, CR3, NEF, ARW, RAF, and DNG. Preview and filtering help you check relevant results before restoring a large batch.
After an accidental Delete All, for example, the scan-and-preview workflow helps you check surviving pictures before making repairs. Its practical advantage here is a visual interface for selecting the card, reviewing images, and saving them elsewhere. Recovery still depends on the source data, not the brand of software.
Windows 7/8/10/11 및 Windows Server 지원
Scan the card and save your photos
1. Prepare the destination. Create a recovery folder on your computer or a separate external drive with enough free space.
2. Install the software. Install Magic Data Recovery on the Windows computer, away from the affected card.
3. Select the source. Connect the card through a reader and identify it by its listed capacity and device details. For two-card shoots, process each card separately; do not confuse the recovery destination with the source.
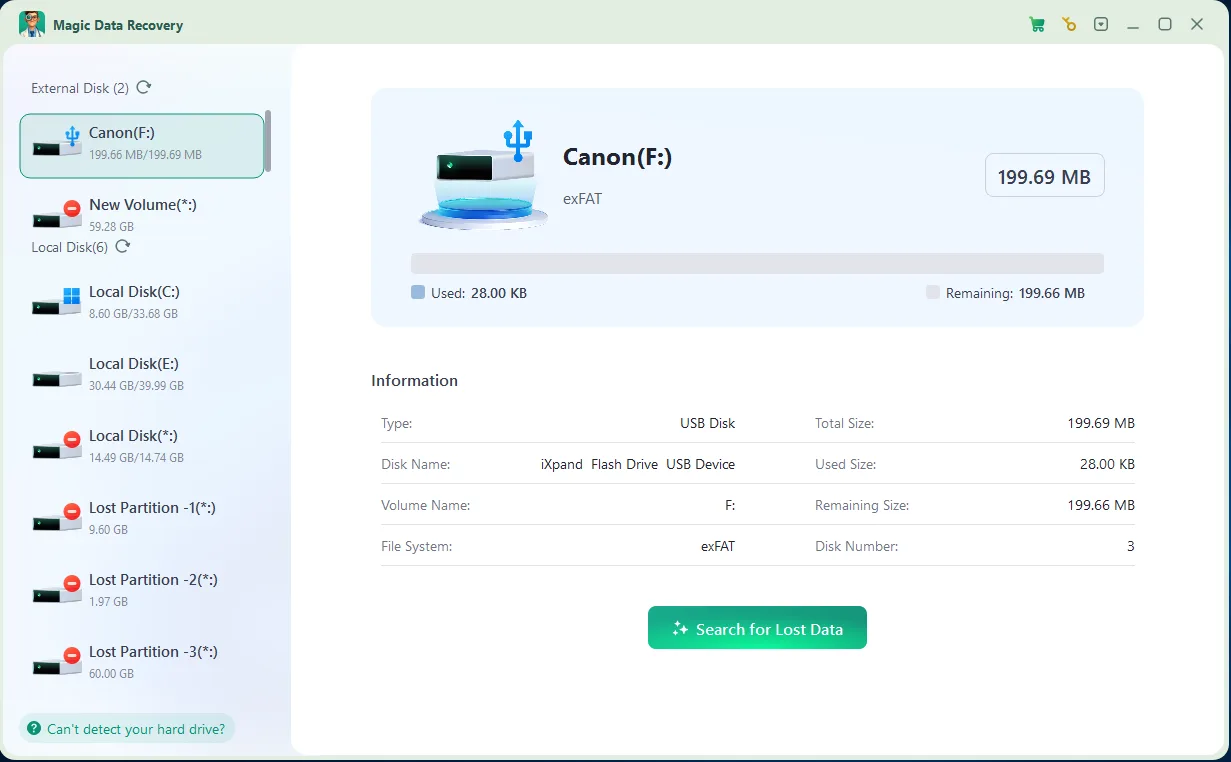
4. 스캔을 시작합니다. Scan the selected card. Let the process finish if the device remains stable; stop if repeated read failures or disconnections occur.
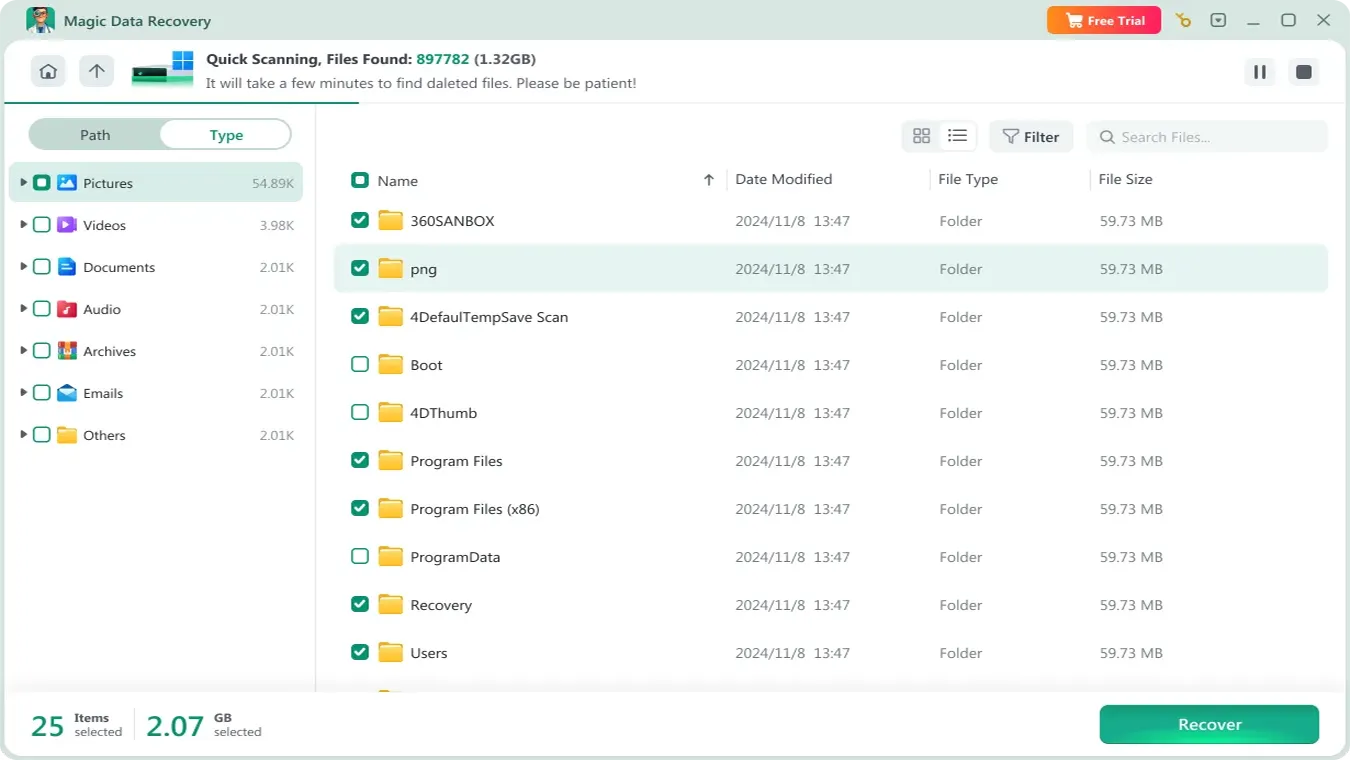
5. Inspect the results. Use available filters to narrow the photo list, and preview supported images. Check different parts of the shoot rather than one convenient thumbnail.

6. Save the selected photos. Recover them into the destination folder, never onto the source card.
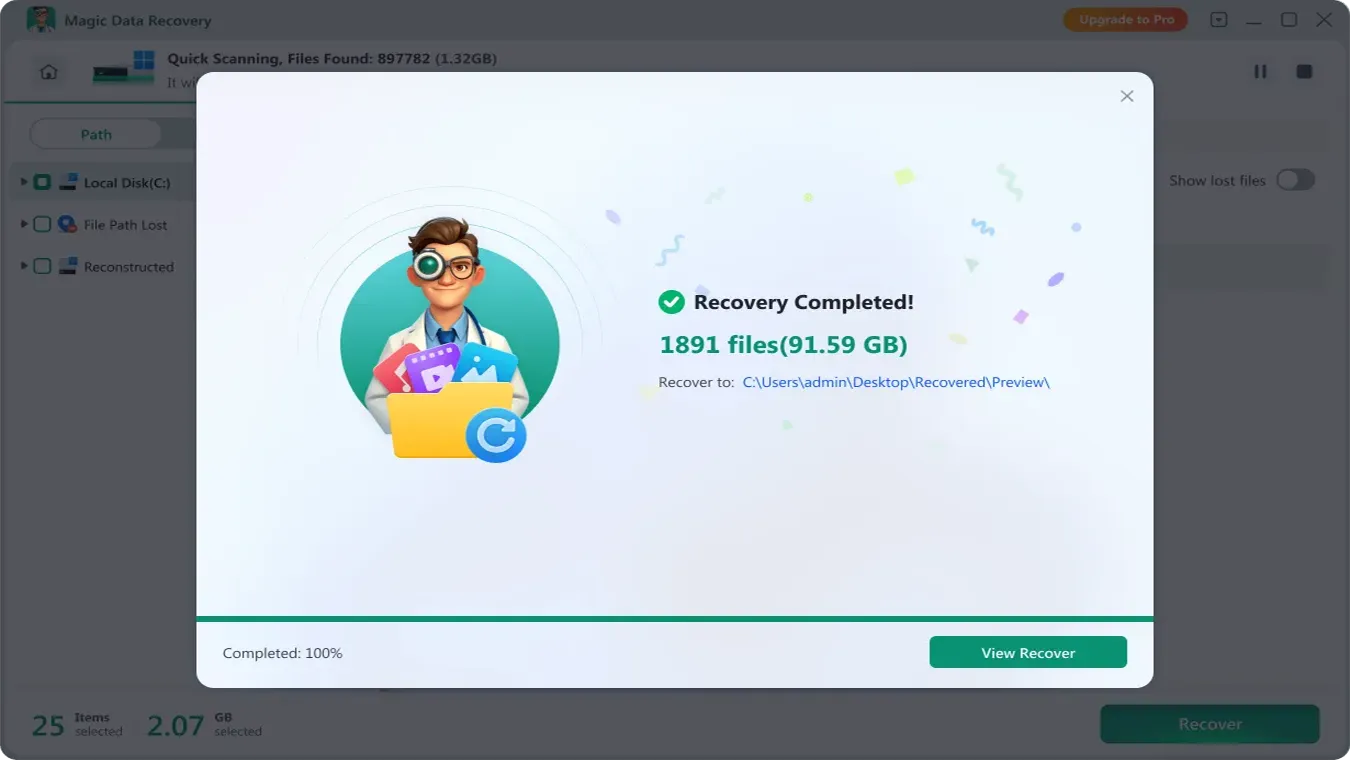
그리고 Magic Data Recovery 사용자 가이드 documents the selection, scan, preview, and save workflow.
Expected result: The destination contains photo files you can open and inspect. A filename in the scan list alone does not confirm success.
제한 사항: Format support does not guarantee intact recovery for every camera model or file. Software cannot undo overwriting or repair physical damage. An unavailable preview may reflect unsupported decoding or an incomplete file; verify a saved sample with a compatible viewer. Check the current recovery allowance and license terms before restoring the full collection.
If results fall short, try the alternative below on a healthy card. Seek specialist advice for unstable hardware or irreplaceable photos.
Method 3: Try PhotoRec as a Free Alternative
최적 대상: Readers comfortable with a technical interface who want a free camera photo recovery 옵션을 선택합니다.
PhotoRec is an open-source tool for Windows, macOS, and Linux. It recognizes file content even without working directory information. Expect to sort results: original filenames and folders may not survive.
다음을 따르십시오. official PhotoRec instructions:
- Extract the downloaded package onto your computer. On Windows, right-click
photorec_win.exe을 클릭하고 관리자 권한으로 실행. These steps use the text interface. - Select the card by its capacity, then select the relevant partition. In 파일 옵션, keep the needed image formats enabled; some RAW formats fall under the TIFF family.
- 선택 검색, 를 클릭한 다음 기타 for FAT/exFAT.
- For an intact FAT32 file system after deletion, use 무료 when available. Choose 전체 for exFAT or a formatted/corrupted partition; the documented unallocated-space option does not include exFAT.
- Select a destination on another drive and confirm it to start recovery.
Review the output in the recup_dir folders. Expect generic filenames and possible thumbnails. If the desired pictures are absent, recheck the source card and enabled formats before repeating a scan. Correct settings with no usable results call for specialist advice if the photos matter; instability means stop immediately.
Check That Your Recovered Photos Are Complete
A scan count cannot tell you whether you have the full shoot. Check the saved originals:
- Open important JPEGs at full size and inspect the entire frame.
- Compare pixel dimensions with intact photos from the same camera settings.
- Check RAW files in an editor that supports the camera model, then try exporting a JPEG.
- Look for gray areas, broken colors, truncation, and unexpectedly tiny files.
- Check dates and scene coverage to identify gaps in the shoot.
A thumbnail may survive even when part of the original image does not. Likewise, a RAW viewer can display an embedded preview without decoding the full RAW data. Try a full-resolution export in a compatible editor. If it fails, check whether that editor supports your exact camera before concluding the file is corrupt.
For RAW+JPEG shoots, compare matching frame numbers where filenames survive. One intact JPEG does not confirm its RAW counterpart, and a missing JPEG does not prove the RAW is lost. Keep the source card untouched until you have checked the important files and made another backup.
언제부터 DIY 복구를 중단해야 할까요?
Stop if the card repeatedly drops out, reports inconsistent capacity, suffers visible damage, or produces worsening read errors. After one check with a known-good reader, persistent “No Media” or 0-byte readings justify professional assessment.
For irreplaceable photos, consider a service before scanning. Report the symptoms, formatting, and later shooting. Specialists may access otherwise unreadable storage, but cannot promise to reconstruct overwritten data.
Do not run CHKDSK repair options before securing the photos. Microsoft documents that repair options modify file-system errors and that FAT repairs can involve data loss. Secure the photos before considering repairs or reformatting.
Keep the Next Shoot Safe
After each shoot, keep two independent copies. Open originals and verify both collections before formatting the card.
If available, choose dual-card backup recording; overflow and RAW/JPEG separation serve different purposes. Replace cards with recurring errors after securing their contents.
결론
To recover photos from camera storage, preserve the card first and choose a method based on its condition. Accessible originals or verified backups offer the most dependable route. A stable card with genuine data loss may benefit from recovery software. Physical damage and repeated disconnections call for professional assessment.
권장 사항 Magic Data Recovery for the Windows software route because it combines SD-card support, relevant image formats, and a preview-based recovery workflow. Use it to evaluate what survives, with realistic expectations about overwritten or incomplete files.
For related detection and access problems, follow our SD 카드 복구 가이드. Whatever method you choose, save the recovered photos elsewhere and verify the originals before you reuse the card.
Windows 7/8/10/11 및 Windows Server 지원
자주 묻는 질문
Can I recover camera photos without a computer?
Can I recover camera photos deleted months ago?
Can I recover camera photos after taking new pictures?
Will recovery preserve photo quality and EXIF metadata?
Can I recover photos from a camera SD card on a Mac?
Will a camera factory reset bring back deleted pictures?
Does the SD card’s lock switch prevent further data loss?
Why did recovery find JPEGs but not my RAW originals?

Jason는 15년 이상의 실무 경험을 갖춘 데이터 복구 및 기술 지원 전문가입니다. 그는 현장 사용자와 폭넓게 협력하며, 까다로운 데이터 손실 사례를 해결하고, 실수로 인한 삭제, 드라이브 포맷, 파일 시스템 손상, 파티션 손실, 시스템 장애 및 기타 긴급 복구 상황에 대한 실용적인 복구 솔루션을 제공해 왔습니다. 또한 백업 및 복원, 파일 복구, 재해 복구 분야에서도 전문성을 갖추고 있으며, 안전하고 신뢰할 수 있으며 기술적으로 정확한 지침을 제공하는 데 중점을 두고 있습니다.