Enable BitLocker in Windows 10: A Complete Security Guide
If you want to enable BitLocker in Windows 10, data security is likely your main concern. Whether you store personal files, business documents, or sensitive client information, disk encryption is no longer optional—it is essential.
BitLocker is Microsoft’s built-in encryption feature that protects your entire drive from unauthorized access. However, enabling encryption without understanding recovery keys, system requirements, or real-world risks can lead to permanent data loss.
This guide explains how to enable BitLocker in Windows 10, how BitLocker encryption works, and—just as importantly—how to manage and recover BitLocker keys safely. You will also learn how tools like Magic Recovery Key can help prevent lockouts and simplify key management after BitLocker is enabled.
Supports Windows 7/8/10/11 and Windows Server
Table of Contents
What Is BitLocker and Why You Should Enable It
BitLocker is a full-disk encryption technology built into Windows Pro, Enterprise, and Education editions. Once you enable BitLocker encryption, all data on the selected drive is automatically encrypted and protected.
Key Benefits of BitLocker Encryption
- Protects data if your device is lost or stolen
- Encrypts system and data drives automatically
- Integrates tightly with Windows security
- Works with TPM, passwords, USB keys, or smart cards
For Windows 10 users who handle private or business data, enabling BitLocker is one of the most effective security upgrades you can make.
System Requirements Before You Enable BitLocker
Before you attempt to enable BitLocker in Windows 10, confirm the following:
Supported Windows Versions
- Windows 10 Pro
- Windows 10 Enterprise
- Windows 10 Education
BitLocker is not available on Windows 10 Home by default.
Hardware and Configuration Checks
- Administrator access
- TPM chip (optional but recommended)
- Sufficient free disk space
- Updated BIOS and firmware
Even without TPM, you can still enable BitLocker encryption using a password or USB key.
How to Enable BitLocker in Windows 10 (Step-by-Step)
Follow these steps to enable BitLocker safely and correctly.
Step 1: Open BitLocker Management
- Click Start
- Search for Manage BitLocker
- Select the system drive (usually C:)
- Click Turn on BitLocker
Step 2: Choose an Unlock Method
You can unlock the drive using:
- Password
- USB startup key
- TPM-based automatic unlock
For most users, a strong password combined with TPM offers the best balance of security and convenience.
Step 3: Back Up Your Recovery Key
Windows will prompt you to back up the BitLocker recovery key. Options include:
- Microsoft account
- Local file
- USB drive
- Printed copy
This step is critical. Losing your recovery key means losing access to encrypted data permanently.
Step 4: Select Encryption Mode
- Used disk space only (faster, suitable for new PCs)
- Encrypt entire drive (recommended for existing systems)
Step 5: Start Encryption
Once confirmed, Windows begins encrypting the drive in the background. You can continue using your computer during this process.
At this point, you have successfully enabled BitLocker encryption.
Common BitLocker Configuration Scenarios
TPM vs Non-TPM Devices
- With TPM: Automatic protection during boot
- Without TPM: Manual password or USB key required
Internal vs External Drives
You can enable BitLocker on:
- System drives
- Secondary internal drives
- External hard drives (BitLocker To Go)
External drives encrypted with BitLocker require the password or recovery key on every new device.
Why BitLocker Recovery Keys Matter More Than You Think
Many users focus only on how to enable BitLocker in Windows 10. In practice, the biggest risk appears afterencryption.
BitLocker may request a recovery key due to:
- Windows updates
- BIOS or firmware changes
- TPM configuration changes
- System crashes
- Drive migration
Without the correct key, data remains locked—even to the original owner.
Best Practices for BitLocker Key Management
To avoid lockouts, follow these expert recommendations:
- Store recovery keys in at least two locations
- Keep one offline backup (USB or printed copy)
- Verify key access after encryption
- Document which drive matches which key
- Avoid major hardware changes without backups
Preparation is the difference between strong encryption and permanent data loss.
What If You Lost Your BitLocker Recovery Key?
Officially, Microsoft offers no backdoor. If the recovery key is lost and no backup exists, encrypted data cannot be unlocked.
In reality, many users do not realize:
- Recovery keys may still exist on the current system
- Keys can remain stored in system memory or configuration data
- Previously unlocked devices may still contain recoverable information
This is where specialized recovery tools become valuable.
Recommended Solution: Magic Recovery Key
When you enable BitLocker encryption, proactive key management becomes essential. Magic Recovery Keyaddresses this exact challenge without overpromising.
Core Problems It Solves
- Locates existing BitLocker recovery keys on the current system
- Helps recover keys from previously unlocked environments
- Reduces the risk of permanent lockouts
Key Advantages
- Designed specifically for BitLocker-related scenarios
- Scans the local system safely (read-only process)
- Supports recovery of:
- BitLocker recovery keys
- Installed software license keys
- Saved network and system credentials
- Simple interface suitable for non-technical users
Practical Use Scenarios
- After enabling BitLocker but forgetting where the key was stored
- Before hardware upgrades or system migration
- When consolidating encryption keys across multiple PCs
Unlike relying solely on manual backups or cloud accounts, Magic Recovery Key provides an additional recovery layer that improves reliability.
If you are looking for a safer way to manage encryption data after you enable BitLocker, this tool offers a practical and realistic solution.
How to use Magic Recovery Key
1. Download and Install the Software
Visit the official Magic Recovery Key website to download and install the software. The installation is quick and straightforward, allowing you to begin your recovery scan within minutes.
Supports Windows 7/8/10/11 and Windows Server
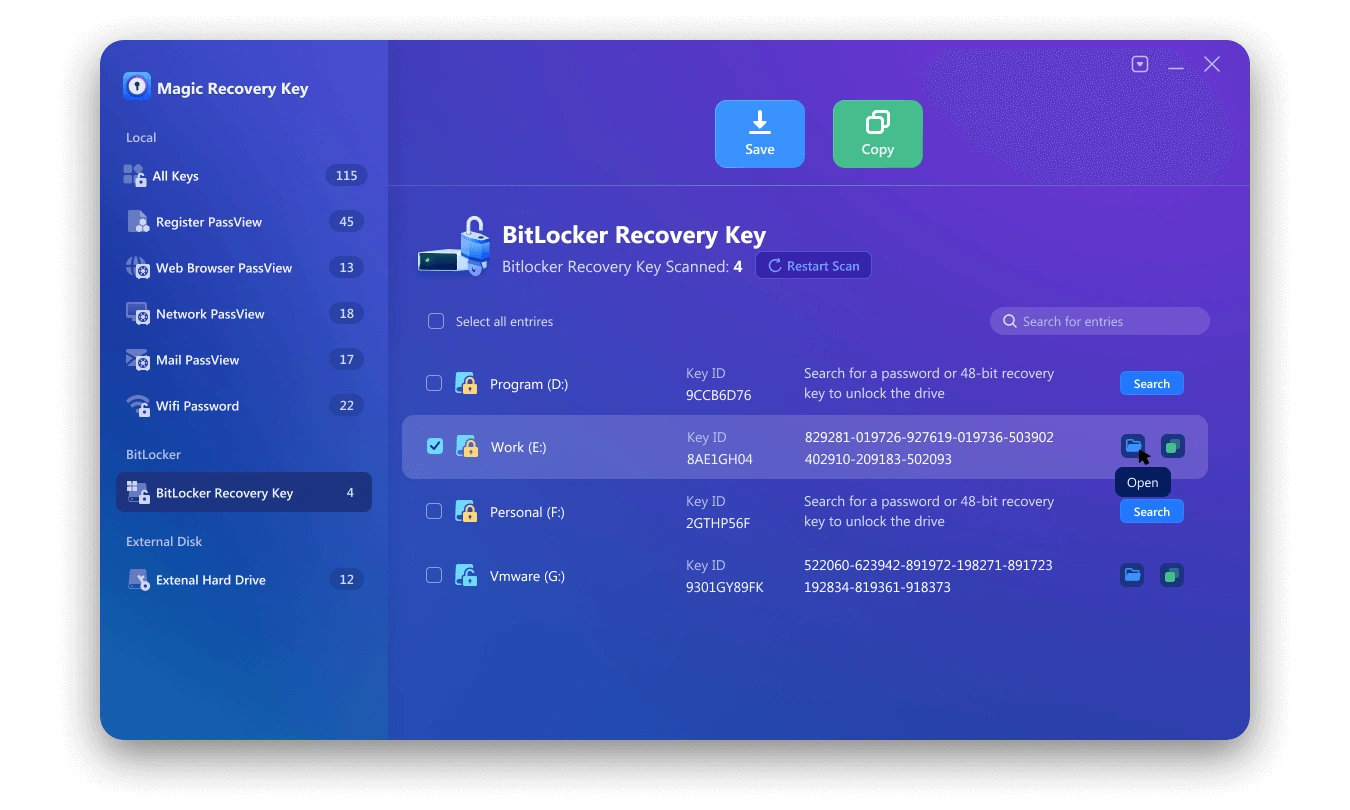
2. Launch and Select “BitLocker Recovery Key”
Open the Magic Recovery Key application. From the main interface, select the “BitLocker Recovery Key” option from the left-hand menu. This module is specifically designed to thoroughly scan your system for any stored BitLocker credentials.
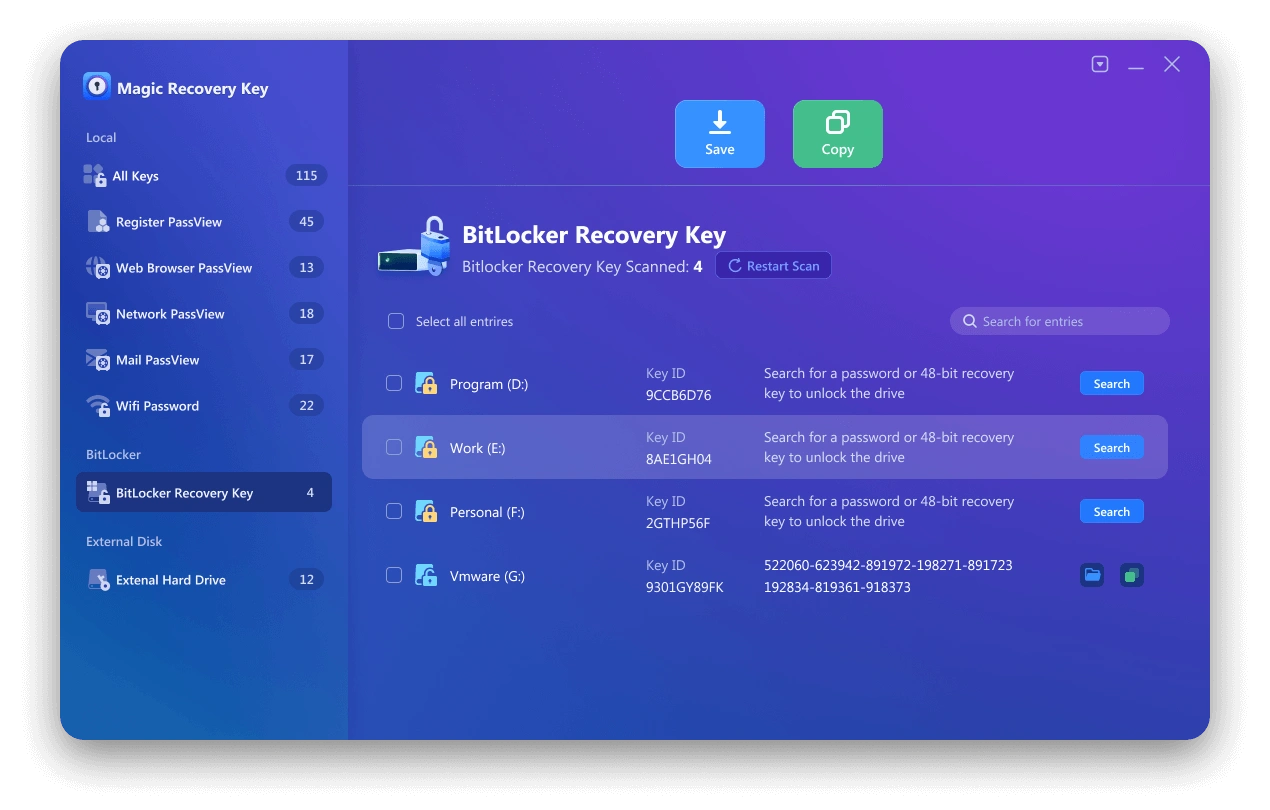
3. Start the Scan
Click the “Search” button to initiate the scanning process. The software will automatically analyze your current Windows installation, connected drives, system files, and configuration data for any existing BitLocker recovery keys. The process is fully automated and requires no technical expertise.
4. Retrieve and Use Your Key
If a BitLocker recovery key is found on your system, Magic Recovery Key will clearly display it on the screen. You can then copy the 48-digit recovery key and use it to unlock your BitLocker-encrypted drive.
If you want a more efficient recovery and management option, Magic Recovery Key is worth considering.
Frequently Encountered BitLocker Issues and Fixes
BitLocker Option Missing
- Check Windows edition
- Verify admin privileges
Recovery Key Prompt Appears Unexpectedly
- Confirm recent BIOS or TPM changes
- Locate backup keys immediately
Cannot Unlock External Drive
- Verify correct BitLocker password
- Check for matching recovery key
These issues are common and preventable with proper planning.
Conclusion: Enable BitLocker the Right Way
Enable BitLocker in Windows 10 to protect your data—but do not stop there. Encryption without recovery planning creates unnecessary risk.
The best approach combines:
- Proper BitLocker configuration
- Secure recovery key storage
- Reliable BitLocker recovery tools for real-world scenarios
That is why Magic Recovery Key is recommended. It supports users after encryption, when mistakes or changes often happen. Instead of relying on a single backup location, you gain an additional safety net for BitLocker keys and system credentials.
Supports Windows 7/8/10/11 and Windows Server
FAQs
Does Windows 11 automatically enable BitLocker?
Is BitLocker enabled on my PC?
Why should you disable BitLocker?
Should I enable BitLocker on my laptop?
What if BitLocker is off?
How to fix “BitLocker could not be enabled”?
How to enable and disable BitLocker?
Why is BitLocker not showing up in Windows 10?
Erin Smith is recognized as one of the most professional writers at Amagicsoft. She has continually honed her writing skills over the past 10 years and helped millions of readers solve their tech problems.