How to Recover Shift Deleted Files in Windows 11/10

Don’t Panic, Your Files Are Likely Still There
We’ve all been there. A moment of haste, a keyboard shortcut meant for something else, and suddenly a crucial file vanishes—not into the Recycle Bin, but into thin air. Using Shift + Delete to permanently delete files can feel like a point of no return. The immediate sinking feeling is real: “Are they gone forever?” The good news is, in most cases, no, they are not. To recover shift deleted files is frequently possible because the data is not immediately erased.
This guide is your definitive resource to recover shift deleted files in Windows 11/10. We will walk you through exactly why recovery works, the critical first steps you must take immediately, and the most effective methods to get your shift deleted files back, including a look at specialized software like Magic Data Recovery. Let’s begin by understanding what really happens when you press those keys.
Supports Windows 7/8/10/11 and Windows Server
Table of Contents
Understanding Shift Delete and Why Recovery Is Possible
To effectively recover shift deleted files, it helps to know what this command does differently.
What Does Shift+Delete Actually Do?
Normally, when you delete a file, Windows moves it to the Recycle Bin. This is a safety net, allowing easy restoration. The Shift + Delete command bypasses this safety net entirely. It tells Windows to remove the file immediately without sending it to the Recycle Bin.
However—and this is the key to recovery—the data is not instantly erased from your hard drive.
The Science Behind Data Recovery: It’s About Pointers, Not Erasure
Think of your hard drive as a massive library and the Windows file system as its catalog. When you save a file, Windows writes the data to a “shelf” (a physical sector on the disk) and creates a “catalog entry” (a pointer) that records the file’s name, location, and other details.
When you delete a file, especially with Shift+Delete, Windows simply removes that catalog entry and marks the shelf space as “available for new books.” The actual “book” (your file data) remains on the shelf until the operating system needs that space to write new data and overwrites it.
This creates a crucial window of opportunity for shift deleted file recovery. As long as the original data sectors haven’t been overwritten, specialized software can scan the drive, find these “orphaned” data fragments, and reconstruct the file. This fundamental principle is why acting quickly is your most important advantage.
What to Do IMMEDIATELY After Accidental Deletion
Your actions in the first few minutes directly determine your success rate. Follow this checklist without delay.
- Stop Using the Drive: This is non-negotiable. Any activity—saving downloads, installing programs, even browsing the web (which creates cache files)—can write new data to the “available” space, potentially overwriting your deleted files.
- Do Not Restart Your Computer (if possible): A reboot can trigger system writes to the disk. If you must shut down, do so gracefully and avoid booting back into the operating system on the affected drive if you have alternatives.
- Identify the Correct Drive: Note exactly which drive or partition contained the deleted files (e.g., C: drive, D: drive, or an external USB drive).
- Prepare a Recovery Destination: Have another storage device ready, such as an external hard drive, USB flash drive, or a different internal partition. You must never save recovered files back to the same drive they were lost from, as this could cause overwriting.
With these immediate actions taken, you’ve preserved the best possible environment for recovery. Now, let’s explore the most effective solution.
Method 1: Using Professional Data Recovery Software (Most Effective)
For users without a backup, professional data recovery software offers the highest chance of success. These tools are designed to deep-scan your storage media, locate recoverable data fragments, and rebuild files.
Why Choose Magic Data Recovery?
While there are several tools available, Magic Data Recovery stands out as a comprehensive and user-friendly solution designed for real-world data loss scenarios. It’s not just for recovering shift deleted files; it’s a versatile tool built to handle complex situations.
Core Problems It Solves:
- Permanent Deletion: Expertly recovers files lost via Shift + Delete or emptied from the Recycle Bin.
- Complex Data Loss: Goes beyond simple deletion to tackle formatting errors, partition loss, corrupted file systems, and virus attacks—situations where other basic tools fail.
- Wide Format Support: Recovers hundreds of file types, from documents and photos to videos and emails.
Key Advantages (Unique Selling Points):
- Deep & Dual Scan Engine: Combines a quick scan for recently deleted items with a deep scan that searches by file signatures, maximizing data find potential.
- Preview Before Recovery: A crucial feature that lets you preview photos, documents, and videos before recovery, ensuring file integrity and saving time.
- Filtered & Focused Results: Powerful filters allow you to sort results by file type, path, date, or size. A search function helps you locate files by name instantly.
- Non-Destructive & Safe: The software performs read-only operations, guaranteeing your original data is never altered during the scan.
Step-by-Step Guide to Recover Shift Deleted Files with Magic Data Recovery
Using Magic Data Recovery is a straightforward process designed for all skill levels.
Step 1: Download and Install Safely
Download the Magic Data Recovery installer from the official Amagicsoft website. Critically, install it on a different drive than the one where you lost your files (e.g., install on C: if files were lost on D:). This prevents overwriting.
Supports Windows 7/8/10/11 and Windows Server
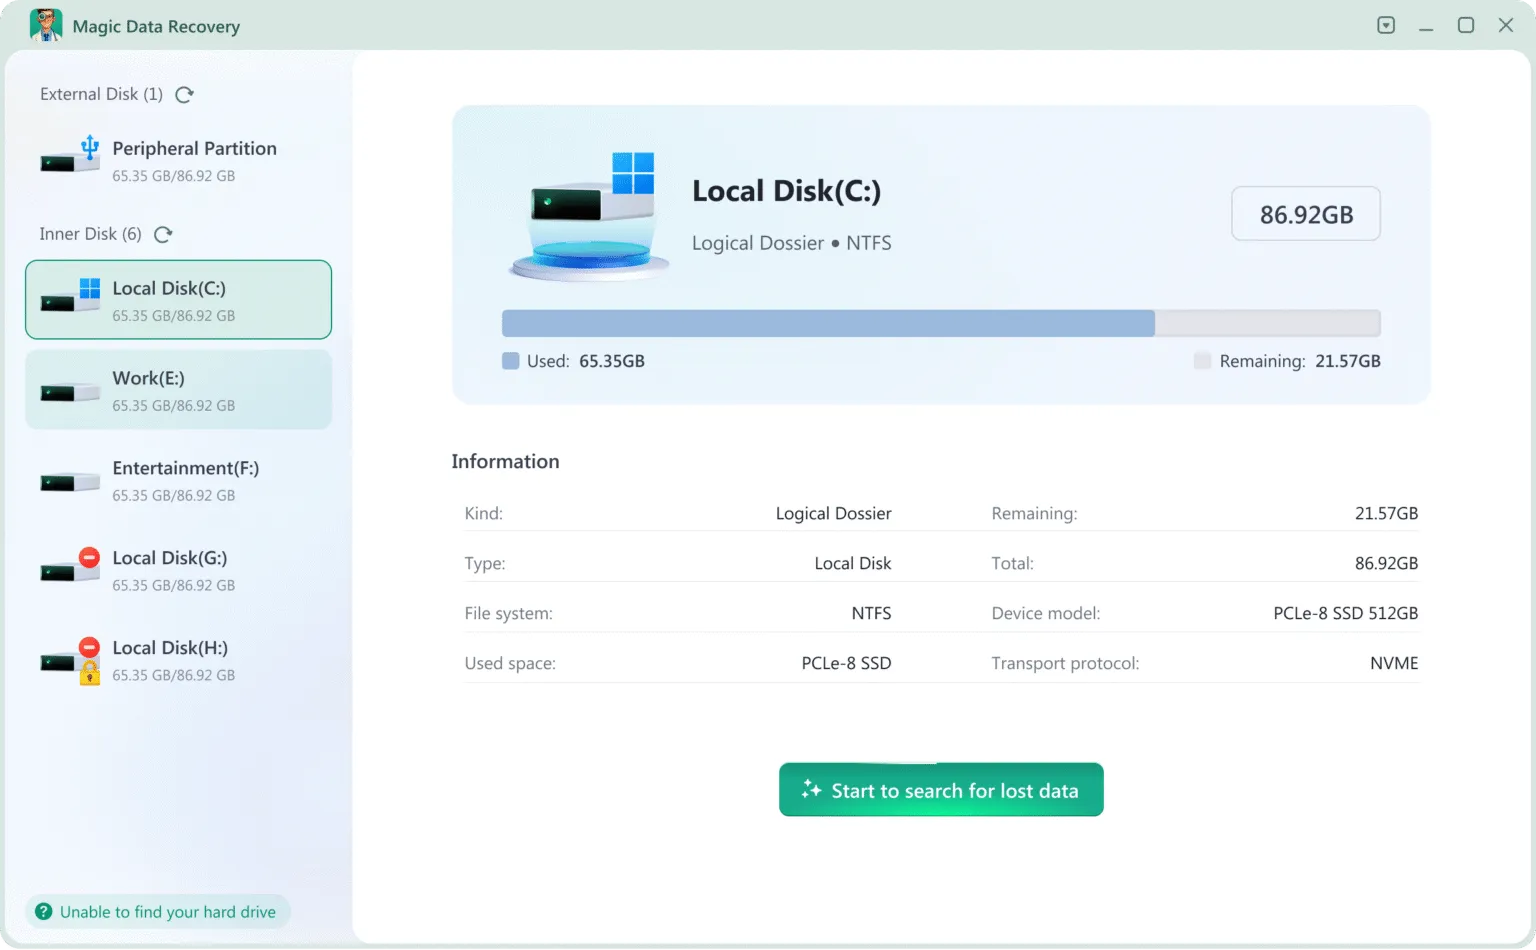
Step 2: Select and Scan the Target Location
Launch the software. You’ll see a list of all available drives and partitions. Select the specific drive or folder where your shift deleted files were located. Click “Search for lost data.” The software will first run a quick scan. For a more thorough search, you can initiate a “Deep Scan” afterward, which is more time-consuming but can find older or more severely lost data.
Step 3: Preview and Select Your Files
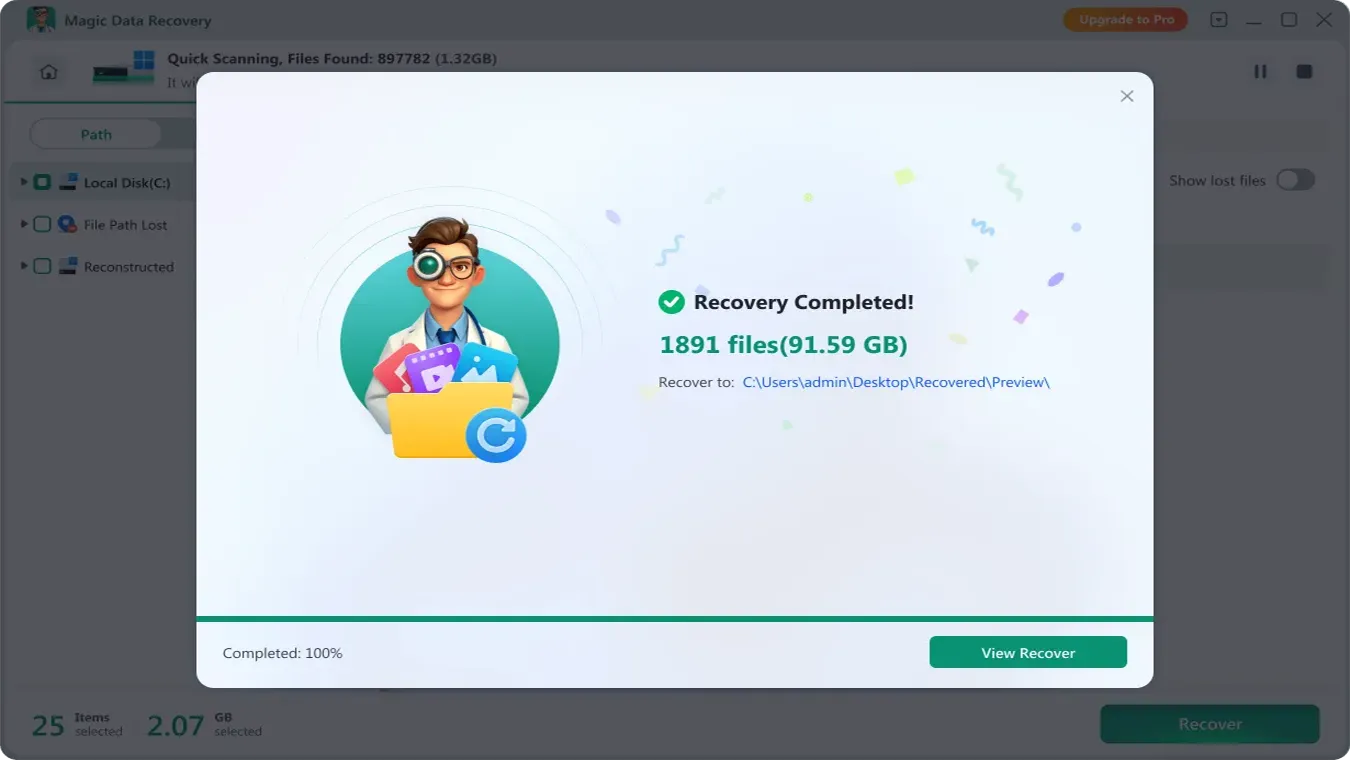
Once the scan completes, the interface will display all recoverable files in a structured tree view (by path) and category view (by file type like Document, Image, Video). Use the filters on the left to narrow down the list. Take advantage of the preview pane on the right. Click on any file—like a JPG photo or a PDF document—to see its contents. This confirms the file is intact before recovery. Check the boxes next to the files and folders you wish to restore.

Step 4: Recover to a Secure Location
Click the “Recover” button. A dialog will prompt you to choose a save location. Remember the golden rule: select a folder on a different physical drive. Click “OK” to start the final recovery process. When finished, navigate to that folder to verify your recovered shift deleted files.
Method 2: Restoring from a Windows Backup (If Available)
If you were proactive about backups, recovering your files can be simple and instantaneous. Windows includes built-in tools for this purpose.
Using File History
File History automatically backs up versions of files in your key folders (Desktop, Documents, Pictures, etc.) to an external drive or network location.
- In the Windows Search bar, type “Restore your files with File History” and open it.
- Use the left/right arrows to browse through backup timelines.
- Navigate to the folder containing your lost file, select it, and click the green Restore button to return it to its original location.
Using Windows Backup (Windows 10/11)
For users on modern Windows systems, the integrated backup functionality, often accessed through the Backup and Restore interface, provides a solid recovery option for files backed up to external drives or network locations.
1. Navigate to Settings > Update & Security > Backup (on Windows 10) or Settings > Accounts > Windows Backup (on Windows 11). Alternatively, you can access the legacy interface by searching for “Backup settings” in the Start Menu.
2. Click on “Go to Backup and Restore”
3. Click “Restore my files”.
4. You can then browse or search for specific files and folders from your backup catalog and choose a destination to restore them to.
Pro Tip: Windows is gradually shifting towards newer backup solutions like File History and cloud integration with OneDrive. Regularly verify which backup method you have configured and ensure it is running automatically. A backup is only useful if it’s current and accessible.
Method 3: Using the Windows File Recovery Tool (Free, Advanced)
Microsoft offers a free, native command-line tool called Windows File Recovery. It’s powerful but requires comfort with terminal commands.
- Pros: Completely free from Microsoft. Can be effective for basic recovery scenarios.
- Cons: No graphical interface; uses complex command syntax. Less user-friendly for non-technical users.
Basic Usage Example:
To recover all .docx files from your C: drive’s Documents folder to an external drive E:, you would open Command Prompt as Administrator and type:
winfr C: E: /regular /n \Users\YourName\Documents\*.docx
For advanced users who need to recover shift deleted files at no cost and don’t mind a steeper learning curve, this is a viable path.
Prevention: How to Avoid Future Data Loss Scenarios
Recovery is helpful, but prevention is ideal. Implement these best practices:
- Adopt the 3-2-1 Backup Rule: Keep 3 copies of your data, on 2 different media types, with 1 copy stored offsite (e.g., cloud storage).
- Disable or Be Cautious with Shift+Delete: Consider changing your habit. The extra click to empty the Recycle Bin is worth the safety net.
- Use Cloud Storage with Versioning: Services like OneDrive, Google Drive, or Dropbox keep previous versions of files, offering another recovery layer.
- Monitor Drive Health: Use utilities to check your drive’s S.M.A.R.T. status for early warning signs of failure.
Conclusion and Key Takeaways
Recovering shift deleted files in Windows 11/10 is a common and often solvable challenge. The journey starts with understanding that your data persists until overwritten and hinges on your immediate action to preserve it.
We’ve explored three primary paths:
- The most effective and user-friendly method: professional data recovery software like Magic Data Recovery.
- The simplest method if prepared: restoring from a Windows backup.
- The free but technical method: using the Windows File Recovery command-line tool.
In summary, for most users facing urgent data loss without a backup, Magic Data Recovery provides the optimal balance of power, simplicity, and reliability. Its ability to handle not just accidental deletions but also complex cases like formatting or partition loss makes it a versatile tool for your digital toolkit. The preview function and filtered results turn a potentially stressful recovery process into a manageable one. If you want a quick overview, deleted file recovery guide covers common scenarios and safe next steps—especially if you haven’t saved new data yet.
Take control of your data’s safety. Start by implementing a solid backup strategy today. And for those unexpected moments when you need to recover shift deleted files, you now have a clear, actionable guide to follow.
Supports Windows 7/8/10/11 and Windows Server
FAQs
Can I recover a file after shift delete?
Does Shift delete permanently delete?
How can I recover permanently deleted files?
How do I recover shift deleted files in Windows 11?
How to recover shift deleted word files?
How to recover ctrl z files?
Where do permanently deleted files actually go?
Does Shift delete permanently delete emails?
Why does shift delete not work?
Erin Smith is recognized as one of the most professional writers at Amagicsoft. She has continually honed her writing skills over the past 10 years and helped millions of readers solve their tech problems.