우분투에서 삭제된 파일을 안전하게 복구하는 방법
rm 명령어를 실행한 직후, 잘못된 디렉터리를 지웠다는 사실을 깨닫고 심장이 멎을 듯한 순간을 겪어본 적이 있으신가요? 그런 경험이 있는 분은 여러분뿐만이 아닙니다. 실수로 휴지통을 비웠든, 파티션 전체를 지워버렸든, 데이터 손실 리눅스에서는 초보자든 노련한 시스템 관리자든 누구나 겪을 수 있는 일입니다. 따라서 신뢰할 수 있는 삭제된 파일 복구 이 방법이 시급한 과제가 됩니다. 다행히도 중요한 데이터가 사라지면 많은 사용자가 즉시 안전한 방법을 찾아 우분투에서 삭제된 파일 복구 남아 있는 데이터를 손상시키지 않고. 하지만 리눅스 EXT4 파일 시스템의 독특한 특성 때문에 이 작업은 시간을 다투는 과제가 됩니다. 운영 체제를 계속 사용해 해결책을 찾으려고 하면, 백그라운드 시스템 로그가 손실된 데이터를 영구적으로 덮어쓸 수 있습니다. 바로 이 때문에 Magic Data Recovery 를 적극 권장합니다.
Windows 7/8/10/11 및 Windows Server 지원
목차
우분투 삭제 파일 복구의 핵심 원칙
복구 명령을 실행하기 전에, 리눅스가 파일 삭제를 어떻게 처리하는지 먼저 이해해야 합니다. 리눅스 시스템에서 파일을 삭제하면 EXT4 또는 EXT3 파티션, 운영 체제는 저장 장치에서 데이터 블록을 즉시 삭제하지 않습니다. 대신, 해당 파일의 포인터를 제거하고 해당 공간을 나중에 사용할 수 있도록 표시할 뿐입니다.
따라서 새로운 데이터가 그 자리를 차지할 때까지 원본 데이터는 저장 섹터에 그대로 유지됩니다. 만약 성공적으로 완료하려면 우분투에서 삭제된 파일 복구 작업 및 우분투에서 삭제된 파일 복구하기 안전을 위해 다음 세 가지 황금률을 즉시 준수해야 합니다:
- 디스크 활동 최소화: 먼저, 파일 다운로드, 업데이트 실행 또는 애플리케이션 실행을 중단하십시오.
- 파티션 분리: 둘째, 보조 드라이브에서 데이터가 손실된 경우, 백그라운드 쓰기 작업이 진행되지 않도록 즉시 마운트를 해제하십시오.
- 로컬에 소프트웨어를 설치하지 마십시오: 셋째, 복구 도구를 문제가 발생한 우분투 시스템에 직접 설치하지 마십시오. 그렇게 하면 복구하려는 정확한 섹터 위에 새로운 데이터가 덮어쓰여질 수 있습니다.
Ubuntu에서 기본 시스템 휴지통(GUI)을 이용한 삭제된 파일 복구
데스크톱 그래픽 사용자 인터페이스(GUI)를 사용하여 파일을 삭제했다면, 해당 데이터는 시스템 휴지통에 남아 있을 가능성이 높습니다. 이는 의심할 여지 없이 복원을 시작하는 가장 간단한 방법입니다. 우분투에서 삭제된 파일 복구 이 과정은 기술적 지식이 필요하지 않기 때문에.
단계별 가이드:
- 먼저, 우분투 도크에서 기본 파일 관리자(Files)를 실행하세요.
- 다음으로, 휴지통 왼쪽 사이드바 하단에 있는 아이콘.
- 그런 다음, 삭제된 항목 목록을 살펴보며 잃어버린 파일을 찾아보세요.
- 마지막으로, 복원하려는 파일이나 폴더를 마우스 오른쪽 버튼으로 클릭한 다음 복원.
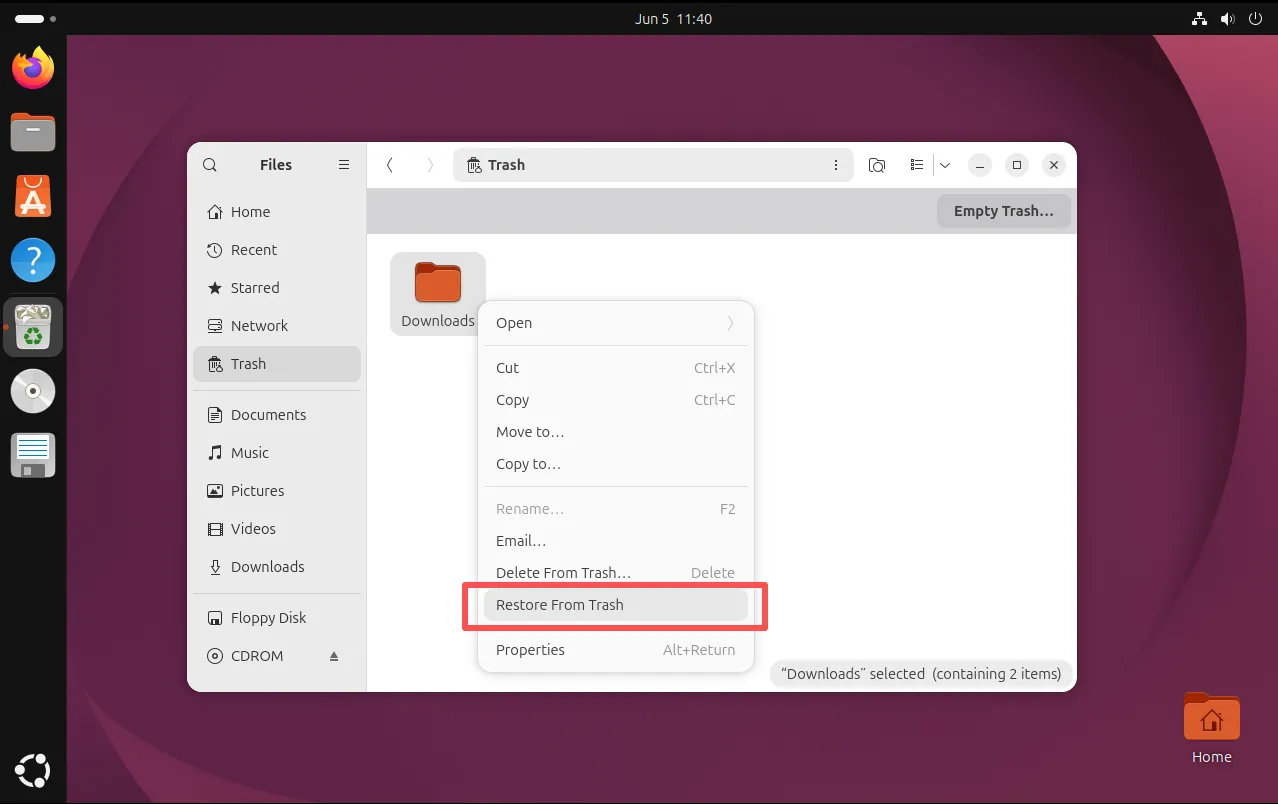
참고: 이 기본 방법은 데스크톱 GUI를 통해 삭제된 파일에만 적용됩니다. 터미널 명령어를 사용한 경우rm또는 눌렀을 때Shift + 삭제, 해당 파일은 휴지통을 완전히 우회하므로, 이를 처리할 다른 방법을 찾아야 합니다. 우분투에서 삭제된 파일 복구하기 비상사태.
우분투에서 삭제된 파일 복구를 위한 TestDisk 사용법
파일이 영구적으로 삭제된 경우, 드라이브의 원시 섹터를 스캔하려면 고급 유틸리티가 필요합니다. 따라서 많은 사용자가 리눅스 시스템에서 파티션 복구 및 데이터 복구를 전문으로 하는, 널리 인정받는 오픈소스 명령줄 도구인 ‘gparted’를 찾습니다. 이 도구는 무료로 우분투에서 삭제된 파일 복구 결과.
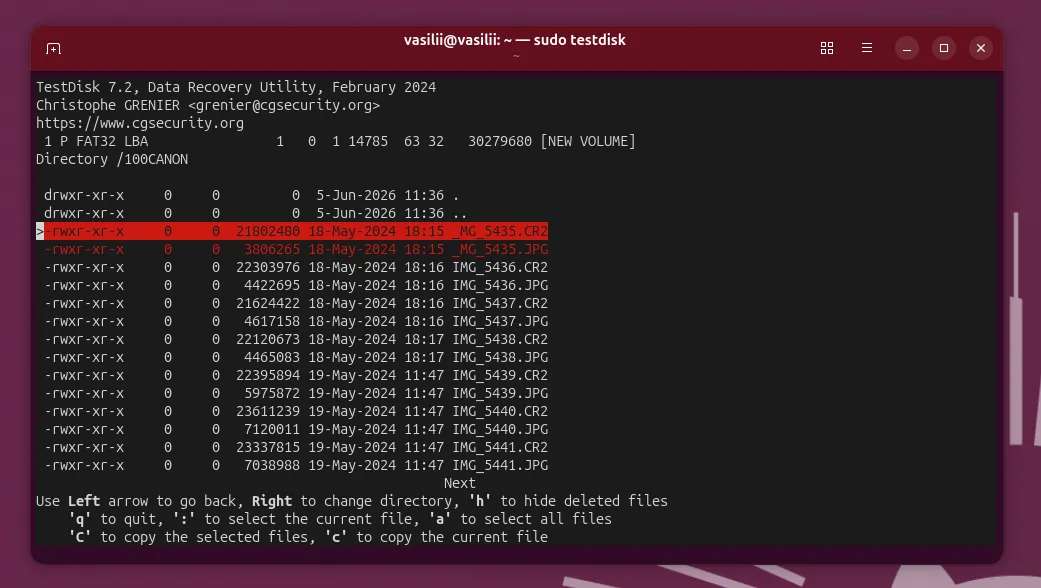
우분투에서 TestDisk 사용 방법:
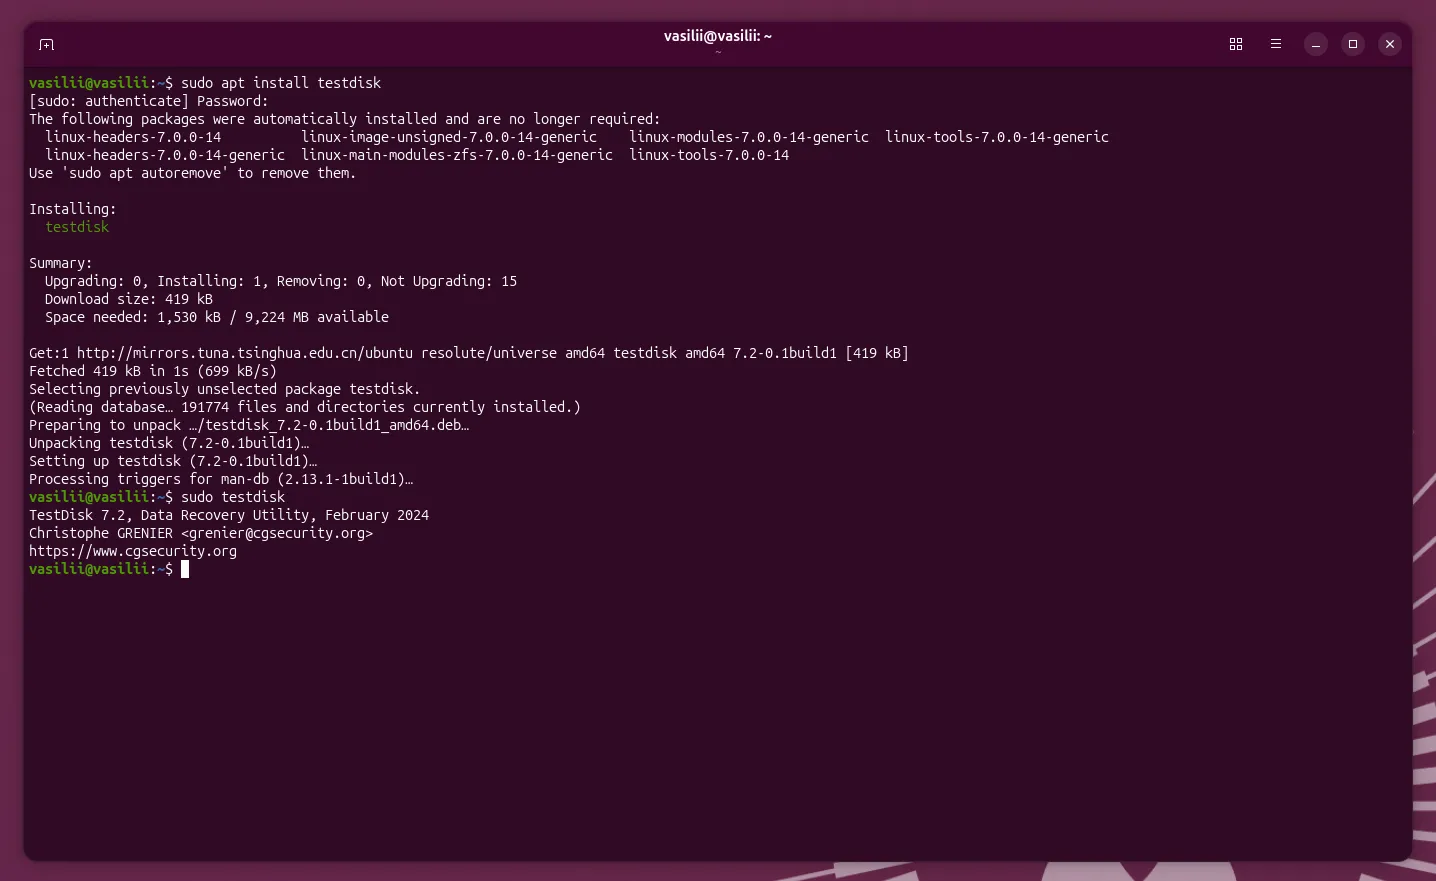
1. 먼저 터미널을 실행합니다 (Ctrl + Alt + T).
2. 다음으로, 다음 명령을 입력하여 유틸리티를 설치합니다: sudo apt 설치 테스트 디스크
3. 그런 다음 관리자 권한으로 응용 프로그램을 실행합니다: sudo testdisk
4. 4. 만들기 새 로그 파일을 생성하려면.
5. 삭제된 리눅스 파일이 들어 있는 하드 드라이브를 선택한 다음 Enter 키를 누르세요.
6. 파티션 테이블 유형을 선택하십시오(보통 인텔 또는 EFI GPT).
7. 다음 위치로 이동합니다. 고급, 특정 Ubuntu 파티션을 선택한 다음 삭제 취소 하단의 명령어.
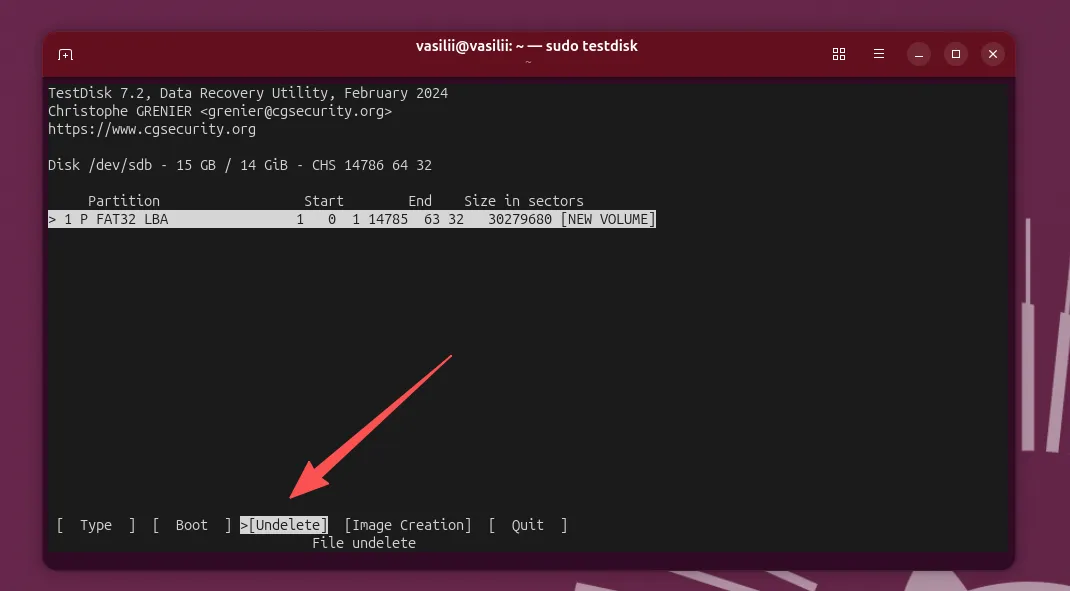
8. 마지막으로, 화살표 키를 사용하여 빨간색으로 표시된 삭제된 파일들을 살펴본 다음, C 선택한 파일을 안전한 디렉터리에 복사합니다.
이 접근법의 한계:
TestDisk는 매우 효과적이지만, 데이터를 복구하려는 일반 사용자에게는 상당한 어려움을 안겨줍니다. 우분투에서 삭제된 파일 복구하기 작동. 텍스트 전용 인터페이스는 다소 부담스럽게 느껴질 수 있으며, 단 한 번의 잘못된 키 입력만으로도 파티션 테이블 전체가 손상될 수 있습니다. 게다가 TestDisk는 안전하게 우분투에서 삭제된 파일 복구하기 파편화가 심한 EXT4 드라이브에서 복잡한 폴더 계층 구조를 다룰 때.
Ubuntu 기본 복구 기능으로 삭제된 파일을 복원하는 방법이 실패할 수 있는 이유
많은 기술 블로그에서는 실행 중인 우분투 시스템에 다양한 명령줄 도구를 직접 설치할 것을 권장합니다. 하지만 이러한 조언은 데이터 복구에 관한 업계 표준 모범 사례와 상충됩니다.
Ubuntu 시스템이 부팅되면 백그라운드 애플리케이션 로그, 브라우저 캐시 및 임시 시스템 파일이 드라이브에 지속적으로 기록됩니다. 이러한 지속적인 활동은 데이터 손상의 심각한 위험을 초래합니다. 작업을 마치기도 전에 시스템이 저장소 섹터를 덮어쓰게 되면 우분투에서 삭제된 파일 복구 한 번이라도 시도한다면, 어떤 리눅스 유틸리티도 그 파일들을 복구할 수 없을 것입니다.
따라서 기술에 익숙한 사용자들은 종종 크로스 플랫폼 전략을 모색하여 우분투에서 삭제된 파일 복구하기 원본 우분투 드라이브는 전혀 건드리지 않는 방식입니다.
우분투에서 삭제된 파일을 복구하는 더 안전한 방법: Windows 사용
만약 ~을 완료하고 싶다면 우분투에서 삭제된 파일 복구 위험을 최대한 줄이려면, Windows와 같은 보조적이고 안정적인 운영 체제에서 복구 작업을 수행해야 합니다. Ubuntu가 설치된 하드 드라이브를 물리적으로 분리하여 Windows 컴퓨터에 연결하면, 해당 드라이브는 엄격한 읽기 전용 환경으로 전환됩니다.
Windows는 기본적으로 알 수 없는 Linux 시스템 구조에 임시 파일을 작성할 수 없기 때문에, 이 방법을 사용하면 실수로 데이터가 덮어쓰어질 위험을 완전히 없앨 수 있습니다. 결과적으로 최적의 우분투에서 삭제된 파일 복구 안전하게 복구할 수 있습니다. 연결이 완료되면 고급 그래픽 소프트웨어를 사용하여 EXT4 디렉터리 트리를 안전하게 재구성할 수 있습니다.
이 크로스 플랫폼 방식을 구현할 수 있는 매우 효율적인 솔루션을 찾고 계신다면, 다음을 사용해 보시기를 강력히 추천합니다. Magic Data Recovery.
Magic Data Recovery를 사용하여 우분투에서 삭제된 파일을 복구하는 방법
Magic Data Recovery는 복잡한 리눅스 파일 구조와 사용자 친화적인 윈도우 인터페이스 간의 격차를 해소합니다. 이 소프트웨어는 윈도우 환경에서 실행되지만, 리눅스 파일을 원본 그대로 읽고 해독하는 고급 포렌식 알고리즘을 갖추고 있습니다. 리눅스 네이티브 파일 시스템, EXT2, EXT3, EXT4 등을 포함하여. 따라서 이는 다음을 실행하려는 모든 사용자에게 신뢰할 수 있는 해결책을 제공합니다. 우분투에서 삭제된 파일 복구 워크플로.
이 솔루션의 주요 장점:
- 상위 데이터 덮어쓰기 방지: Windows 컴퓨터에서 스캔을 실행하면 Ubuntu 드라이브에 백그라운드 쓰기 작업이 전혀 발생하지 않습니다.
- 직관적인 시각적 인터페이스: 성공적으로 수행하기 위해 난해한 터미널 명령어를 외울 필요는 없습니다 우분투에서 삭제된 파일 복구 그렇지 않으면 파티션 구성이 망가질 위험이 있습니다.
- 고급 파일 복구: 이 소프트웨어는 심층 섹터 스캔을 수행하여 원본 파일의 시그니처를 찾아내어, 손실된 사진, 문서, 데이터베이스 및 소스 코드 파일을 성공적으로 복원합니다.
- 복구 전 미리보기: 저장 여부를 결정하기 전에 체계적인 폴더 구조 내에서 누락된 데이터를 확인할 수 있습니다.
실제 시나리오:
터미널 업데이트가 잘못되어 우분투 데스크톱이 갑자기 부팅되지 않게 되었고, 백업하지 않은 프로젝트 파일들이 사라진 것을 발견했다고 상상해 보세요. 당황해서 리눅스 라이브 USB를 꺼내어 어떻게 대처해야 할지 고민하기보다는 우분투에서 삭제된 파일 복구 문제가 발생하면, 드라이브를 친구의 Windows 노트북에 연결해 보세요. Magic Data Recovery가 EXT4 파티션을 즉시 인식하여, 여러분이 우분투에서 삭제된 파일 복구하기 몇 분 만에 안전한 곳으로 대피했다.
단계별 복원 가이드
1단계: Magic Data Recovery 다운로드 및 설치
먼저, 드라이브를 연결하고 Windows 컴퓨터에 소프트웨어를 다운로드하세요. 분실된 파티션이 실수로 덮어쓰이는 것을 방지하기 위해, Magic Data Recovery를 컴퓨터의 내부 로컬 드라이브에 설치하고, 연결된 Ubuntu 하드 드라이브와는 완전히 분리된 상태로 유지해야 합니다.
Windows 7/8/10/11 및 Windows Server 지원
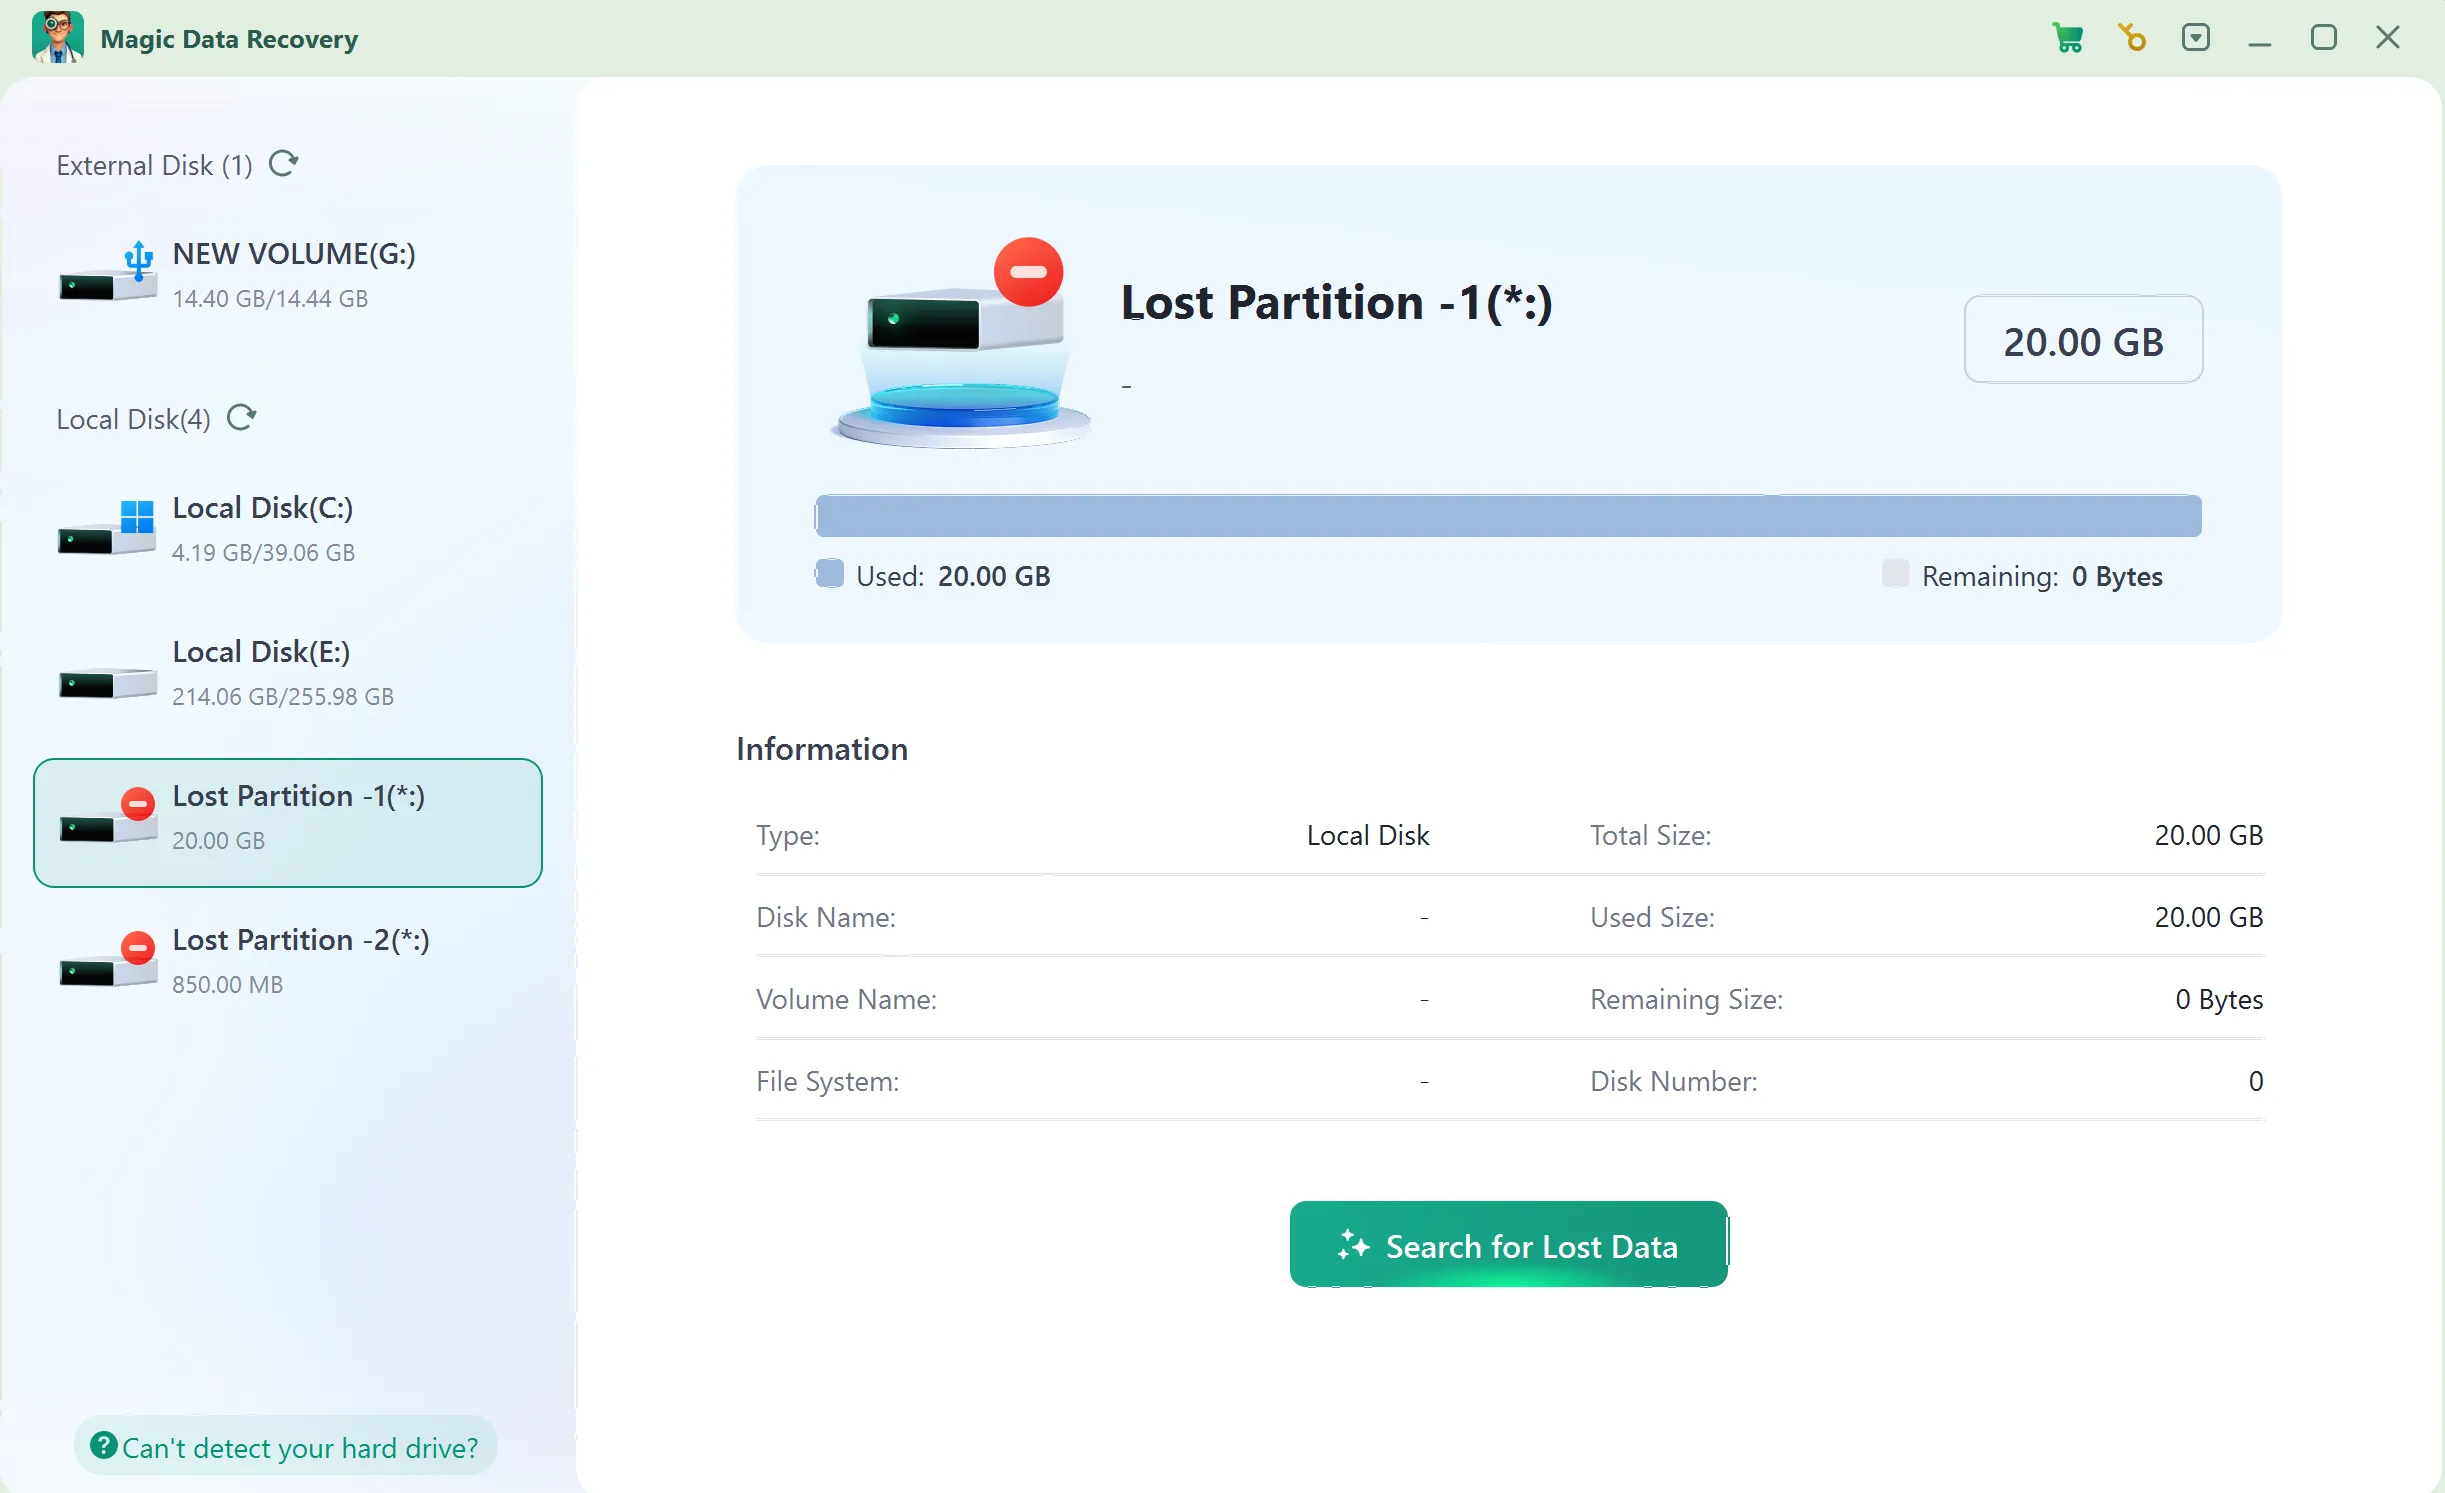
2단계: 스캔할 우분투 하드 드라이브 선택
다음으로 프로그램을 실행하여 메인 대시보드를 엽니다. 파일이 삭제된 특정 리눅스 파티션이나 하드 드라이브를 찾아 선택한 다음, 스캔 과정을 시작하여 우분투에서 삭제된 파일 복구 작동합니다.
3단계: 삭제된 파일을 찾기 위해 저장소 섹터를 스캔합니다
그 후, 소프트웨어는 EXT 데이터 블록에 대해 자동으로 고급 스캔을 수행합니다. 이 과정에서 유틸리티가 모든 항목을 실시간으로 나열하여 사용자가 원하는 항목을 쉽게 찾을 수 있도록 도와주므로, 진행률 표시줄을 확인하실 수 있습니다. 삭제된 파일을 실시간으로.

4단계: 복구 전 삭제된 파일 미리보기
심층 섹터 스캔이 완료되면 시각적 디렉터리 트리를 탐색하세요. 내장된 미리보기 기능을 사용하여 손실된 사진이나 스크립트의 파일 내용을 확인하고, 반드시 우분투에서 삭제된 파일 복구 작업이 성공적으로 완료되었습니다.

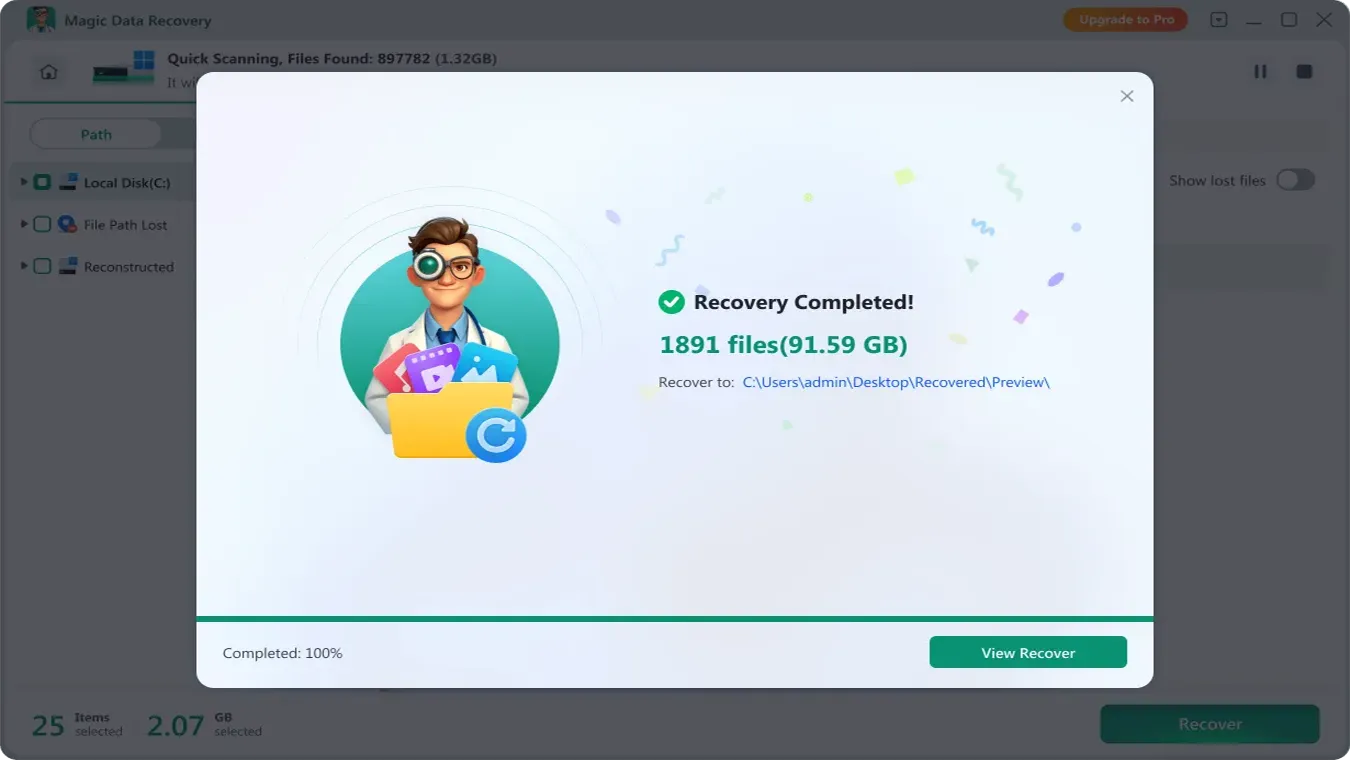
5단계: 파일을 안전한 위치로 복구하기
마지막으로, 복원하려는 파일 옆의 확인란을 선택한 후 메인 복원 버튼을 클릭하여 삭제된 파일을 복원하세요. 복원된 파일은 반드시 동일한 우분투 드라이브가 아닌 Windows 로컬 드라이브에 저장해야 합니다. 원본 드라이브에 데이터를 다시 쓰면 데이터가 즉시 손상될 위험이 있기 때문입니다.
우분투에서 향후 데이터 손실을 방지하기 위한 필수 팁
~을 실행하는 방법을 알면서도 우분투에서 삭제된 파일 복구 이러한 절차는 안심을 선사하지만, 선제적인 보호 전략을 수립하는 것이 여전히 최선의 장기적 해결책입니다.
- 자동 백업 설정: Ubuntu에는 다음과 같은 내장 애플리케이션이 포함되어 있습니다. Déjà Dup 백업. 애플리케이션 메뉴에서 이 도구를 실행한 다음, 외부 저장 장치나 클라우드 계정으로 매주 자동 백업을 설정하세요.
- 터미널에 안전망을 추가하세요: 명령줄 환경을 수정하여 파괴적인 작업이 실행되기 전에 다시 한 번 확인할 수 있습니다. 다음 파일을 열어주세요.
~/.bashrc파일을 열고 다음 줄을 추가하세요alias rm='rm -i'. 이 단축키를 사용하면 파일을 삭제하려고 할 때마다 터미널에서 확인 메시지를 표시합니다. - 별도의 홈 파티션을 활용하세요: Ubuntu를 설치할 때는 다음을 고려해 보세요.
/home메인 루트와는 완전히 분리된 파티션에 있는 디렉터리/시스템. 이 구성은 주 운영 체제에서 치명적인 부팅 오류가 발생하더라도 사용자의 개인 문서를 안전하게 보호합니다.
결론
실수로 키를 잘못 눌러 중요한 데이터를 잃어버리는 일은 언제나 엄청난 스트레스를 주는 경험입니다. 다행히도, 성공적으로 우분투에서 삭제된 파일 복구 신속하게 대응하고 문제가 발생한 디스크에 새로운 데이터를 기록하지 않는다면 이 작업은 충분히 가능합니다.
TestDisk와 같은 리눅스 기본 명령줄 도구는 터미널 사용에 익숙한 분들에게는 효과적인 선택지이지만, 설치 과정에서 실수로 데이터를 덮어쓸 수 있는 위험이 내재되어 있습니다. 복잡한 명령어를 전혀 사용하지 않고도 안전하고 부담 없이 문제를 해결할 수 있는 대안을 원하신다면, 드라이브를 분리하여 Magic Data Recovery Windows 컴퓨터에서 안전성, 편의성, 그리고 강력한 파일 복구 기능을 완벽하게 결합하여 삭제된 파일 복구 성공적으로 완료했습니다.
Windows 7/8/10/11 및 Windows Server 지원
자주 묻는 질문
우분투에서 rm -rf 명령어로 삭제한 파일을 복구할 수 있나요?
네, 복구할 수 있습니다. rm -rf 명령어는 파일 포인터를 제거하지만, 드라이브 섹터에는 실제 데이터가 그대로 남아 있습니다. 하지만 우분투에서 삭제된 파일을 성공적으로 복구하려면, 즉시 시스템 사용을 중단하고 Magic Data Recovery를 사용하여 드라이브를 윈도우 PC에 연결해야 합니다.
왜 파일을 동일한 우분투 파티션으로 복원하지 말아야 하나요?
동일한 파티션에 데이터를 기록하면 데이터가 영구적으로 손상될 위험이 매우 큽니다. 소프트웨어가 복구된 파일을 저장하는 과정에서, 아직 다른 손실된 데이터가 남아 있는 저장 블록을 덮어쓸 수 있기 때문입니다. 따라서 우분투에서 삭제된 파일을 복구할 때는 항상 안전한 Windows 드라이브를 선택해야 합니다.
부팅되지 않는 우분투 시스템에서 삭제된 파일을 복구할 수 있나요?
네, 이 크로스 플랫폼 방식은 이러한 상황을 완벽하게 처리합니다. 드라이브를 물리적으로 분리하여 정상 작동하는 Windows 컴퓨터에 연결하기 때문에, Ubuntu 운영 체제의 부팅 상태는 중요하지 않습니다. 따라서 이는 Ubuntu에서 삭제된 파일을 복구하는 가장 안전한 방법입니다.
손실된 리눅스 소스 코드 파일을 복원하기 전에 미리 볼 수 있나요?
네, 이 유틸리티에는 강력한 시각적 미리보기 기능이 포함되어 있습니다. 심층 스캔을 통해 드라이브 구성이 분석되면, 검색된 텍스트 파일, 스크립트, 문서 또는 사진을 클릭하여 내용을 확인할 수 있으므로, 실제로 필요한 삭제된 파일을 확실히 복원할 수 있습니다.
TestDisk와 같은 네이티브 터미널 유틸리티의 가장 큰 단점은 무엇인가요?
가장 큰 단점은 인적 오류의 위험이 높다는 점입니다. 텍스트 기반 인터페이스는 정밀한 조작이 필요하며, 잘못된 명령어를 실행하면 파티션 테이블 전체가 쉽게 삭제될 수 있습니다. 또한, 복잡한 폴더 구조를 가진 우분투 삭제 파일 복구 작업을 수행할 때 수동 터미널 도구는 종종 실패하기 쉽습니다.
바실리는 이 분야에서 약 10년간 실무 경험을 쌓은 데이터 복구 전문가입니다. 그는 경력 전반에 걸쳐 삭제된 파일, 포맷된 드라이브, 손실된 파티션 및 RAW 파일 시스템과 관련된 수천 건의 복잡한 사례를 성공적으로 해결했습니다. 그의 전문 지식은 헥스 에디터와 같은 전문 도구를 사용한 수동 복구 방법과 복구 소프트웨어를 사용한 고급 자동화 솔루션을 모두 다룹니다. 바실리의 사명은 IT 전문가와 일반 사용자 모두에게 신뢰할 수 있는 데이터 복구 지식을 제공하여 소중한 디지털 자산을 보호할 수 있도록 돕는 것입니다.