TestDisk Recover Files Guide
Wenn Sie auf der Suche nach testdisk recover files, you probably deleted important documents, lost photos, or opened a drive that no longer shows the files you need. TestDisk can help in some cases, especially when the file system still contains recoverable deleted entries. However, it is not always the easiest or safest option for everyday Windows users.
Dieser Leitfaden erklärt, wie TestDisk recover files works, when PhotoRec becomes necessary, and what you should do before running any recovery tool. For broader Wiederherstellung gelöschter Dateien solutions, you can also visit Amagicsoft’s Wiederherstellung gelöschter Dateien hub for related recovery guides.
You will also learn when a graphical tool such as Magic Data Recovery makes more sense, especially if you need to recover deleted, formatted, or inaccessible files without working through a text-based interface.
Unterstützt Windows 7/8/10/11 und Windows Server
Inhaltsübersicht
What Does “TestDisk Recover Files” Actually Mean?
Die Phrase TestDisk recover files usually refers to two different recovery tasks.
Erstens, TestDisk can recover deleted files from certain file systems, such as NTFS, FAT, exFAT, and ext2. This method works best when the deleted file records still exist and new data has not overwritten the original file content.
Second, many people use TestDisk for partition recovery. In that situation, TestDisk does not simply search for individual deleted files. Instead, it looks for lost partitions, damaged boot sectors, or broken partition tables. After it restores access to a partition, your files may become visible again.
That distinction matters. If you deleted several files yesterday, TestDisk file recovery may help. If your whole drive changed to RAW or a partition disappeared, TestDisk may help repair the disk structure. If the file system is badly damaged, PhotoRec or another recovery tool may work better.
Before You Use TestDisk, Protect the Lost Files First
Before you try TestDisk recover files, take a few careful steps. These steps can improve your recovery result and prevent permanent data loss.
Stop using the affected drive immediately. When Windows deletes a file, it often marks the space as available instead of wiping every byte at once. However, any new file, software installation, browser cache, or system update may overwrite that available space.
Next, do not install TestDisk or any recovery software on the same drive where the lost files were stored. If the lost files were on drive C, install recovery software on another computer or another partition when possible.
Also, never save recovered files back to the same drive. Use another healthy disk, external hard drive, or USB device as the destination. This rule applies to TestDisk, PhotoRec, and Magic Data Recovery.
You should also avoid formatting the drive, running CHKDSK, rebuilding partitions, or creating a new volume before recovery. These actions may change file system structures and reduce the chance of successful Wiederherstellung gelöschter Dateien.
If your drive makes clicking sounds, disconnects repeatedly, or does not appear in Disk Management, stop DIY recovery. In that case, a physical failure may exist. For logical data loss on a detectable drive, you can continue with software-based recovery.
For more drive-specific advice, read this Wiederherstellung gelöschter Dateien auf der Festplatte Leitfaden.
How to Recover Deleted Files with TestDisk
If your drive remains detectable and you feel comfortable using a text-based tool, you can try recover deleted files with TestDisk by following this general workflow.
Step 1: Download and Run TestDisk
Download TestDisk from the official CGSecurity source. Extract the package, then run the TestDisk executable as administrator on Windows. Running it with administrator permission helps the program access disks and partitions correctly.
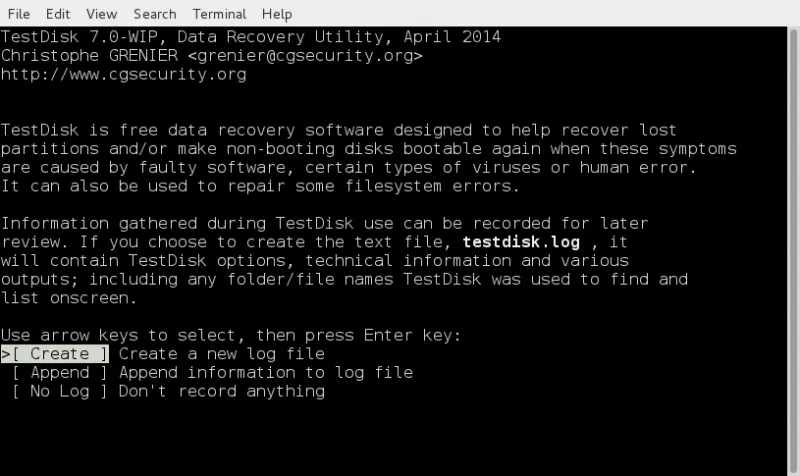
When TestDisk opens, it will ask whether to create a log file. You can choose “Create” for normal recovery. The log may help you review what the tool detected.
Step 2: Select the Correct Disk
TestDisk lists physical disks, not just drive letters. Therefore, check the disk size and model carefully. Select the disk that originally stored the deleted files.
This step deserves attention. If you select the wrong disk, you may waste time scanning irrelevant storage. Worse, you may make changes to the wrong partition later.
Step 3: Choose the Partition Table Type
TestDisk usually detects the partition table type automatically. In most modern Windows cases, it may identify Intel/PC, EFI GPT, or another relevant structure. If you do not understand the options, avoid changing advanced partition settings.
For simple TestDisk recover files tasks, you often need the “Advanced” menu rather than the deeper partition repair options.
Step 4: Open the Undelete Function
Choose the affected partition, then select the file undelete option. TestDisk will scan the file system and show deleted entries if it can still find them.
On supported file systems, deleted files may appear in red. Browse the list and locate the files or folders you need. You can select individual files or multiple items.
Step 5: Copy Files to Another Drive
After selecting the files, copy them to a different destination. Do not choose the original partition as the recovery location.
This final step is essential. If you copy recovered files back to the damaged or deleted-file source drive, you may overwrite other files that still remain recoverable.
When TestDisk Cannot Find the Files
Manchmal TestDisk recover files does not show the files you expect. This can happen for several reasons.
The deleted entries may have already been overwritten. The file system may not support TestDisk’s direct undelete feature. The partition may have been formatted. In other cases, the drive may have file system corruption that prevents TestDisk from reading the old directory structure.
At this point, PhotoRec may help. PhotoRec does not depend as heavily on the original file system records. Instead, it searches raw disk space for known file signatures. This approach can recover photos, documents, videos, archives, and other file types even when the file system is damaged.
However, PhotoRec has an important limitation. It often cannot restore original file names or folder paths. As a result, you may receive many recovered files with generic names. Sorting them can take time.
Therefore, PhotoRec is useful when you only need the file content. If you want a clearer recovery tree, previews, filters, and a simpler workflow, a GUI-based recovery program may fit better.
TestDisk vs Magic Data Recovery: Which Should You Use?
TestDisk remains a respected free utility, especially for technical users. Still, many users searching for testdisk recover files do not actually want a command-line recovery process. They want a clear way to scan a drive, preview files, and recover only what matters.
Das ist der Punkt, an dem Magic Data Recovery can be more practical.
Merkmal | TestDisk | Magic Data Recovery |
Am besten für | Advanced partition repair and supported file system undelete | Deleted, formatted, corrupted, RAW, and file system error recovery |
Schnittstelle | Text-based interface | Graphical interface |
User skill level | Better for technical users | Suitable for ordinary Windows users |
Dateivorschau | Begrenzt | Vorschau vor der Wiederherstellung |
Filtering | Begrenzt | Search and filter by name, type, size, and date |
Recovery workflow | Manual and technical | Select drive, scan, preview, recover |
Risk of wrong operation | Higher for beginners | Lower because the workflow is guided |
Ideal scenario | Lost partition, boot sector issue, advanced repair | Everyday file recovery from HDD, SSD, USB, SD card, and external drive |
In short, TestDisk can be excellent when you know what you are doing. However, Magic Data Recovery offers a more user-friendly path when you need fast, visual, and safer recovery from common data loss scenarios.
Why Magic Data Recovery Is a Practical TestDisk Alternative
Eine gute TestDisk alternative should not simply recover files. It should reduce mistakes during recovery. Magic Data Recovery focuses on that practical need.
It helps solve several common problems:
- Files deleted with Shift + Delete
- Files removed after emptying the Recycle Bin
- Data lost from formatted drives
- Files missing from RAW or corrupted partitions
- Photos and videos lost from USB drives or SD cards
- Documents lost after file system errors
- Data missing after accidental operation or virus damage
The main advantage is the guided workflow. You choose the affected device, start a scan, preview recoverable files, and save them to another safe location. This approach works better for users who do not want to interpret partition tables or navigate a text interface.
Magic Data Recovery also supports common recovery targets such as documents, photos, videos, audio files, archives, and more. For example, if you deleted a work folder from an external hard drive, you can scan the drive, filter by document type, preview files, and recover only the required items.
Compared with TestDisk, the biggest difference is control. TestDisk gives technical users powerful low-level options. Magic Data Recovery gives ordinary users a clearer file-level recovery process. Therefore, it often becomes the better choice when the priority is to recover important files safely rather than repair disk structures manually.
Wie man Dateien mit Magic Data Recovery wiederherstellt
Wenn TestDisk recover files feels too complex, you can use Magic Data Recovery instead. The process is simple.
Schritt 1: Installieren Sie die Software auf einem sicheren Laufwerk
Herunterladen und installieren Magic Data Recovery. Do not install it on the drive that contains your lost files. If the lost files were on drive C, use another partition or another computer when possible.
Unterstützt Windows 7/8/10/11 und Windows Server
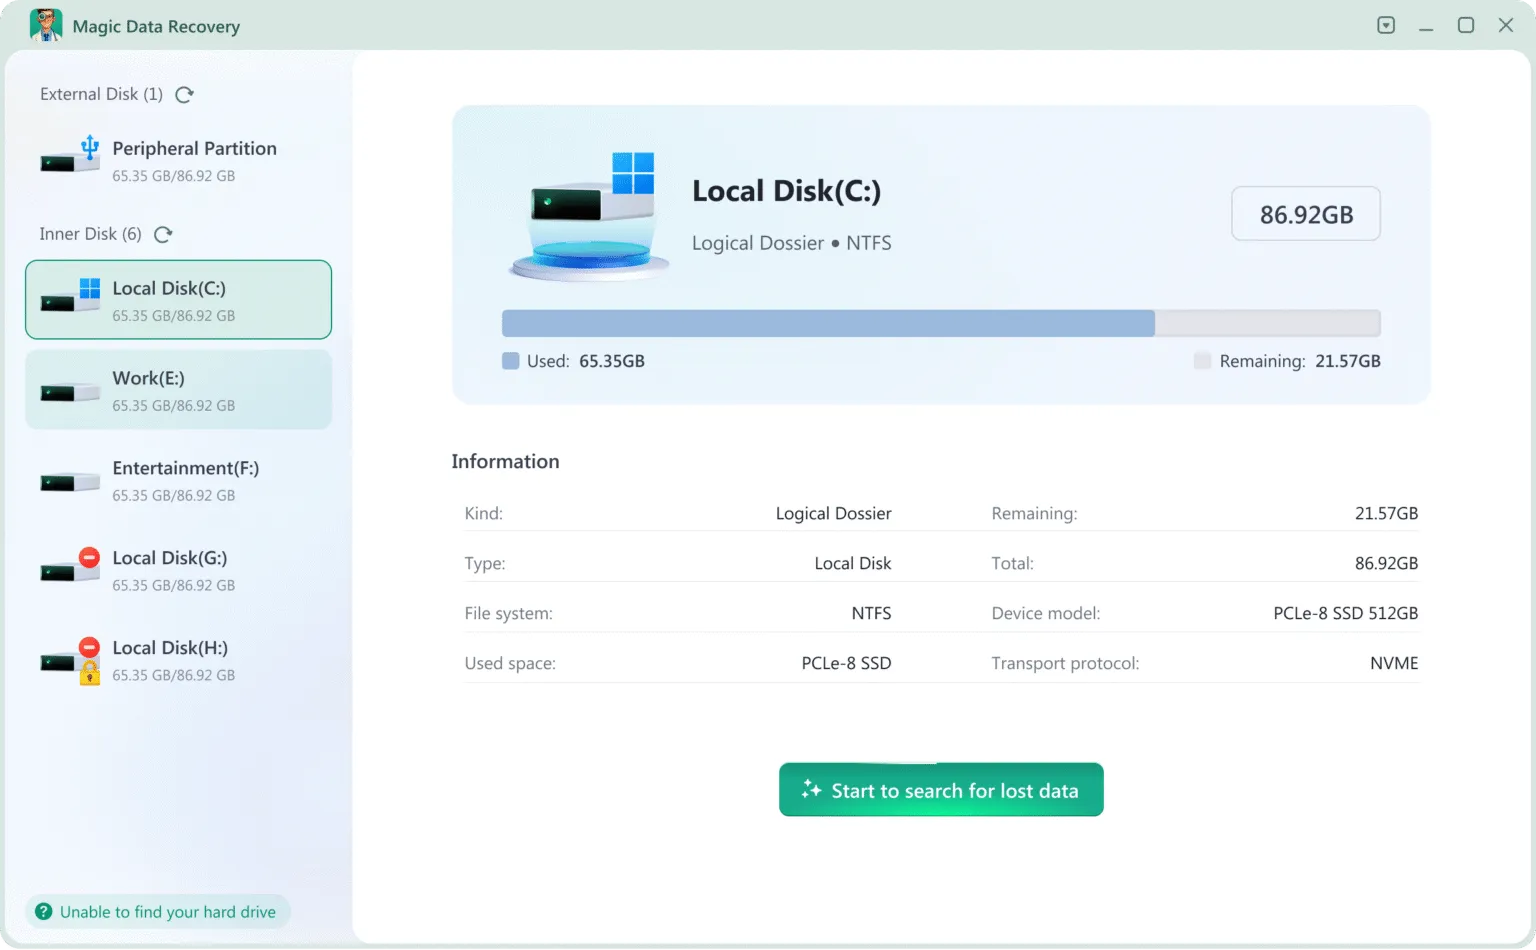
Schritt 2: Wählen Sie das betreffende Laufwerk aus
Open the program and select the drive, partition, USB flash drive, SD card, or external disk where the files were lost.
Schritt 3: Starten Sie den Scan
Run a scan to search for deleted, lost, formatted, or inaccessible files. During the scan, keep the affected drive connected and avoid using it for other tasks.

Schritt 4: Vorschau und Filterung der Ergebnisse
After scanning, browse recoverable files. Use file type, file name, size, or date filters to locate important data faster. Previewing files before recovery helps you avoid restoring useless or damaged items.

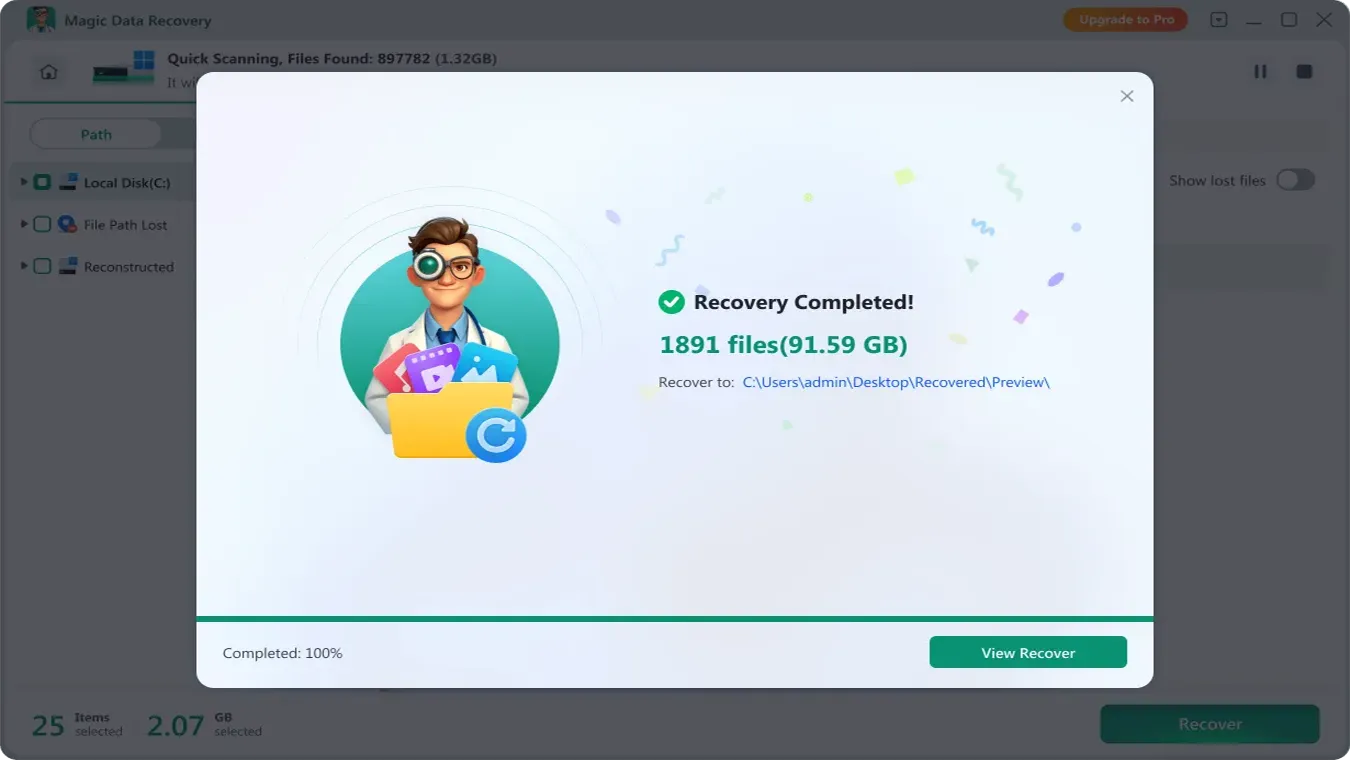
Schritt 5: Dateien an einem anderen Ort wiederherstellen
Select the files you need and save them to a different healthy drive. This protects other recoverable data from being overwritten.
For detailed product steps, you can also check the Magic Data Recovery Benutzerhandbuch.
Häufige Fehler, die den Erfolg der Dateiwiederherstellung verringern
Many recovery failures happen because users act too quickly. If you are trying TestDisk recover files or any other recovery method, avoid these mistakes.
Do not keep using the affected drive. Even small background writes can overwrite deleted data. Do not download recovery software to the same partition. Do not save recovered files to the source disk.
In addition, do not format the drive just because Windows asks you to. If a USB drive or SD card becomes RAW, formatting may make the device usable again, but it can damage recoverable file records.
You should also avoid running random repair tools before recovery. A repair tool may change file system metadata. Recover files first, then repair the device later.
If your files were deleted from the Recycle Bin, this recover deleted files in Recycle Bin guide may help you choose a safer first step.
For broader software comparisons, you can also review Amagicsoft’s best free data recovery software Leitfaden.
Best Workflow: TestDisk First or Magic Data Recovery First?
The best tool depends on the situation.
Use TestDisk first if you are comfortable with disk structures, the partition is missing, or you need to repair a boot sector or partition table. TestDisk gives advanced users strong control in those cases.
Verwenden Sie Magic Data Recovery first if you mainly want to recover deleted files, formatted data, or files from a corrupted but detectable drive. Its preview and filtering functions make the recovery process easier to verify.
Use PhotoRec if TestDisk cannot find files and you accept that original file names and folders may not return.
Most importantly, recover important files before making disk repairs. Once your data is safe, you can format the device, rebuild partitions, or attempt additional repairs with less risk.
Conclusion: Is TestDisk Recover Files the Best Option?
TestDisk recover files is a useful solution when you understand its workflow and your file system still contains recoverable deleted entries. It is especially valuable for technical users who need partition recovery, boot sector repair, or low-level disk analysis.
However, TestDisk is not always the best choice for ordinary users. Its text-based interface, limited preview options, and technical steps can make recovery stressful. If your goal is to recover deleted, formatted, or inaccessible files with a clearer process, Magic Data Recovery is a more practical solution.
It offers a guided scan, file preview, filters, and support for common storage devices such as HDDs, SSDs, USB drives, SD cards, and external hard drives. If you want a safer and more efficient way to handle everyday Wiederherstellung gelöschter Dateien, visit the Wiederherstellung gelöschter Dateien hub or try Magic Data Recovery before the lost data gets overwritten.
Unterstützt Windows 7/8/10/11 und Windows Server
FAQs About TestDisk Recover Files
Can TestDisk recover deleted files?
Yes, TestDisk can recover deleted files from supported file systems such as NTFS, FAT, exFAT, and ext2 when the file records and data remain available. However, TestDisk recover files does not work equally well in every case. If the file system is damaged, formatted, or overwritten, you may need PhotoRec or Magic Data Recovery.
Is TestDisk safe for file recovery?
TestDisk can be safe if you use it carefully and avoid writing changes to the wrong disk. The safest approach is to copy recovered files to another drive and avoid partition repair until your data is secure. Beginners should be cautious because TestDisk includes advanced disk options that may confuse non-technical users.
Why can’t TestDisk find my deleted files?
TestDisk may fail to find deleted files if the original file records no longer exist, new data has overwritten the storage space, or the file system is not supported for direct undelete. In these cases, PhotoRec may recover files by signature, while Magic Data Recovery can offer a clearer scan and preview workflow.
What is the difference between TestDisk and PhotoRec?
TestDisk focuses on partition recovery, boot sector repair, and deleted file recovery from supported file systems. PhotoRec focuses on file carving, which means it searches raw disk space for file signatures. PhotoRec may recover files when TestDisk cannot, but it often loses original filenames and folder structure.
Does TestDisk keep original filenames?
TestDisk may keep original filenames when it recovers deleted files through the file system’s deleted entries. However, this depends on the file system condition and whether metadata remains intact. If you use PhotoRec instead, recovered files often receive generic names because PhotoRec recovers file content rather than the original directory structure.
Is Magic Data Recovery a good TestDisk alternative?
Yes, Magic Data Recovery is a good TestDisk alternative for users who prefer a graphical interface and a guided workflow. It supports deleted files, formatted drives, file system errors, and common storage devices. Its preview and filter options also help users confirm recoverable files before saving them to another location.
Wo sollte ich wiederhergestellte Dateien speichern?
Always save recovered files to another healthy drive, not the original location. This rule applies to TestDisk, PhotoRec, Magic Data Recovery, and other recovery tools. Saving files back to the same disk may overwrite other recoverable data and reduce your chance of restoring additional lost files later.
Can I recover files after formatting with TestDisk?
TestDisk may help if formatting damaged or removed partition information but did not overwrite the actual file data. However, direct deleted-file recovery becomes harder after formatting. For formatted drives, Magic Data Recovery often provides a simpler workflow because it scans the drive, lists recoverable files, allows previews, and saves selected files safely.
Jason hat über 15 Jahre praktische Erfahrung in der Computersicherheitsbranche. Er ist spezialisiert auf Datenwiederherstellung, Backup und Wiederherstellung sowie Dateireparaturtechnologien und hat Millionen von Benutzern weltweit bei der Lösung komplexer Datenverluste und Sicherheitsprobleme geholfen.