
ASUS Data Recovery: How to Recover Lost Files Safely

Your ASUS Vivobook’s Documents folder is empty, photos disappeared from a Zenbook, or a ROG laptop asks you to format a drive. ASUS data recovery may still be possible, but missing files are not always permanently deleted. The right recovery method depends on whether the files were moved, deleted, or became inaccessible because of a storage problem.
A moved folder may only require a quick search, while deleted files on an HDD could remain recoverable until new data overwrites them. However, SSD TRIM, formatting, and physical damage can significantly reduce recovery chances. Therefore, identifying the cause before taking action is essential.
影響を受けたドライブへの新規データの書き込みを停止してください。. Avoid formatting, reinstalling Windows, or running repair tools until your important files are safe. This guide explains how to identify the problem, choose the safest recovery method, and verify the results. For additional storage-related guidance, visit our Hard Drive Recovery and Solutions Hub.
目次
First Steps for Safe ASUS Data Recovery
Before troubleshooting, protect the original data:
- Do not download, install, or save files to the affected partition. New writes can overwrite deleted content.
- Do not format, initialize, reset Windows, or run CHKDSK yet. These actions may change file-system structures.
- Do not start ASUS Cloud Recovery to retrieve personal files. This restores the operating system and erases data on the system storage device.
- Stop DIY scanning if the drive clicks, disconnects repeatedly, or reports severe read errors. A professional may need to handle physical failure.
- 復元したファイルは、別の物理ドライブに保存してください。. Do not overwrite the original recovery source.
Can ASUS Data Recovery Restore Your Files? Choose Your Situation
目に見えるもの | その意味するところ | 最も安全な次のステップ |
Files missing, but Windows works normally | Moved folder, hidden files, another user profile, or synchronization change | Search File Explorer and check the signed-in account |
最近削除されたファイル | Files may still be in Recycle Bin | ごみ箱から直接復元 |
Desktop or Documents files disappeared after sync | OneDrive may contain a copy or older version | Check OneDrive and its Recycle Bin |
Files were deleted or replaced earlier | A previous backup may exist | Check File History and external backups |
Recycle Bin emptied or Shift+Delete used | File records were deleted; content may or may not remain | Avoid new writes; try an appropriate recovery tool |
Quick-formatted or RAW partition | File-system references may be damaged or replaced | Recover files before repairing the volume |
Drive clicks or vanishes intermittently | Possible physical damage | Stop DIY attempts and assess professional recovery |
簡単な答え: Restore an existing copy first. For deleted files on healthy storage, try a scan. For unstable hardware, stop DIY ASUS data recovery and seek specialist help.
Check Why ASUS Files Disappeared Before Scanning
スタート ASUS data recovery by confirming what disappeared; a changed folder path needs no disk scan.
Missing after an Update or Account Change
Sign: Desktop or Documents looks empty after an update. チェックする: 検索 このPC in File Explorer for *.docx or another extension. Inspect C:\Users\ for other account folders and check the OneDrive sign-in. 次へ: Copy located files to safety. If Windows uses a temporary profile, preserve new work before signing out. A moved file does not need scanning.
A Drive Asks to Be Formatted or Shows RAW
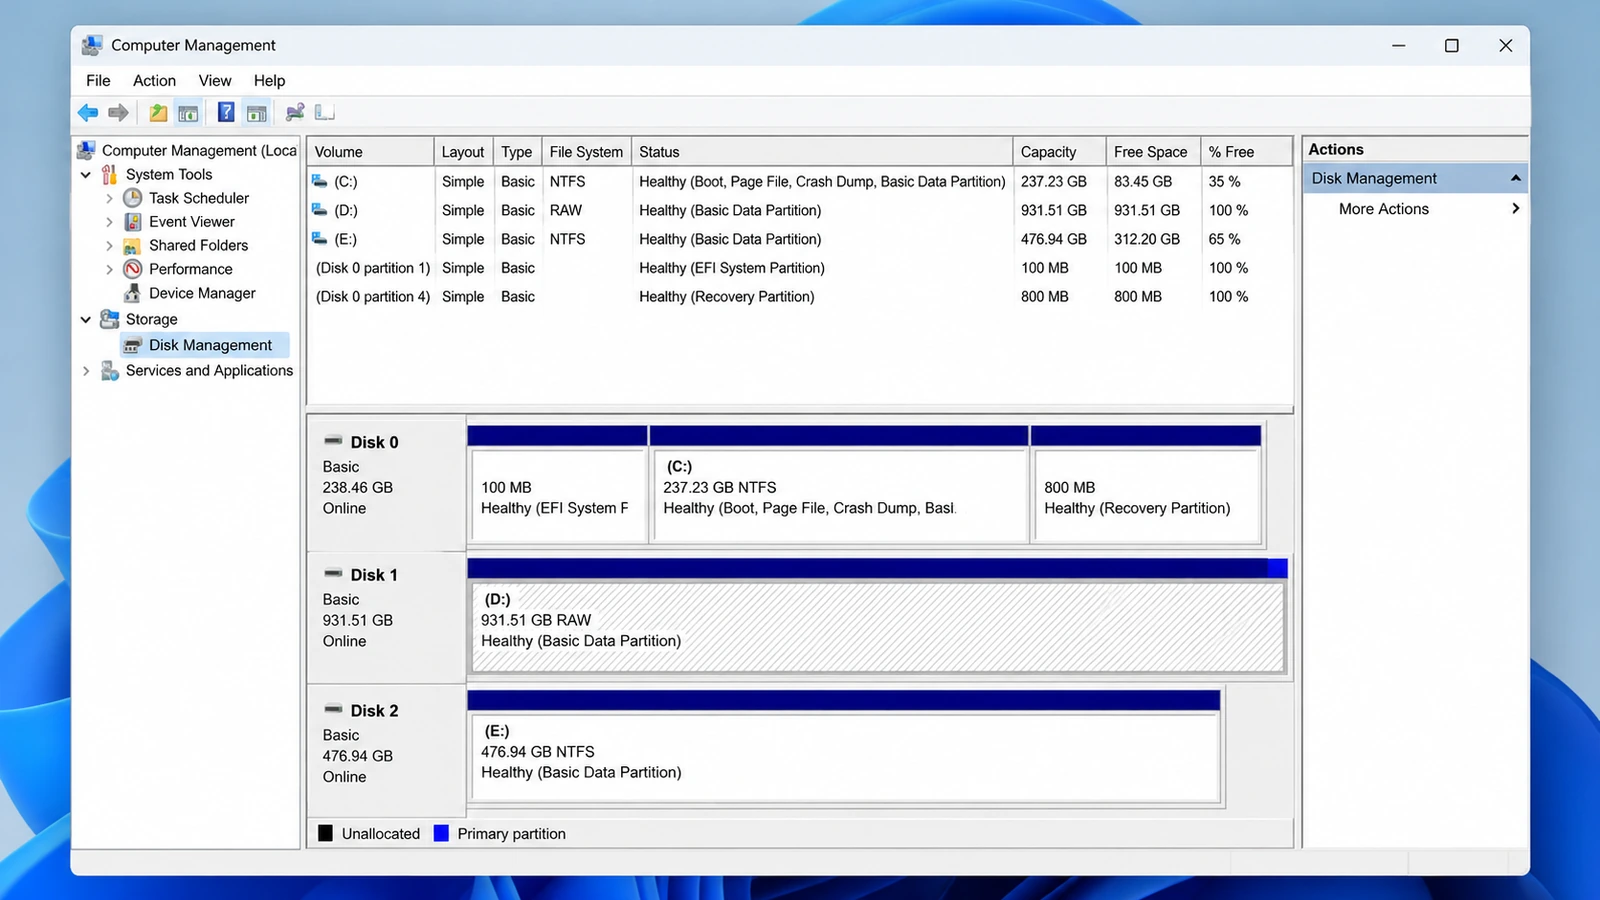
Sign: Windows asks to format a partition. チェックする: オープン ディスク管理 through Windows + X and note its status without changing anything. A RAW label means Windows cannot read the file system, not necessarily that the content is gone. 次へ: Recover files before repairs; see our RAW drive recovery guide.
A Disk Disappears or Makes Unusual Sounds
Sign: Clicking, repeated disconnections, or worsening read failures. 次へ: Stop scans and consult a specialist; software cannot fix physical defects.
Why Deletion, Formatting, and SSD TRIM Matter
On an HDD, deletion often removes a directory reference, leaving data blocks available for reuse. A クイックフォーマット rebuilds file-system structures but may leave file contents. A Windows フルフォーマット or secure erase may destroy that content.
On SSDs, トリム identifies deleted blocks for discard, sometimes eliminating software-recovery possibilities. For ASUS data recovery, minimize writes and remember: finding a filename does not prove its contents survived.
Try Built-In ASUS Data Recovery Options First
For most ASUS data recovery cases, restoring an existing copy is safer than scanning. Choose the method that fits your situation.
Restore Recently Deleted Files from Recycle Bin
最高だ: Files deleted normally from an accessible Windows drive. 制限: Shift+Delete, an emptied bin, and some removable-drive deletions bypass this option.
- オープン ごみ箱 デスクトップ上で。.
- Sort or search for the missing files.
- Right-click the correct items and choose リストア.
- Open the original folder to confirm they returned.
期待される結果: Files return to their original folder. Otherwise, check cloud storage and backups. See our Windows 11 deleted-file guide for permanent deletion.
Recover Synced Files from OneDrive
最高だ: Missing Desktop, Documents, or Pictures files that were previously synced. 制限: The account, synchronization settings, and retention period determine which copies exist.
- ログインして ワンドライブ using the correct Microsoft account.
- オープン ごみ箱 and look for deleted items.
- 選ぶ リストア for the required files.
- If a file still exists but its contents changed, inspect バージョン履歴.
期待される結果: A cloud copy or earlier version opens. If absent, check independent backups; sync alone is not a backup.
Restore an Earlier Copy from File History or Backup
最高だ: An ASUS laptop whose backups were configured before the loss. 制限: File History cannot create historical copies retroactively.
- Connect the original backup drive, if applicable.
- オープン コントロールパネル > システムとセキュリティ > ファイル履歴.
- 選択 個人ファイルの復元.
- Choose a saved version and restore it, preferably without replacing the current copy.
Alternatively, check プロパティ > 以前のバージョン for the original folder or バックアップと復元(Windows 7) for older backups. ASUS documents File History in its official instructions.
期待される結果: The selected version opens and contains the missing information. If no backup exists, software scanning may be the next option.
ASUS Data Recovery After Permanent Deletion
When backups are absent after Shift+Delete or a quick format, ASUS data recovery may require scanning a stable, readable drive. Neither option below restores overwritten or TRIM-discarded blocks.
Option A: Windows File Recovery (Free, Command Line)
最高だ: Advanced users who prefer free ASUS data recovery 道具を使う。. 制限: No graphical preview; installing it onto an affected C: drive risks overwriting data.
If Windows File Recovery is already available, connect a separate destination drive such as E: そして、次のように入力します:
winfr C: E: /regular /n \UsersYourName\Documents
交換 YourName with your profile folder. マイクロソフトの推奨 Regular mode for recent NTFS deletion and Extensive mode for older deletion, formatting, and non-NTFS file systems.
期待される結果: Candidates appear on the destination drive; open them to verify. If command-line use is unsuitable, try a graphical tool.
Option B: Magic Data Recovery for Missing ASUS Files
最高だ: Permanently deleted documents, photos, or videos, and some formatted or logically damaged partitions on storage that Windows can read reliably. 制限: It cannot repair physical defects, bypass encryption, restore overwritten bytes, or undo completed SSD TRIM.
Magic Data Recovery searches accessible storage for remaining file records and recognizable content. Unlike Recycle Bin, File History, and OneDrive, it does not depend on an existing copy. Its interface displays candidates and previews supported files before recovery.
について ASUS data recovery without backups, this is useful only if storage is stable. A quick-formatted HDD may retain files; an erased SSD may not. See our formatted-drive recovery guide.
How to Use Magic Data Recovery on an ASUS Laptop
ステップ1: Magic Data Recoveryのダウンロードとインストール
Install on a different partition, preferably another physical disk. Installing on the affected volume may overwrite recoverable blocks.
Windows 7/8/10/11およびWindows Serverをサポート
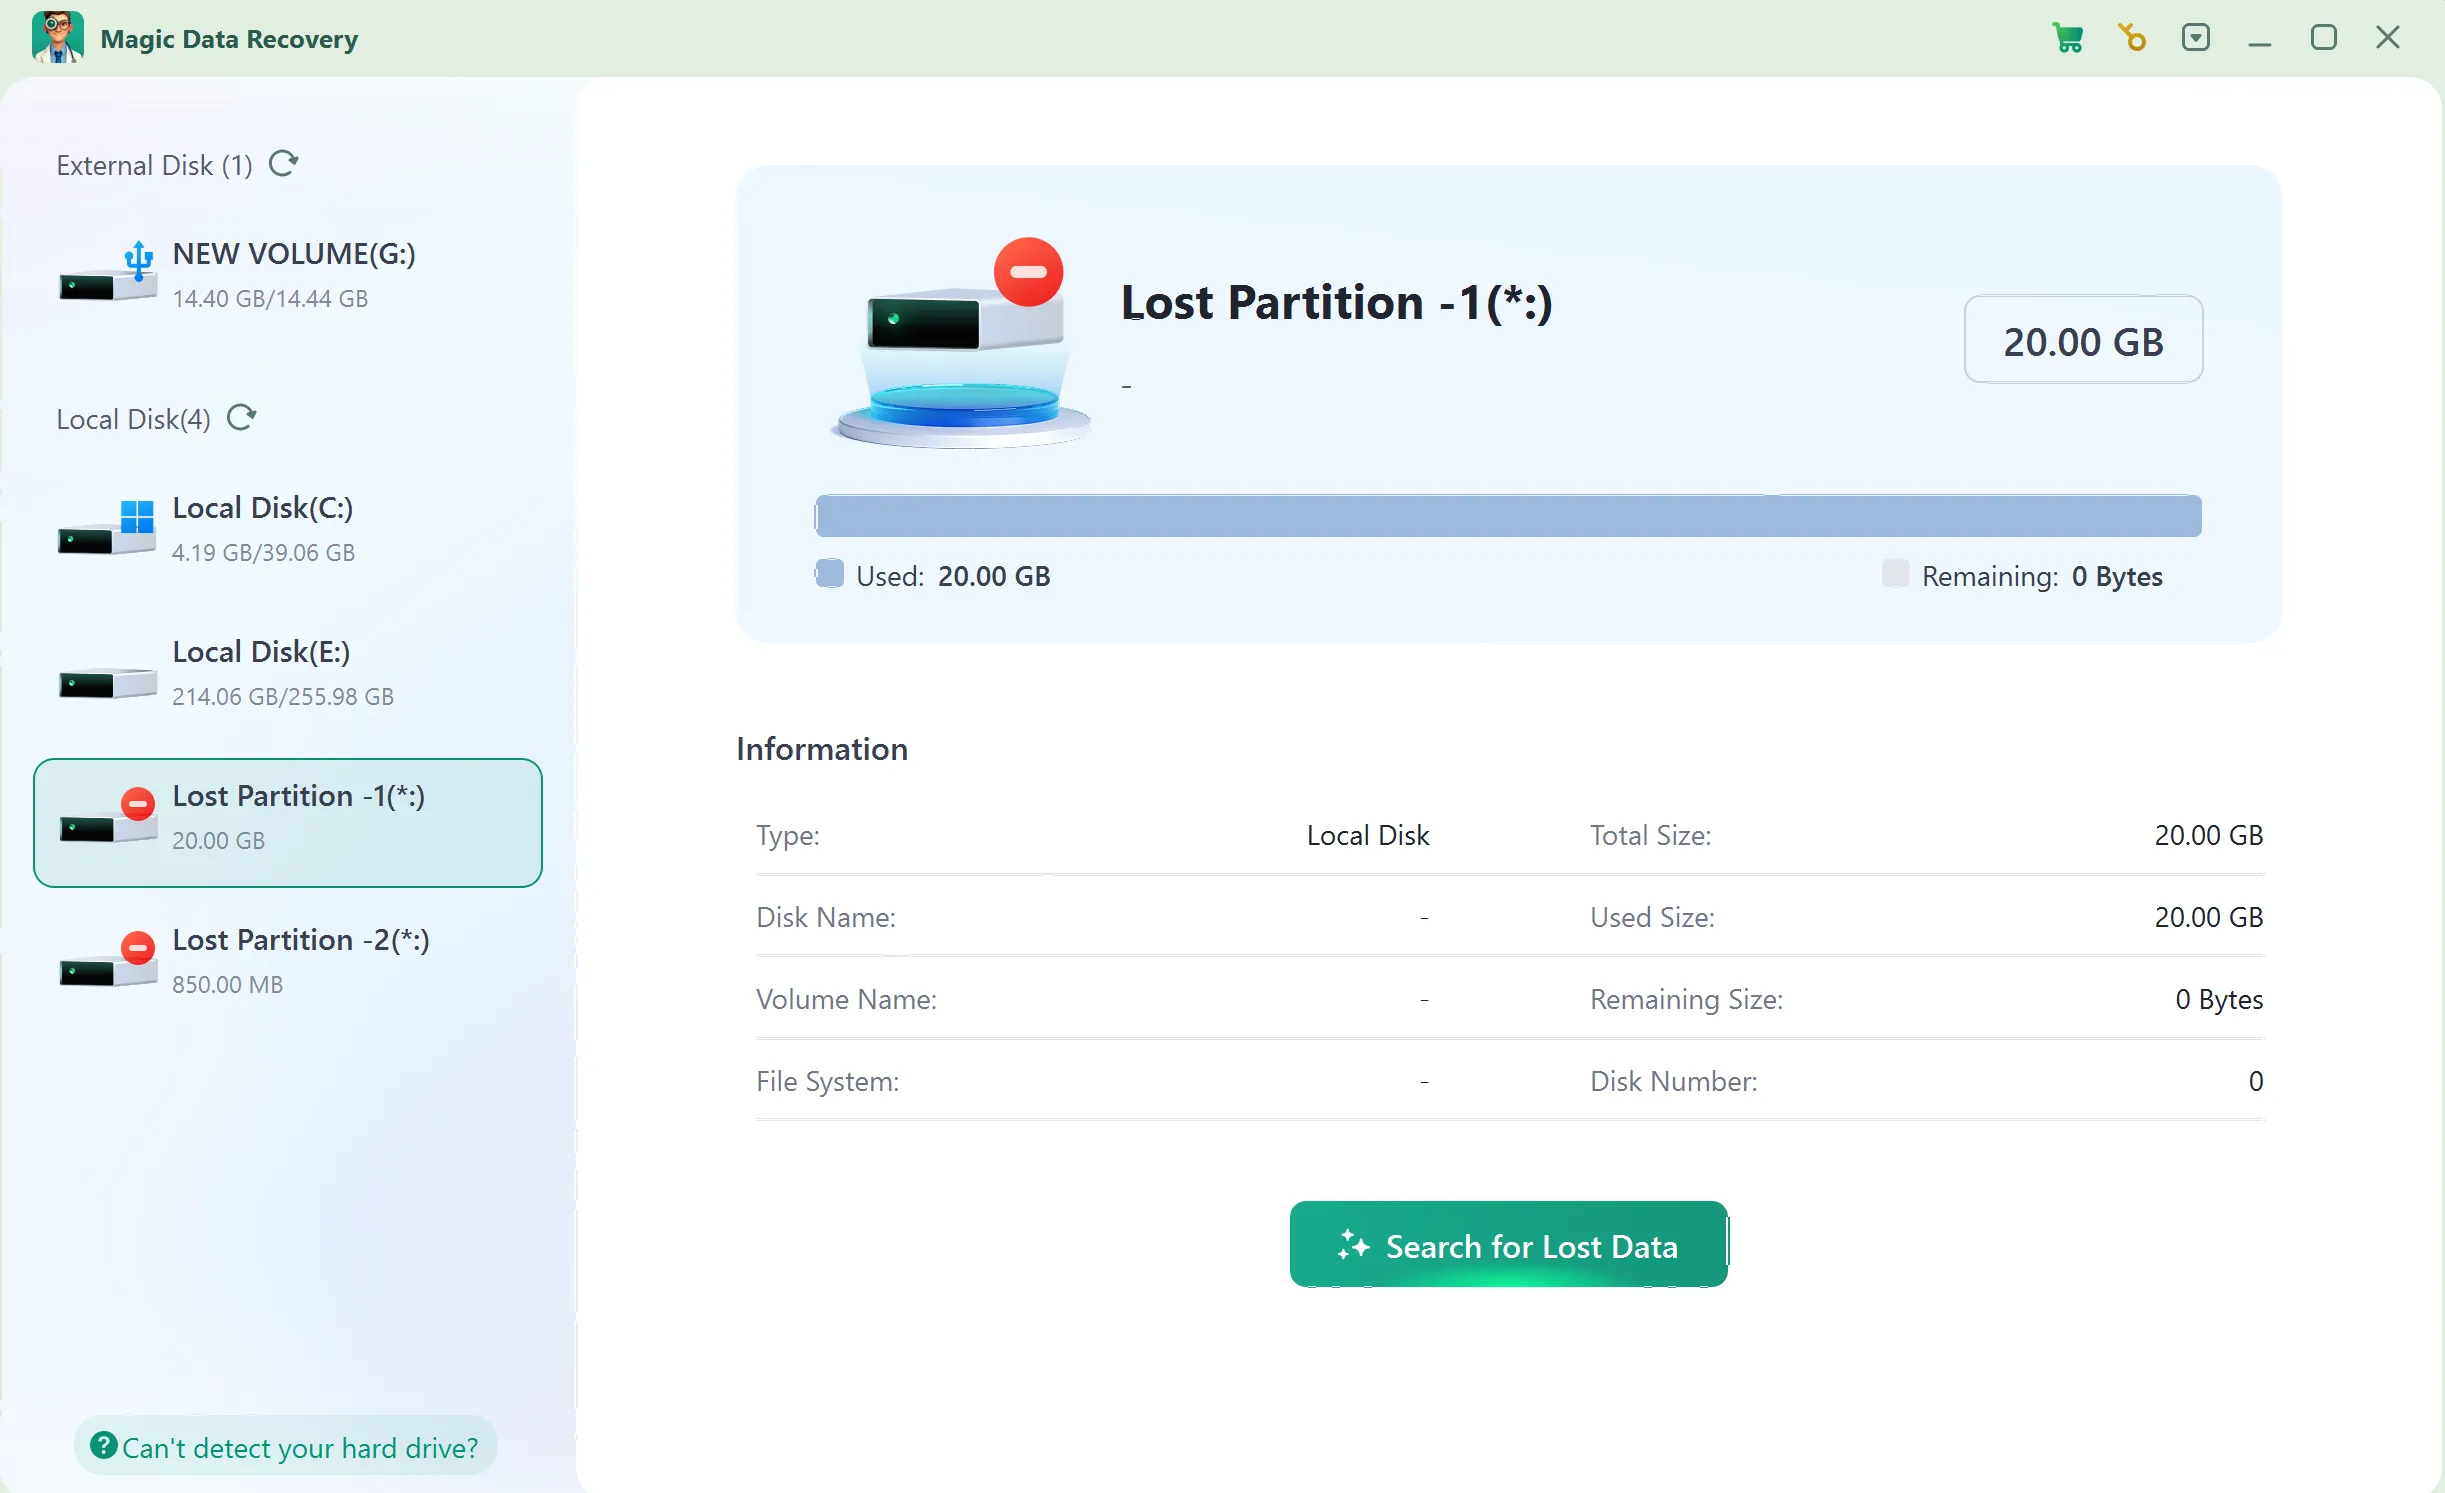
Step 2: Select the ASUS Drive or Partition to Scan
Open the application, identify the original ASUS drive by capacity and label, and start the scan.
Step 3: Scan for Lost or Deleted ASUS Files
Let the scan search for documents, photos, and folders without writing to the source drive.
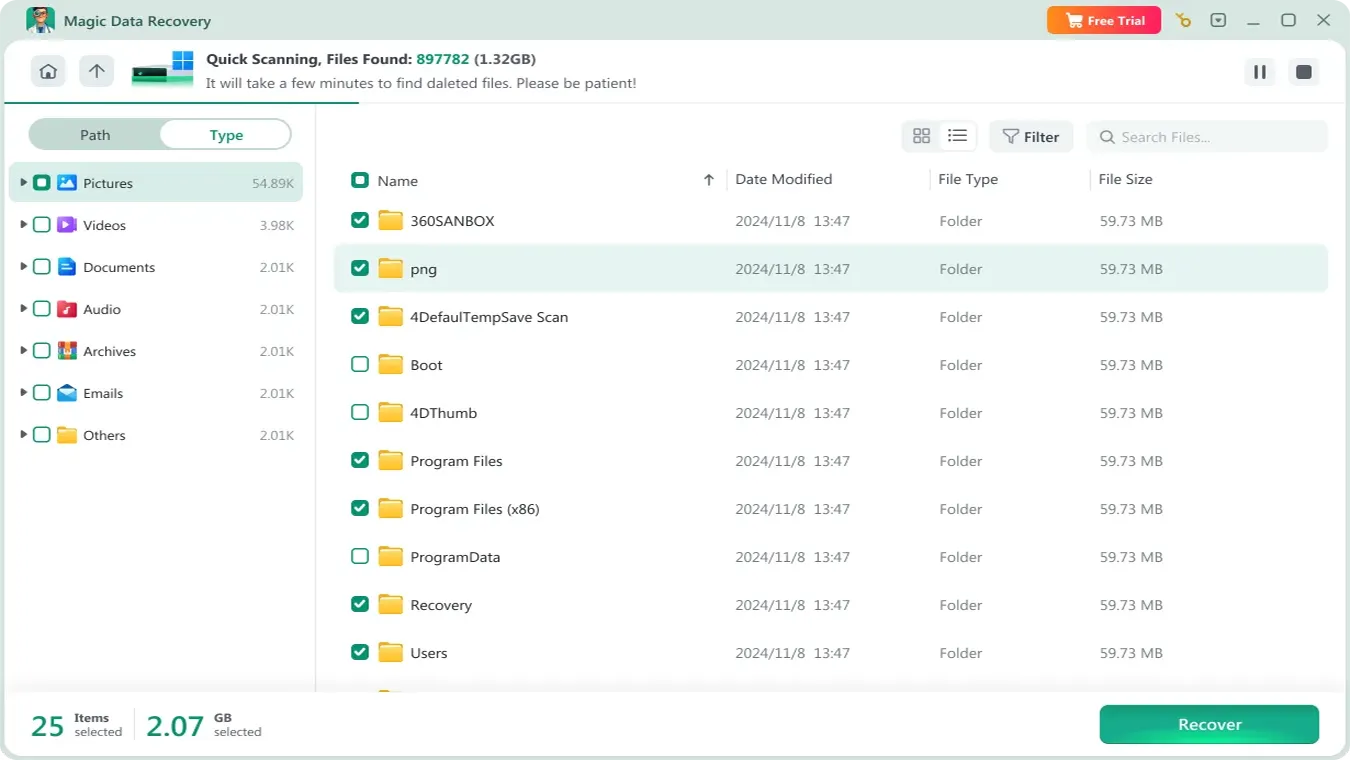
ステップ4:リカバリーの前にファイルをプレビューする
Preview supported documents and images where possible; filenames do not prove file integrity.

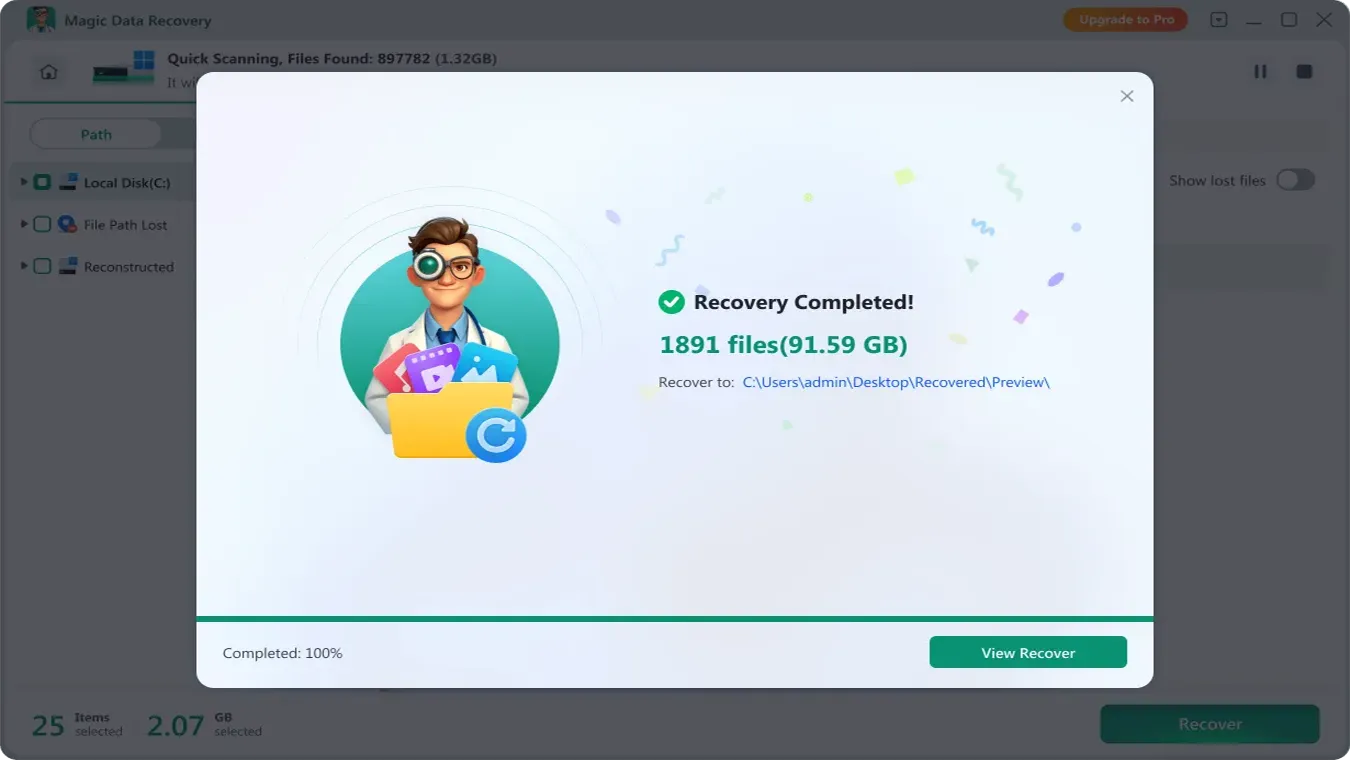
ステップ5:ファイルを安全な場所に復元する
Save selected files to another physical drive, then open the copies to verify them.
Verify ASUS Data Recovery Results Before Repairing Anything
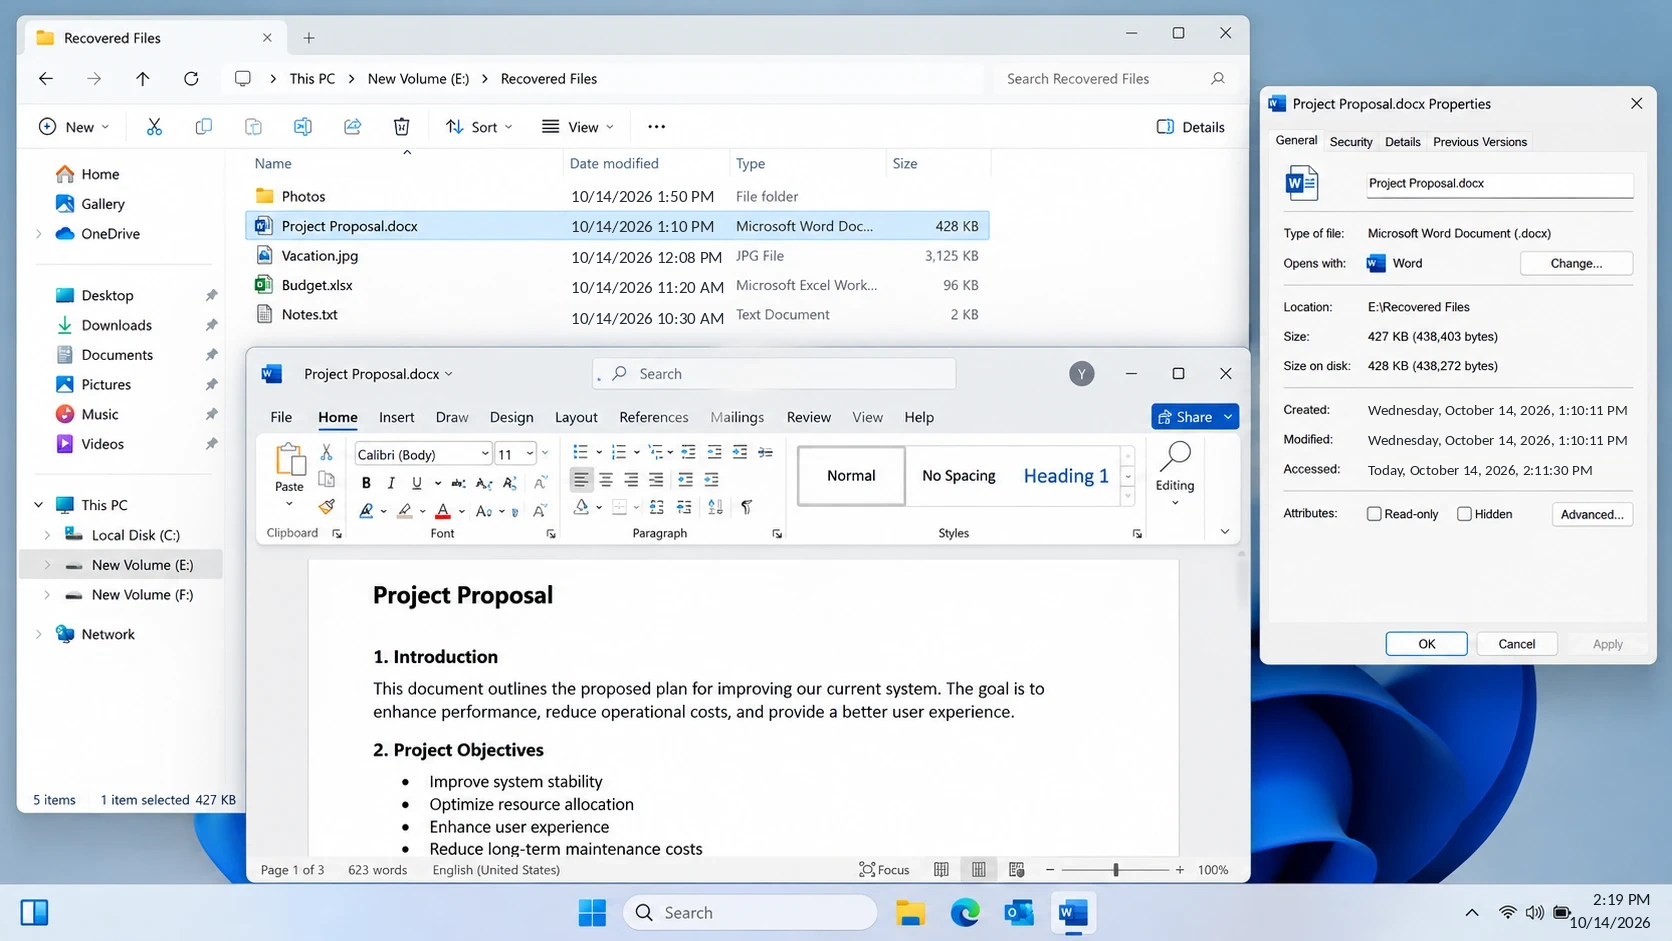
A scan result is not proof of successful ASUS data recovery. Before reusing the source:
- Open several restored files in the applications that created them.
- Check file sizes and contents. A zero-byte document or a photo that will not open needs further investigation.
- Check folder structure and versions. Make sure you recovered the correct project, not just an older namesake.
- Back up verified copies. Store important recovered data in more than one location.
Only then consider file-system repair, reformatting, or Windows reinstallation.
Do Not Confuse ASUS Cloud Recovery with File Recovery
ASUS Cloud Recovery そして ASUS Recovery in WinRE restore Windows, not deleted personal files. ASUS warns that Cloud Recovery erases data on the system storage device, including its partitions.
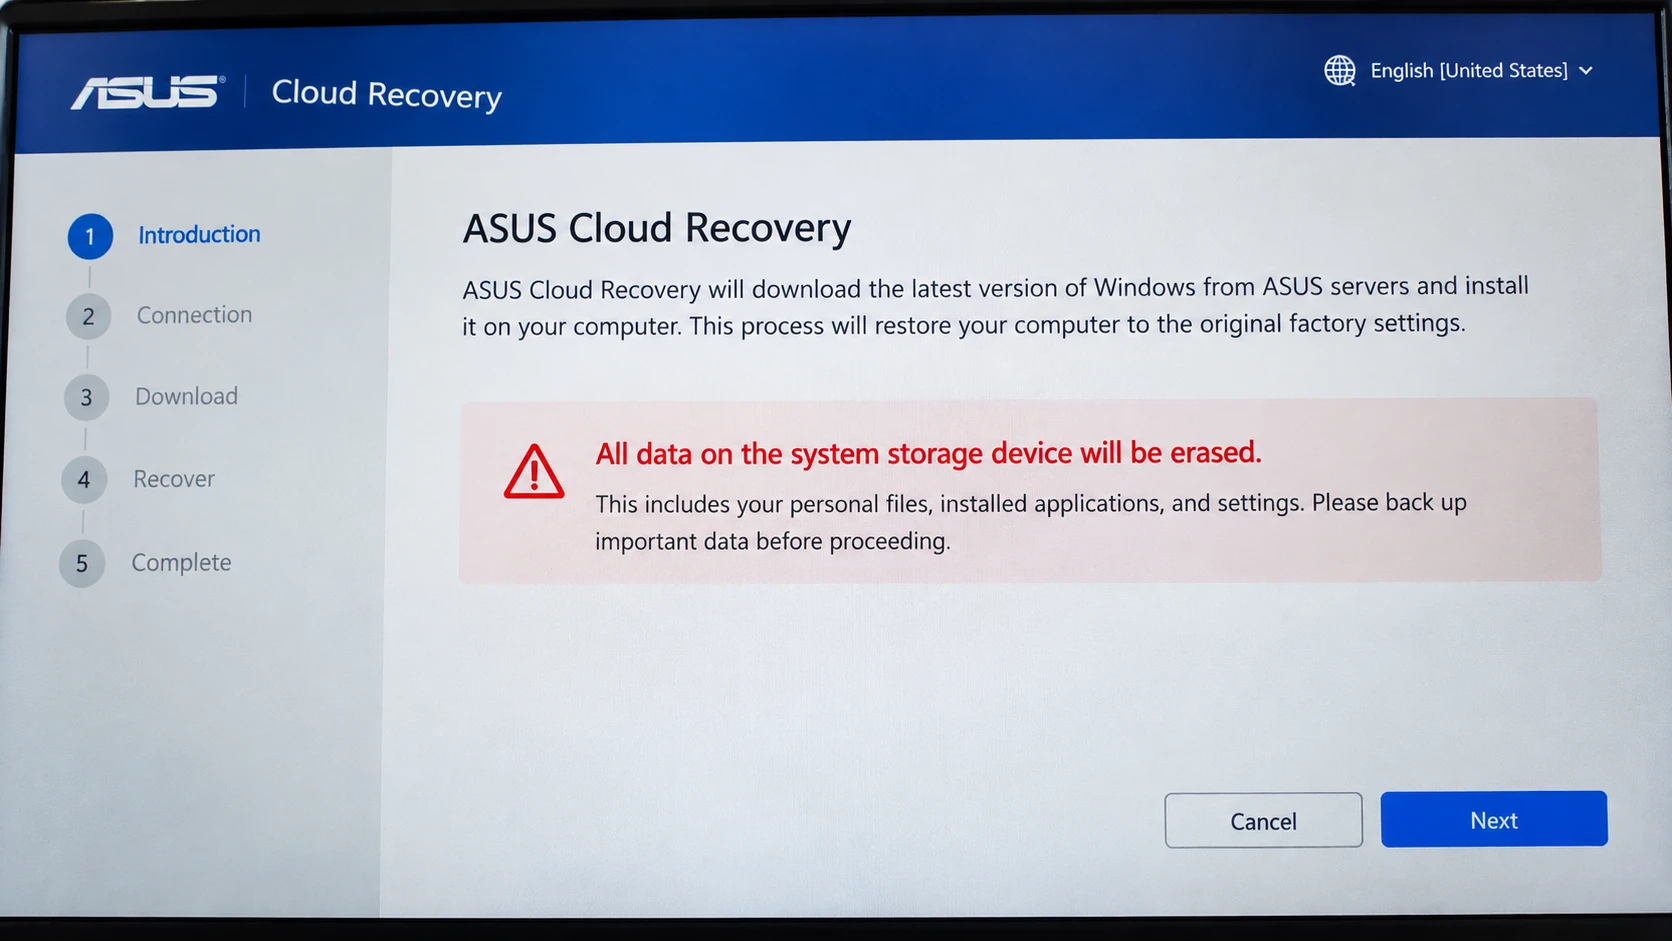
If Windows cannot boot, prioritize files. A healthy drive might be accessible on another computer, but BitLocker requires the correct key. For unstable storage, seek qualified help. Never use a factory reset as an ASUS data recovery shortcut.
DIYによる復旧をいつ中止すべきか
DIYはやめよう ASUS data recovery if a drive clicks, repeatedly disconnects, has worsening read errors, or suffered liquid or impact damage. Seek specialist help when the only copy is irreplaceable.
Repeated scans cannot repair failing hardware. Formatting, initializing, or running CHKDSK before securing files may complicate logical recovery. The correct order: recover, verify, then repair or reuse.
Prevent Future File Loss on ASUS Computers
Reliable backups make future ASUS data recovery emergencies less likely. Once files are safe, reduce dependence on a single SSD or HDD:
- Use independent backups. Keep an external copy of important files in addition to any cloud-synced folder. A 3-2-1 backup approach is a useful target.
- Enable version history where available. File History, OneDrive version history, and application-level recovery features help with different loss scenarios.
- 復元処理を定期的にテストしてください。. Verify that a sample photo, document, and project folder open from the backup.
- 暗号化キーを安全に保管してください。. Store BitLocker recovery information securely and separately from the laptop.
- Back up before major changes. Do this before an ASUS factory recovery, Windows reinstall, partition operation, or drive replacement.
Autosave is not a permanent independent backup.
まとめ
最も安全な ASUS data recovery path depends on the cause. For moved or synced files, find the existing copy. For deletion, check Recycle Bin and backups. If readable storage has no copy, try a scan; if hardware is failing, stop and consult a specialist.
Avoid factory reset, formatting, and CHKDSK before securing data. Verify recovered files and save them away from the source.
内蔵メソッドが失敗したとき、, Magic Data Recovery offers scanning and preview for readable ASUS drives. For related solutions, visit the Hard Drive Recovery Hub.
Windows 7/8/10/11およびWindows Serverをサポート
よくある質問
How long after deletion can ASUS data recovery still work?
Can I recover ASUS files after a full format or factory reset?
Is there a free ASUS data recovery method?
Can I recover data if my ASUS laptop will not boot?
Why is deleted-file recovery difficult on an ASUS SSD?
Can recovery software find an unsaved Word file on ASUS?
Will scanning an ASUS drive erase data, and where should I save recovered files?

バシリイは、この分野で約10年の実務経験を持つデータ復元のスペシャリストです。そのキャリアを通じて、彼は削除されたファイル、フォーマットされたドライブ、失われたパーティション、RAWファイルシステムを含む何千もの複雑なケースの解決に成功してきました。彼の専門知識は、16進エディタなどの専門ツールを使用した手動復元方法と、復元ソフトウェアを使用した高度な自動化ソリューションの両方をカバーしています。バシリの使命は、信頼できるデータ復元知識をITプロフェッショナルと一般ユーザーの双方が利用できるようにし、貴重なデジタル資産を保護できるようにすることです。.