
GNU ddrescue:故障しつつあるドライブからデータを復旧する方法

Windowsでのファイル転送がI/Oエラーで中断したり、Ubuntuではハードドライブは認識されるものの、特定のフォルダを読み込めない場合があります。. GNU ddrescue 状況が悪化する前に、読み取り可能なセクタを保護するのに役立ちます。 ただし、アクセスできないドライブが必ずしも削除されたドライブであるとは限らず、ディスクイメージの作成が完了したからといって、ファイルが復元されたことにはなりません。このガイドでは、問題の診断方法、データの安全なコピー方法、中断された復旧作業の再開方法、および復旧後のファイルへのアクセス方法について説明します。より広範なハードウェアの不具合については、Amagicsoftの ハードドライブ復旧ガイド.
簡単な答え: GNU ddrescue これは、破損または不安定なストレージデバイスから読み取り可能なブロックをディスクイメージや別のディスクにコピーする、無料のコマンドラインユーティリティです。マップファイルを使用して進行状況を追跡し、読み取り不可能な領域の再試行が可能です。このユーティリティは ない 物理的な損傷の修復、個々のファイルの復元、あるいは完全な復旧を保証するものではありません。.
目次
GNU ddrescue を使用する前に:ドライブの状態を確認する
まず、コピーに関する問題なのか、ファイルが欠落している問題なのか、それともハードウェアの故障なのかを見極める必要があります。これらによって、取るべき対処法が異なります。.
観察されるもの | ありそうな状況 | 最も安全な最初の対応 |
ドライブが開き、ファイルは通常通りコピーされます | 健全で読み取り可能なストレージ | 重要なファイルを正常な保存先にコピーする。ddrescueは不要です。 |
ファイルのコピー中にフリーズしたり、I/OエラーやCRCエラーが発生したりする | 読み取り不能なセクタ、または接続が不安定 | 正常に動作することが確認済みのケーブルを一度確認してください。ドライブの状態が安定している場合は、イメージングを検討してください。 |
Windowsでは「RAW」と表示されるが、ハードウェアは安定している | ファイルシステムまたはパーティションの破損 | ディスクの状態を保存し、修復前にコピーを確認する |
削除されたファイルはごくわずかであり、ドライブの状態は正常です | 論理削除 | ファイルの復元を検討する前に、ごみ箱やバックアップを確認してください |
クリック音やガリガリという音がしたり、繰り返し接続が切れたり、容量が正しく表示されない | ハードウェアまたはファームウェアの故障の可能性がある | DIYでのスキャンは中止し、専門のデータ復旧サービスに依頼してください |
検出に関する問題の特定についてさらに詳しい情報が必要な場合は、以下を参照してください。 認識されないハードドライブからデータを復元する方法. 特に、BIOS や Linux で安定して認識されなくなったドライブは、ソフトウェアによる再試行を繰り返す対象としては適していません。.
何をするにしても、まずは原本を保護すること
- 影響を受けているドライブへのファイルの保存、インストール、ダウンロードを中止してください。.
- 読み取りエラーが発生しているディスクに対して、フォーマット、初期化、デフラグ、またはCHKDSKを実行しないでください。.
- 不具合のあるソースを読み書き可能な状態でマウントすることは避け、可能であれば完全にアンマウントしてください。.
- 十分なスペースを確保し、健康的な環境を整えましょう。 総供給能力, 、さらにマップファイル用の別の保存場所も必要です。.
- データがかけがえのないものであり、かつディスクの機械的な状態が不安定な場合は、長時間にわたる復旧作業を行うよりも、作業を中止してください。.
安全規則: まずは復旧を優先し、次にコピーを確認し、重要なファイルであることを確認してから修復を行ってください。その GNU ddrescue 公式マニュアル 同様に、I/Oエラーが発生しているドライブのファイルシステムの修復を行うことについても警告しています。.
GNU ddrescueが実際に復元するもの
GNU ddrescue セクタ単位で動作します。まず読み取り可能な領域から処理を行い、問題のある領域は記録しておき、後で適切なタイミングで再処理を行います。NTFS、FAT32、またはexFATボリュームをコピーする際、その基盤となるセクタをコピーするために、Windowsによるボリュームの認識は必要ありません。.
ワークフローは、以下の3つの用語によって定義されます:
- 出典: ddrescue が読み込む、破損したドライブまたはパーティション。.
- 目的地: コピー先となる正常なディスクイメージファイルまたは物理ディスク。.
- マップファイル: 復旧済み、処理中、および不良な領域を示す簡易な進捗記録です。信頼性の高いストレージに保存し、同じ復旧作業でのみ再利用してください。.
たとえば、画像には破損した500 GBのディスクの大部分が含まれているものの、一部のセクタが欠落している場合があります。これにより多くの文書は保存できますが、特定の文書内の読み取り不能なセクタが原因で、その文書が破損したままになる可能性があります。さらに、SSDのTRIM機能によってすでに削除されたデータは、単にディスクをコピーしただけでは復元されることはありません。.
GNU ddrescue 対 ファイル復元ソフトウェア
タスク | GNU ddrescue | ファイル復元ソフト |
エラーが発生しやすいドライブから読み取り可能なセクタをコピーする | 主な目的 | 必ずしもその目的で設計されたわけではない |
中断後のセクターコピーを再開する | Yes, with a mapfile | 変動あり |
Recover individually deleted files | いいえ | Often, if data remains recoverable |
Interpret damaged file-system metadata | Does not reconstruct files | May locate recoverable files |
Repair failing hardware | いいえ | いいえ |
Therefore, do not use a file recovery scan as a substitute for carefully preserving a failing physical drive. Equally, you do not need ddrescue solely because an otherwise healthy disk lost a few files.
How to Install GNU ddrescue on Ubuntu
On Ubuntu, Debian, or Linux Mint, open Terminal and install the gddrescue package:
sudo apt update
sudo apt install gddrescue
Then confirm that the executable is available:
ddrescue --version
Version note: GNU ddrescue 1.30 was released in January 2026. The version offered by your Linux distribution may differ. In particular, -n とは --no-scrape, while in version 1.30 -N とは --no-sweep (older documentation used -N differently). Check ddrescue --help before adapting commands from older tutorials.
How to Use GNU ddrescue to Create a Disk Image
The commands below are illustrative. They assume /dev/sdb is the failing drive and /mnt/recovery is a directory on a separate, healthy, mounted destination disk. Never paste device names without checking your computer.
Step 1: Identify Source and Destination
走れ:
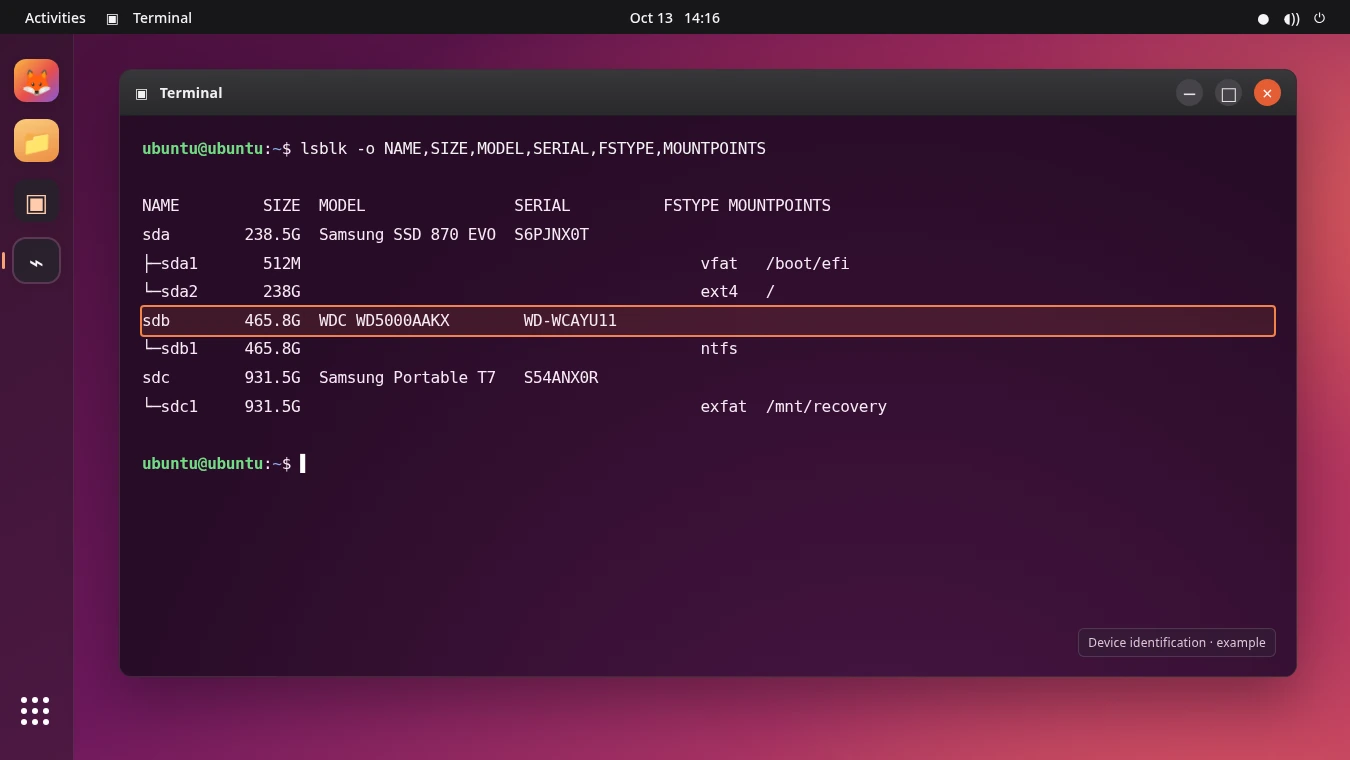
lsblk -o NAME,SIZE,MODEL,SERIAL,FSTYPE,MOUNTPOINTS
Compare the drive sizes, models, and serial numbers. A reboot or reconnection can change names such as /dev/sdb そして /dev/sdc. Next, unmount the failing drive’s partitions. Make sure the destination has free space at least equal to the source’s logical size and supports large image files.
Step 2: Make an Initial Rescue Image
After confirming the mounted destination directory, run:
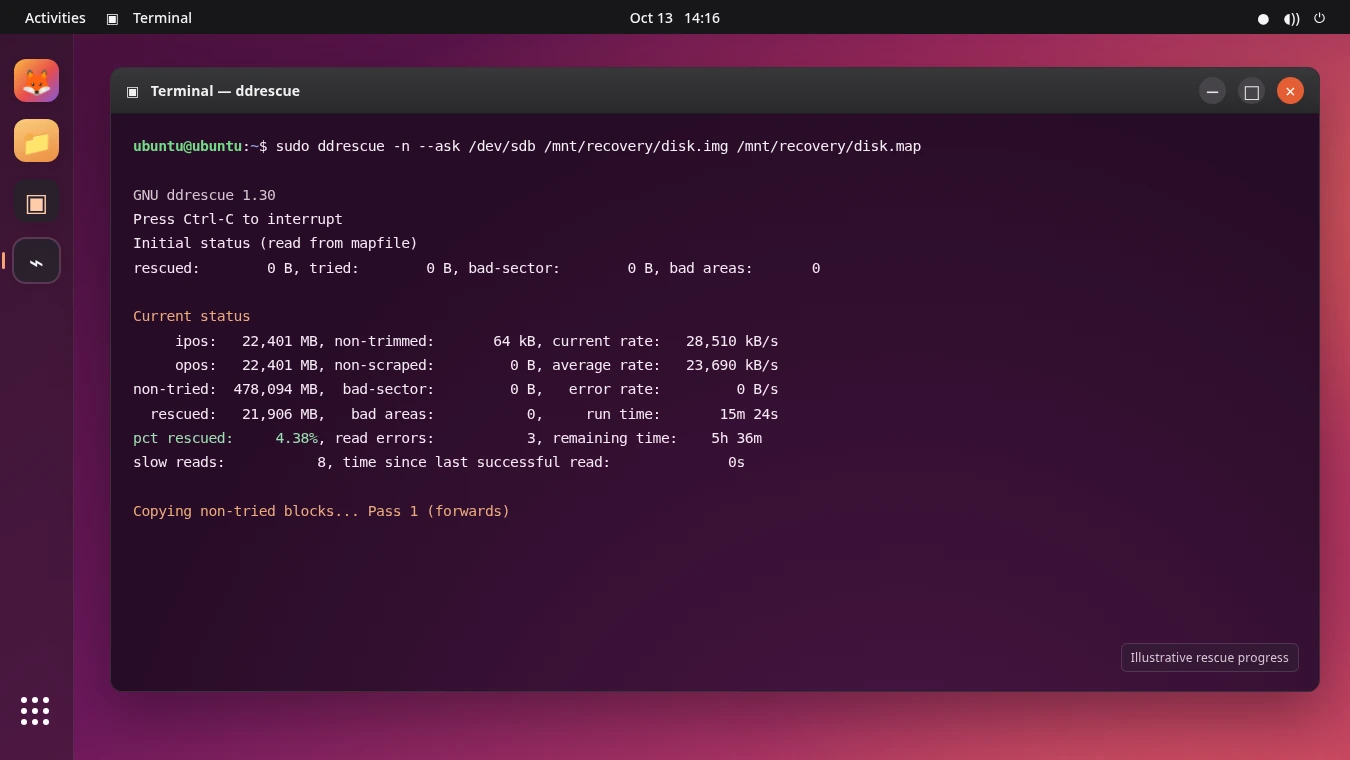
sudo ddrescue -n --ask /dev/sdb /mnt/recovery/disk.img /mnt/recovery/disk.map
ここで、, -n skips the scraping phase, --ask requests confirmation, disk.img stores the copied sectors, and disk.map preserves progress. This initial run favors quicker data collection over laborious scraping. It may still perform other recovery phases; -n する ない mean “copy good sectors only.”
Never save the image or mapfile to the failing source disk. If the destination is another physical disk instead of an image file, the command needs different precautions because that entire output device will be overwritten.
Step 3: Check Progress Before Retrying
一方 GNU ddrescue runs, pay attention to rescued, pct rescued, non-tried, bad-sector, そして 読み取りエラー. A high rescued percentage is useful, but it is ない a percentage of complete documents. Also, repeated disconnects or worsening mechanical symptoms are reasons to stop, not to increase the retry count.
Step 4: Retry Remaining Difficult Areas Only If Stable
If the device remains consistently detectable, you may try a limited additional pass using the same image and mapfile:
sudo ddrescue -d -r2 --ask /dev/sdb /mnt/recovery/disk.img /mnt/recovery/disk.map
-d requests direct input-disk access where supported, and -r2 allows two retry passes over unreadable areas. Direct access may require adjusted sector settings on some devices. Avoid unlimited retries, especially on a worsening drive.
Step 5: Resume After an Interruption
If the computer shuts down or you pause the operation, reconnect everything, verify device identities again, and rerun the original command with the same output and mapfile:
sudo ddrescue -n --ask /dev/sdb /mnt/recovery/disk.img /mnt/recovery/disk.map
The mapfile tells ddrescue which areas it has already copied. Do not delete it, create a new unrelated mapfile, or accidentally switch the source to a different drive.
Can You Run GNU ddrescue on Windows 11?
For physical disk rescue, a Linux live USB is typically more practical than attempting to access Windows drives through an unfamiliar compatibility layer.
- On a healthy computer, prepare a bootable Ubuntu USB.
- Boot the affected computer into Ubuntu’s Try Ubuntu live environment.
- Connect a separate healthy destination, then install
gddrescue必要に応じて。. - Identify the disks with
lsblkand follow the imaging steps above.
Cygwin and some graphical frontends offer other routes, but permissions and raw-device access differ. Also, WSL does not automatically expose every physical Windows disk as /dev/sdX. A tool running inside Windows is not necessarily a direct replacement for a Linux rescue environment.
After Imaging: Check Whether Your Files Are Actually Recoverable
This is the step many tutorials omit. GNU ddrescue finishes copying sectors, but you still need to determine whether the original folders and files survived.
Case 1: Files Open Normally on the Copy
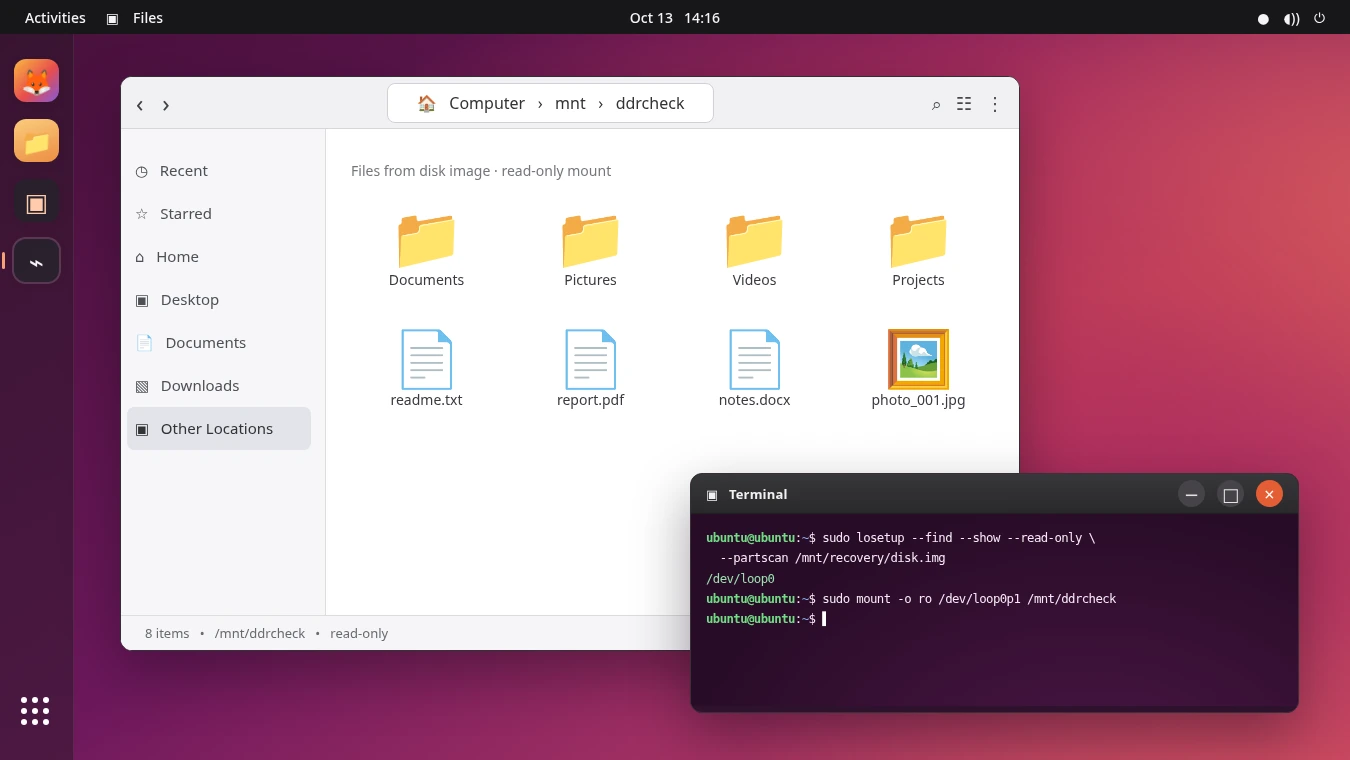
Inspect the image or clone 書き込み禁止 first. On Linux, an experienced user can attach a raw image as a read-only loop device and inspect its partitions. Do not run repair commands on your only image. If files open correctly, copy the valuable ones to a separate healthy destination and verify their contents, not just their filenames.
Case 2: A Partition Appears RAW or Cannot Mount
The copied sectors may be readable even when file-system metadata is damaged. Preserve the master image, investigate on a working copy, and do not accept a Windows prompt to format or initialize the rescued disk. Our RAW drive recovery guide explains why formatting before extracting files can reduce recovery options.
Case 3: Some Files Were Deleted Before the Image Was Made
An image records available sectors; it does not reverse deletion. First check Recycle Bin, File History, and existing cloud or offline backups. If there is no usable copy and the deleted data has not been overwritten or removed by TRIM, file recovery software may help analyze a healthy Windows-recognized clone.
Case 4: The Copy Has Unreadable or Corrupted Files
Compare the original file names, sizes, dates, and important contents. One missing sector may affect part of a document or its file-system record. Consequently, “100% rescued” is not a guarantee of logical integrity, and an incomplete rescue cannot reconstruct data that was never read.
When Is File Recovery Software the Right Next Step?
Use this checkpoint before scanning anything:
チェック | 「はい」の場合 | If no |
Are the files visible and opening on the clone? | Copy and verify them | Continue checking |
Does Recycle Bin, version history, or a backup contain the missing files? | Restore that copy | Continue checking |
Is the original device physically unstable? | DIYでの修理は控えてください | Examine only the healthy clone |
Does Windows reliably recognize the cloned disk? | Consider logical file recovery | Do not assume Windows recovery software can scan it |
Only when the file itself is missing or inaccessible and built-in recovery cannot help should you consider a dedicated file scanner. This is a different job from disk-sector rescue.
Magic Data Recoveryで失われたファイルを復元する
もし GNU ddrescue produced a healthy physical clone that Windows recognizes, but folders or deleted files remain inaccessible, Magic Data Recovery may help locate recoverable documents, photos, videos, and other files on that clone.
Unlike ddrescue’s mapfile-based copying, it scans supported Windows-accessible storage for lost files. It does not repair physical damage, restore overwritten sectors, or guarantee that a file containing unreadable blocks will open. Support for directly scanning a ddrescue .img image should ない be assumed; use this workflow only when the rescued data resides on a recognized disk or partition.
Magic Data Recoveryの使い方
ステップ1: Magic Data Recoveryのダウンロードとインストール
Install the software on a healthy Windows volume, not on the cloned partition containing lost data. Keep the original failing disk disconnected if possible.
Windows 7/8/10/11およびWindows Serverをサポート
Step 2: Select the Healthy Cloned Drive
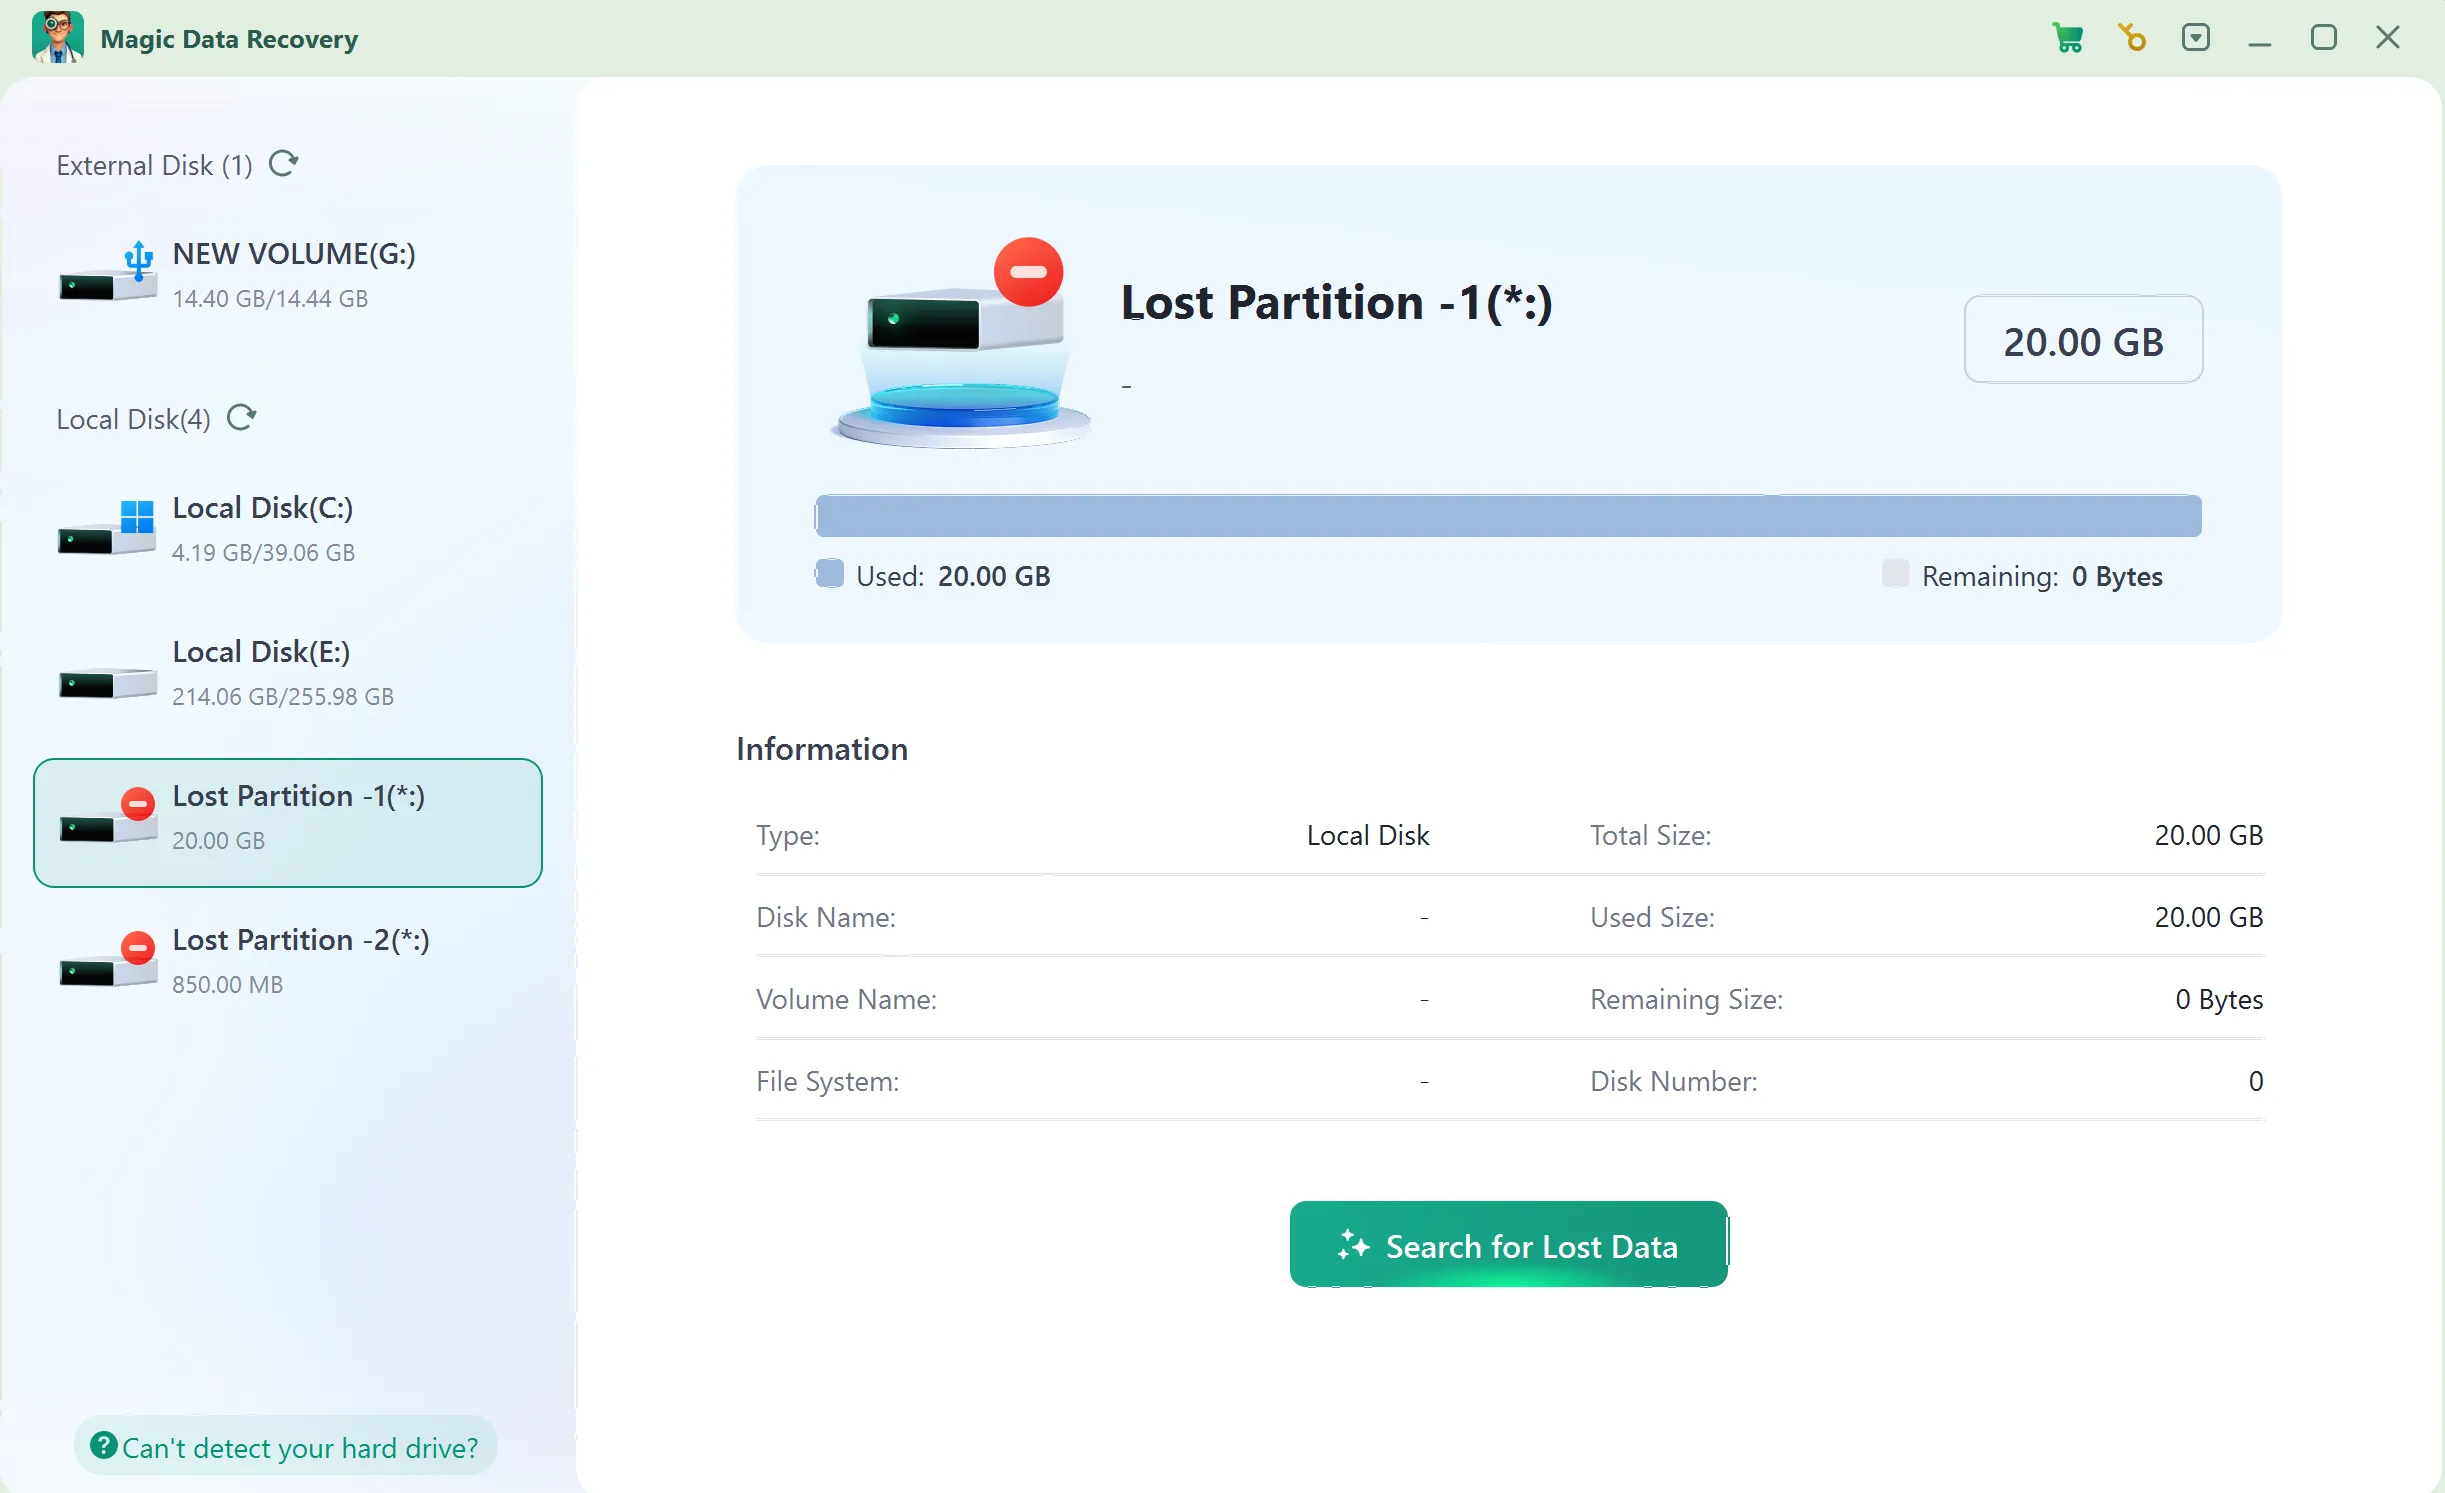
Launch the software and select the Windows-recognized disk clone or partition, not the physically failing source, then start the scan.
Step 3: Scan for Missing Files
Let the scan identify potentially recoverable documents, photos, and other files; results depend on the condition of the copied sectors.
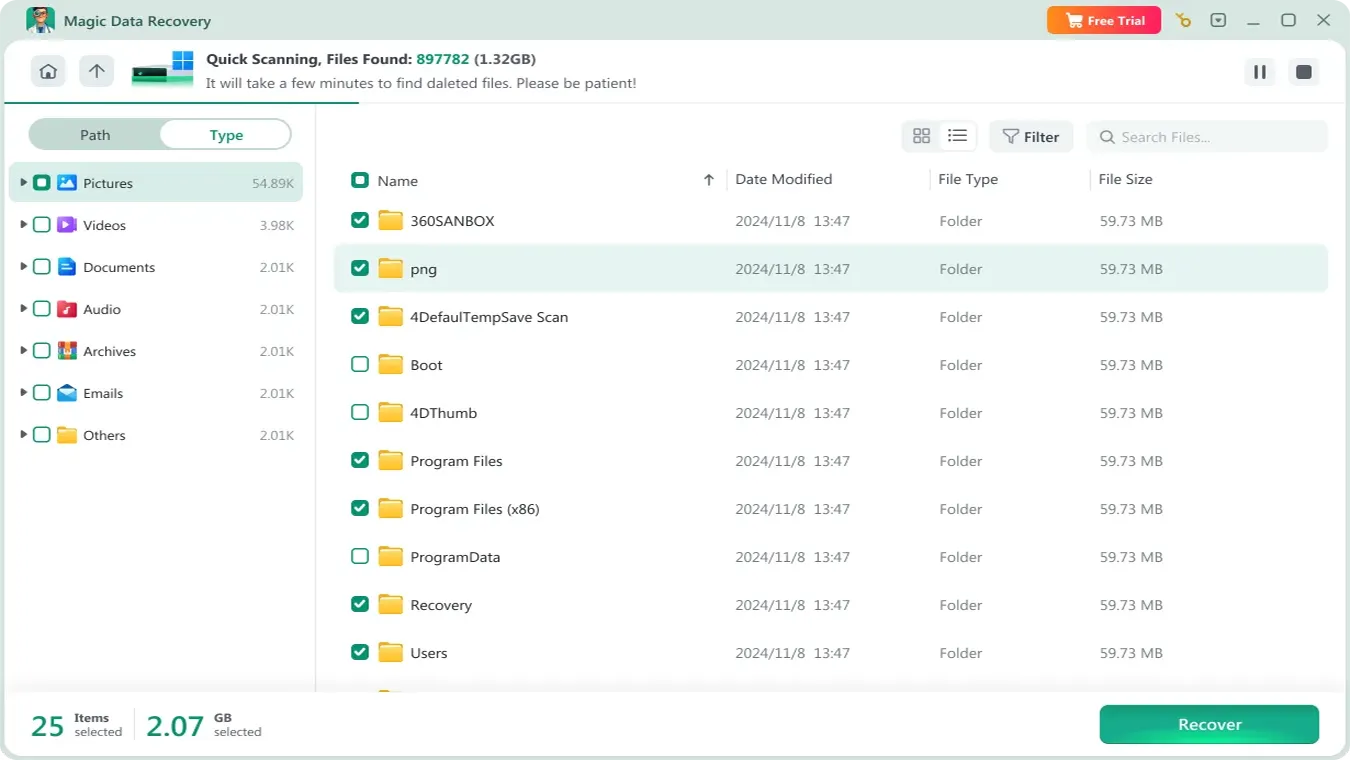
ステップ4:リカバリーの前にファイルをプレビューする
Where preview is available, open a sample to check that its contents are recognizable; not every damaged file can be previewed.

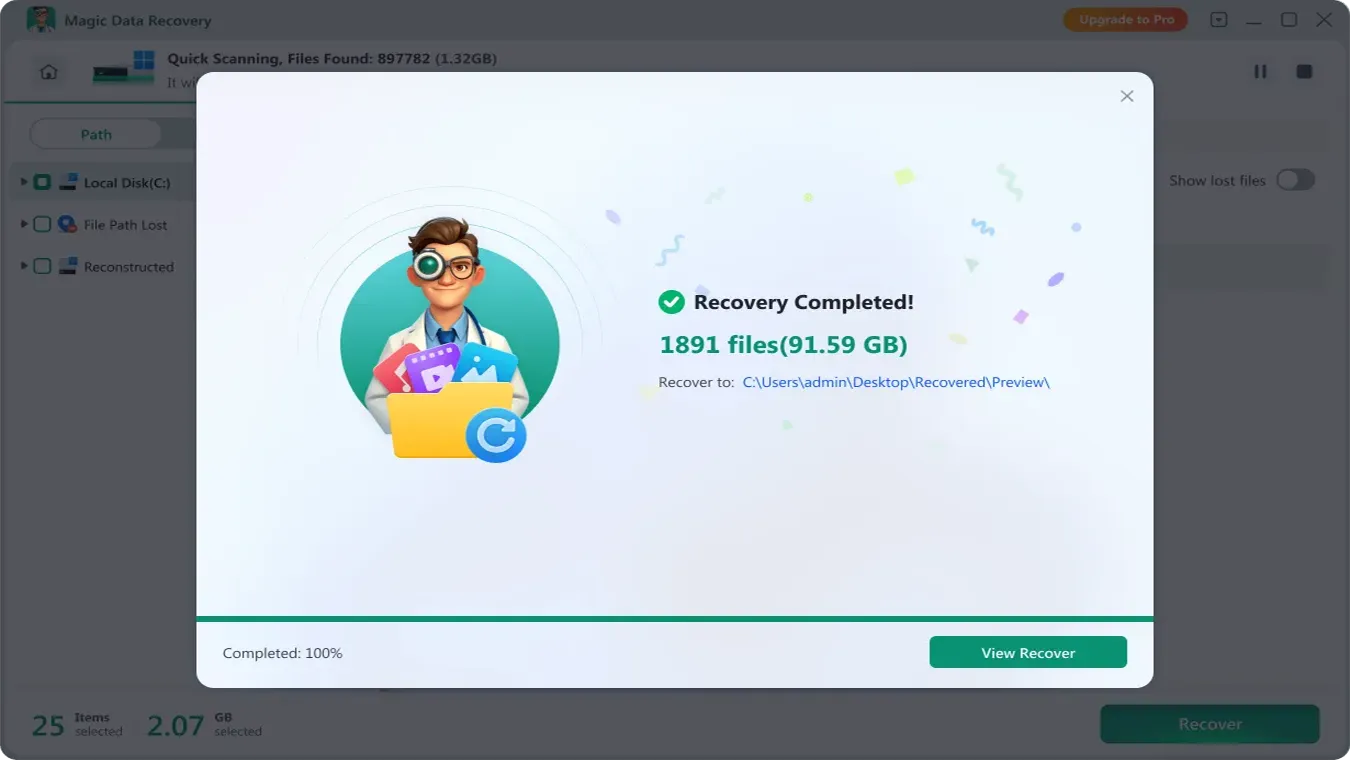
ステップ5:ファイルを別のドライブに復元する
Save selected results to a separate healthy disk, not back to the clone, and verify the recovered files in their normal applications.
What If GNU ddrescue or File Recovery Fails?
First, check whether you selected the correct source and whether the missing data was ever present on that device. Next, retain the image and mapfile so you do not lose progress. If the clone is readable but the file system is not, investigate its structure on a duplicate image rather than repeatedly modifying the master.
However, if an SSD has discarded deleted blocks through TRIM, or new data has overwritten them, more software scans cannot recreate the original content. Likewise, if a hard disk clicks, disconnects, or becomes progressively less readable, discontinue retries and ask a qualified lab about professional imaging.
Prevent Another Emergency Rescue
- Maintain an independent backup with periodic restore checks; synchronization alone may copy accidental deletions.
- Watch for unusual drive noises, read errors, and changing SMART indicators, but avoid lengthy tests on a clearly failing disk.
- Label critical drives and keep notes on drive model and serial number to prevent source/destination mistakes.
- Store rescue images and their matching mapfiles together on healthy storage.
- Replace unstable drives after extracting and verifying important data; imaging is not hardware repair.
For more context on storage defects, see how to fix bad sectors on a hard drive—but complete data rescue before any repair attempt.
まとめ
GNU ddrescue is most useful when a readable but failing drive cannot complete ordinary file copies. Diagnose the symptoms first, protect the original disk, produce a sector-level image with a mapfile, and verify real file contents on the copy. If folders open and your files are intact, no additional recovery tool is necessary.
If the healthy clone still contains deleted or logically inaccessible files, Magic Data Recovery offers a separate Windows file-recovery step—not a replacement for careful imaging. For related drive-specific guidance, visit our hard drive recovery hub.
Windows 7/8/10/11およびWindows Serverをサポート
よくある質問
GNU ddrescueは主にどのような用途に使われますか?
GNU ddrescue では、完全に削除されたファイルを復元できますか?
ddrescueのマップファイルを紛失してしまった場合はどうなりますか?
GNU ddrescueはWindows 10および11で動作しますか?
「100%が復旧した」ということは、すべてのファイルが開けるようになるということですか?
ddrescue の -n オプションと -N オプションの違いは何ですか?
-n とは --no-scrape, これは詳細なスクレイピングの段階を省略する一方で、 -N とは --no-sweep, これによりスイープフェーズを回避できます。以前のリリースでは -N 異なります。そのため、古いチュートリアルからコマンドをそのままコピーすると、ddrescue が問題のある領域を処理する方法が変わってしまう可能性があります。これらのオプションを使用する前に、必ずローカルにインストールされているバージョンとヘルプの出力を確認してください。.ddrescueは、TRIM実行後のSSDからファイルを復元できますか?

バシリイは、この分野で約10年の実務経験を持つデータ復元のスペシャリストです。そのキャリアを通じて、彼は削除されたファイル、フォーマットされたドライブ、失われたパーティション、RAWファイルシステムを含む何千もの複雑なケースの解決に成功してきました。彼の専門知識は、16進エディタなどの専門ツールを使用した手動復元方法と、復元ソフトウェアを使用した高度な自動化ソリューションの両方をカバーしています。バシリの使命は、信頼できるデータ復元知識をITプロフェッショナルと一般ユーザーの双方が利用できるようにし、貴重なデジタル資産を保護できるようにすることです。.