
How to Recover Unsaved Excel File
You finish updating an Excel spreadsheet, close the window, and realize you clicked “Don’t Save.” Or perhaps Excel crashes just before you complete an important report. When you reopen the program, the latest changes have disappeared, and the Document Recovery pane shows nothing.
Before assuming your work is permanently lost, remember that a missing Excel workbook isn’t necessarily a deleted file. Excel may have retained an AutoRecover copy, the original workbook might exist in another folder, or OneDrive could contain an earlier version.
The best way to recover an unsaved Excel file is to identify what actually disappeared. This guide covers eight recovery methods, starting with Excel’s built-in features and moving through temporary files, cloud versions, and backups. If the workbook itself has vanished from storage, you’ll also learn when disk-level recovery becomes appropriate. For more document-related solutions, visit our Document Recovery Guide.
Table of Contents
Before You Start: Protect Your Excel Recovery Files
A few unnecessary actions can make recovery harder. For example, clearing temporary folders after an Excel crash might remove a recovery copy that still contains your work.
Before troubleshooting:
- Don’t clear temporary folders. Avoid Disk Cleanup or third-party cleaning utilities until you’ve checked Excel’s recovery locations.
- Preserve existing versions. If Excel opens a recovered workbook, save a separate copy rather than immediately overwriting the original.
- Keep file locations unchanged. Avoid moving or renaming folders while searching for missing workbooks.
- Check external storage. Reconnect the USB drive or external disk where you originally saved the file.
- Minimize writes to affected drives. If you suspect accidental deletion, new data could overwrite recoverable content.
If your missing work is still visible in an open Excel window, save it immediately. You don’t need a recovery tool while the data remains accessible.
Quick Diagnosis: What Happened to Your Excel File?
Not every missing Excel workbook requires the same recovery method.
Start by matching your symptoms to the most likely cause.
What You See | Likely Cause | Best Solution |
New workbook closed without saving | Unsaved session | Recover Unsaved Workbooks |
Excel crashed and recent edits vanished | Interrupted editing session | Document Recovery |
Existing workbook opens without recent changes | Unsaved modifications | Manage Workbook |
Recovery pane is empty | Missing or unavailable AutoRecover copy | Recovery folders |
Workbook isn’t in Recent but may still exist | Changed file location | File Explorer search |
Workbook opens but external links fail | Broken source path | Change Source |
OneDrive workbook contains incorrect data | Version or sync issue | Version History |
Previously saved workbook was deleted | Actual file loss | Recycle Bin, backups, or storage recovery |
An unsaved workbook and a deleted workbook are not the same problem.
A new workbook may depend entirely on recovery information created by Excel. A previously saved workbook already existed on storage, so backups or data recovery software may offer additional options.
Also, the Recent list only provides shortcuts to files you’ve opened. A missing entry doesn’t prove that Windows deleted the workbook.
How to Recover an Unsaved Excel File: 8 Methods
The following instructions primarily apply to Excel for Windows, including Microsoft 365 and commonly used desktop versions of Excel 2016–2024. Menu names may vary slightly.
Start with the method that matches your situation rather than trying every option in order.
Method 1: Recover Unsaved Excel Files Using AutoRecover
Best for: A brand-new workbook that you closed without saving.
Excel provides a built-in feature called Recover Unsaved Workbooks. It searches for retained recovery copies, even when you never assigned the workbook a filename.
Steps:
- Open Microsoft Excel.
- Go to File > Info.
- Select Manage Workbook or Manage Document, depending on your version.
- Click Recover Unsaved Workbooks.
- Review the available files and their modification times.
- Open the workbook that matches your lost session.
- Select Save As to preserve the recovered data.
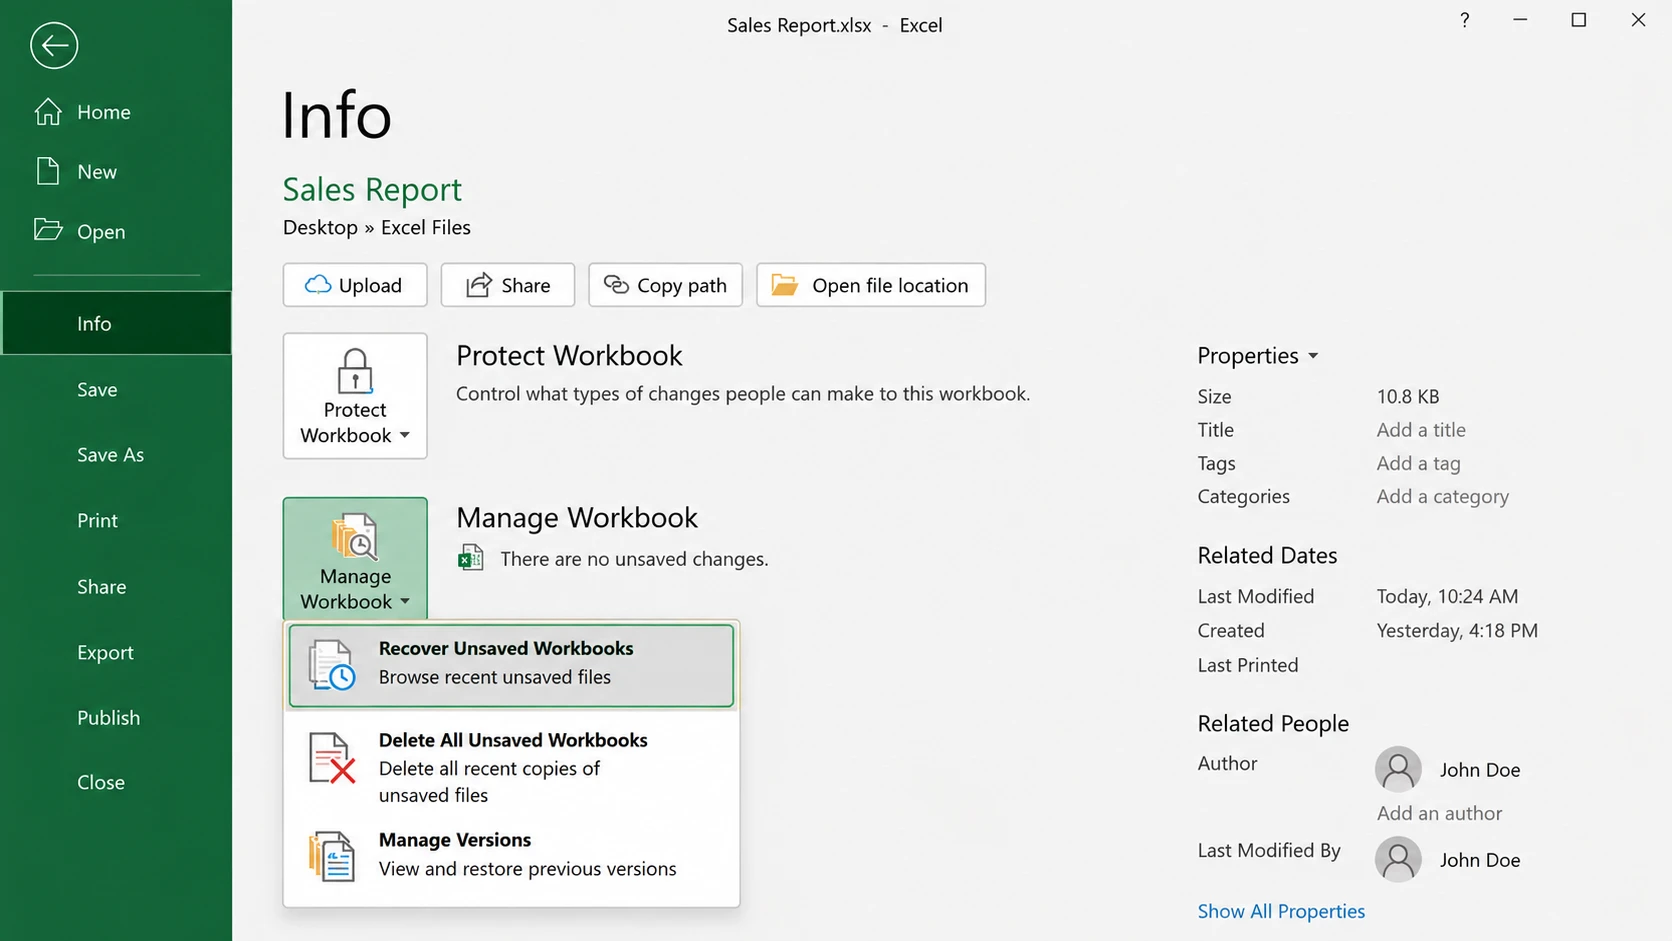
For example, suppose you spent 40 minutes organizing customer records and accidentally selected “Don’t Save” when closing Excel.
If Excel retained a recovery copy, this feature may restore some or all of that session.
Expected result: A temporary workbook version that you can open and save as a normal Excel file.
Limitation: This method only works when Excel created and retained usable recovery information. The recovered copy may not contain your final edits.
Microsoft provides additional details in its official Office file recovery guide. If the recovery window is empty, continue with the next methods.
Method 2: Recover Excel Files After a Crash with Document Recovery
Best for: Unexpected Excel crashes, power failures, or forced Windows restarts.
When Excel closes abnormally, it may display the Document Recovery pane the next time you launch the application.
This pane lists available recovery versions and their timestamps.
Steps:
- Restart Excel after the crash.
- Look for the Document Recovery pane.
- Review the listed workbook versions.
- Open the version closest to your lost editing session.
- Check whether important worksheets and formulas remain intact.
- Save the recovered workbook under a new filename.
Imagine editing a financial forecast when your computer suddenly restarts. Excel might retain a version from several minutes before the interruption.
That copy could preserve most of your calculations, even if the latest adjustments are missing.
How to choose the correct recovery version
If Excel lists several copies, check:
- Timestamp: Does it match your last editing session?
- File size: Does the workbook appear unusually small?
- Worksheet content: Are the expected sheets and records present?
- Formulas: Do important calculations still return valid results?
Don’t replace the original workbook until you’ve checked the recovered version.
For detailed instructions, see our Excel Document Recovery pane guide.
Limitation: If Excel never created a usable recovery copy, the Document Recovery pane cannot reconstruct your missing changes.
Method 3: Restore Unsaved Changes to an Existing Excel Workbook
Best for: A previously saved workbook whose latest edits disappeared.
This situation differs from losing a new workbook. Your original spreadsheet still exists, but recent changes are missing.
Excel may have retained an AutoRecovered version of those edits.
Steps:
- Open the original Excel workbook.
- Navigate to File > Info.
- Look under Manage Workbook.
- Find a version labeled “(when I closed without saving)”, if available.
- Open the version and examine its contents.
- Choose Restore if appropriate, or save a separate copy first.
For example, you might update a monthly budget, close Excel without saving, and later discover that the workbook still contains yesterday’s figures.
If Excel retained a suitable version, you may recover the missing edits without rebuilding the spreadsheet.
Expected result: An earlier recovery state containing some of your recent changes.
Limitation: Excel doesn’t retain every editing session. Some workbooks may have no available recovery versions.
If you accidentally saved new content over an existing workbook, that is an overwrite problem rather than an ordinary unsaved session. Our recover overwritten Excel file guide covers that scenario.
Method 4: Find the Excel AutoRecover File Location Manually
Best for: Recovery copies that don’t appear in Excel’s recovery interface.
Sometimes the recovery window is empty even though a temporary workbook copy remains in a local folder.
A common unsaved Excel file location on Windows is:
%localappdata%\Microsoft\Office\UnsavedFiles
You can inspect this folder directly.
Steps:
- Press Windows + R.
- Paste the path above.
- Press Enter.
- Sort the files by Date modified.
- Look for files created around the time your work disappeared.
- Copy promising files to a separate folder.
- Try opening those copies in Excel.
Another location worth checking is:
%appdata%\Microsoft\Excel
However, Excel doesn’t always use the same recovery folder.
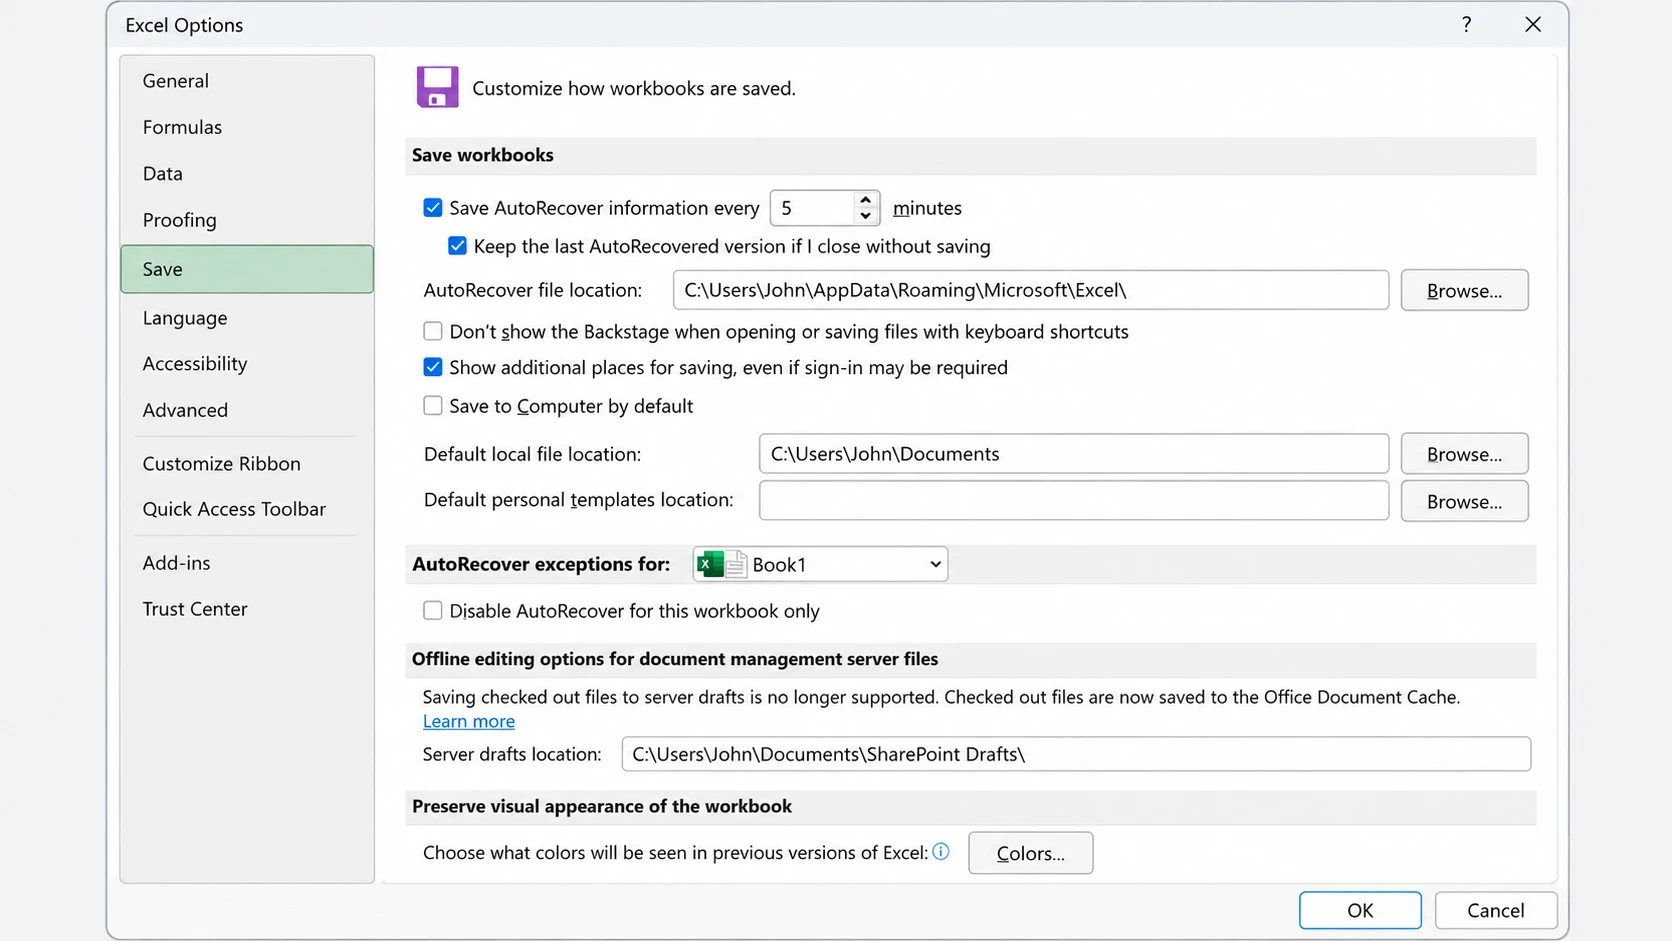
How to find your configured AutoRecover location
- Open Excel.
- Select File > Options > Save.
- Find AutoRecover file location.
- Copy the displayed path.
- Open that location in File Explorer.
Depending on the recovery mechanism and Excel version, workbook copies may use different filenames and extensions, including .xlsb. Don’t search only for .xlsx files.
What if several recovery files exist?
Compare their timestamps, sizes, and contents. Open copies rather than editing the original recovery files. For more location-specific guidance, read our Excel Auto Recovery File Location guide.
Limitation: An empty folder doesn’t automatically mean the workbook was deleted. Excel may have used another location, removed the temporary information, or never created a recovery copy.
Method 5: Search for Missing Excel Files and Repair Broken Paths
Best for: Workbooks missing from Recent, files saved to unexpected folders, or Excel documents with broken external links.
Before treating a spreadsheet as deleted, check whether Windows can still locate the original file.
Search for the actual workbook
- Open File Explorer.
- Check Documents, Desktop, Downloads, OneDrive, and your usual work folders.
- Search for the workbook name or part of its name.
- Try extensions such as
*.xlsx,*.xls,*.xlsm, and*.xlsb. - Sort results by Date modified.
If you originally saved the workbook to a USB drive or external disk, reconnect that device and confirm that Windows recognizes it.
Also check File > Open > Recent in Excel. Even when a shortcut no longer works, it may reveal the previous filename or location.
If you find the workbook, open it and save a verified copy. You don’t need disk recovery software.
Fix broken links to other Excel workbooks
Sometimes the workbook itself opens correctly, but Excel displays a warning about unavailable linked data.
This usually means the source workbook was moved, renamed, or disconnected.
In current Windows versions of Excel, you can check workbook links using:
- Open the affected workbook.
- Go to Data > Queries & Connections > Workbook Links.
- Identify the source workbook that Excel cannot locate.
- Select the More Commands (…) menu beside the source.
- Choose Change source.
- Browse to the correct workbook and select it.
Some older Excel interfaces use Data > Edit Links instead.
Important: Don’t select Break Links when you’re trying to reconnect a missing source. Breaking a workbook link can replace linked formulas with their current calculated values.
If the source workbook still exists, correcting its path is usually safer than attempting file recovery. Microsoft documents these procedures in its Manage Workbook Links guide.
Search temporary Excel files
If you still can’t locate the missing workbook, check the Windows temporary folder.
A common temporary Excel files location is:
%temp%
Steps:
- Press Windows + R.
- Type
%temp%and press Enter. - Switch File Explorer to Details view.
- Sort files by modification date.
- Inspect files created around the time Excel closed.
- Copy plausible temporary files before attempting to open them.
You may find .tmp files or other application-generated files.
However, not every temporary file contains workbook data.
Files beginning with ~$ are commonly Excel owner or lock files rather than complete spreadsheet backups. Similarly, renaming a random .tmp file to .xlsx cannot convert invalid data into a usable workbook. For more troubleshooting, see our guide to recovering files from the Temp folder.
Method 6: Recover Excel Files with OneDrive Version History
Best for: Excel workbooks stored in OneDrive or SharePoint.
If you use Microsoft 365, AutoSave may automatically save changes to supported cloud-stored workbooks.
Version History can also retain earlier versions of those files.
Steps:
- Open OneDrive or the relevant SharePoint document library.
- Locate the Excel workbook.
- Right-click the file and select Version history.
- Review the available versions and timestamps.
- Open the version you want to inspect.
- Restore it or preserve a separate copy when possible.
For example, imagine several colleagues editing a quarterly sales forecast. Someone accidentally replaces an important formula, and the workbook starts producing incorrect totals.
Instead of searching local temporary folders, you can review Version History for a copy saved before the change.
AutoSave vs. AutoRecover
These features protect different parts of your workflow.
Feature | AutoSave | AutoRecover |
Main purpose | Automatically save cloud-file changes | Preserve recovery information |
Typical storage | OneDrive or SharePoint | Configured recovery location |
Saving behavior | Saves changes as you work | Saves at intervals |
Main recovery use | Earlier cloud versions and saved changes | Interrupted editing sessions |
AutoSave doesn’t guarantee that every historical state will remain available forever. Version retention depends on the service and its configuration.
What if OneDrive shows the wrong version?
Before restoring or editing the workbook:
- Confirm you’re signed into the correct Microsoft account.
- Check the workbook’s cloud folder and filename.
- Examine OneDrive’s synchronization status.
- Review Version History before replacing any existing file.
- Preserve a separate copy of the version you want to keep.
A red synchronization error icon may indicate that OneDrive couldn’t upload or download changes.
Likewise, a blue cloud icon beside a file generally indicates that the file is available online rather than fully stored locally. That doesn’t mean the document was deleted.
If the local and cloud copies differ, avoid overwriting either one until you’ve identified the correct version. Microsoft explains these distinctions in its OneDrive file status guide.
Limitation: Version History requires an existing cloud-stored workbook and retained versions. It cannot recreate a brand-new local workbook that was never saved.
Method 7: Restore Excel Files from the Recycle Bin or Windows Backups
Best for: Previously saved workbooks that were deleted, moved, or replaced.
If your Excel file existed before it disappeared, Windows may have another recoverable copy.
Option A: Check the Recycle Bin
- Open the Recycle Bin.
- Search for the missing workbook.
- Confirm its filename and original location.
- Right-click the matching file.
- Select Restore.
Windows normally returns the file to its original location.
However, files removed with Shift + Delete or deleted from certain removable devices may not appear in the Recycle Bin.
Option B: Use Windows Previous Versions
If File History or a compatible backup was active before the loss:
- Open the workbook’s original folder.
- Right-click the file or folder.
- Select Restore previous versions, or open the Previous Versions tab if available.
- Examine the available backup dates.
- Open a suitable version to verify its contents.
- Restore the file, preferably to a separate location.
For example, if an important workbook disappeared during folder cleanup, File History may contain an earlier backup.
Important: A backup only helps when it includes the workbook or relevant recovery data.
A backup created after deletion may not contain the missing version.
Similarly, these methods cannot reconstruct a new spreadsheet that never existed on storage.
If you confirmed that the workbook was deleted rather than merely left unsaved, our Deleted Excel File Recovery guide explores additional solutions.
Deletion Checkpoint: Do You Actually Need Data Recovery Software?
By now, you’ve checked Excel’s built-in recovery features, local file locations, external links, cloud versions, and available backups.
Before scanning the drive, answer these questions:
Recovery Check | Recommended Action |
Can File Explorer find the original workbook? | Open it directly |
Does Excel contain a usable AutoRecover copy? | Save the recovered version |
Is the problem caused by a broken workbook link? | Correct the source path |
Does OneDrive contain an earlier version? | Restore or save that version |
Does File History contain the workbook? | Recover the backup |
Was a previously saved workbook actually deleted? | Consider storage recovery |
Does the drive show physical failure symptoms? | Stop DIY attempts and seek professional assistance |
This distinction matters because data recovery software cannot recreate workbook content that Excel never wrote to storage.
Suppose you entered data into a new workbook but never saved it, and Excel never created a recovery copy. A disk scan cannot reconstruct those missing entries.
On the other hand, imagine saving Annual_Report.xlsx to a USB drive and accidentally deleting it the next day.
The workbook previously existed on storage. If its data remains available, a recovery tool may be able to locate it.
That second situation is where storage-level recovery becomes appropriate.
Method 8: Recover Lost Excel Files with Magic Data Recovery
Best for: Previously saved workbooks or AutoRecover copies lost through deletion, formatting, or certain file system errors.
If you confirmed that the workbook or recovery copy existed on disk but can no longer locate it through Excel, Windows, cloud history, or backups, Magic Data Recovery provides another recovery approach.
Unlike Excel AutoRecover, which relies on recovery information created by the application, Magic Data Recovery scans the storage device for recoverable file data.
Why Magic Data Recovery Fits This Scenario
Its relevant advantages include:
- Excel file support: Searches for common spreadsheet formats, including XLS and XLSX.
- Storage-level recovery: Scans for files lost after deletion, formatting, or certain file system problems.
- File preview: Helps identify supported recoverable files before saving them.
- Read-only scanning: Scans without intentionally modifying the source drive’s existing data.
- Multiple storage devices: Supports compatible internal drives, external HDDs, SSDs, USB drives, and memory cards.
Consider a spreadsheet that you saved to an external USB drive. After accidentally formatting the drive, File Explorer no longer displays the workbook.
Excel AutoRecover may not help because the problem concerns the external storage device rather than an unsaved editing session. Magic Data Recovery can scan that device for recoverable workbook data.
How to Recover Excel Files with Magic Data Recovery
If your Excel workbook or AutoRecover copy was previously saved to disk but later deleted or lost, follow these steps to search for recoverable files with Magic Data Recovery.
Step 1: Download and Install Magic Data Recovery
Download Magic Data Recovery from the official website. Install it on a different physical drive from the one containing your missing Excel files. This precaution helps prevent new data from overwriting recoverable workbook information.
Supports Windows 7/8/10/11 and Windows Server
Step 2: Select the Drive Where Your Excel File Was Lost
Launch Magic Data Recovery and locate the drive or partition where your Excel workbook was originally stored. Select the affected location to begin searching for lost spreadsheet files.
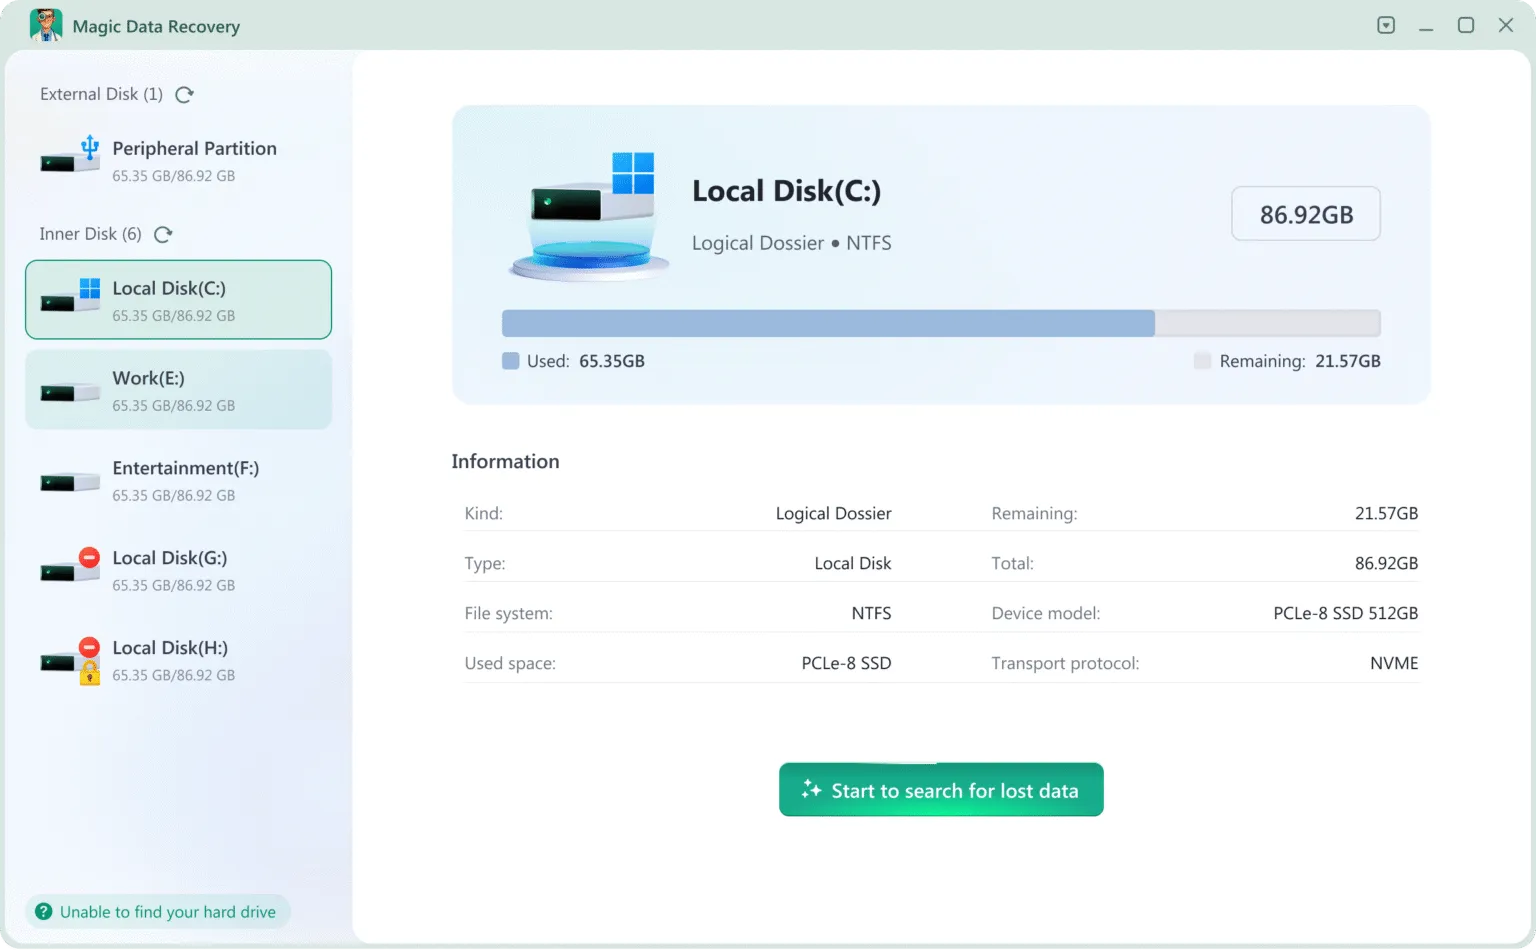
Step 3: Scan for Lost Excel Workbooks
Magic Data Recovery automatically performs an Advanced Scan and displays discovered files as the scan progresses. Look for Excel formats such as .xlsx, .xls, and .xlsm. You can also check filenames and original folder paths to identify relevant workbooks.
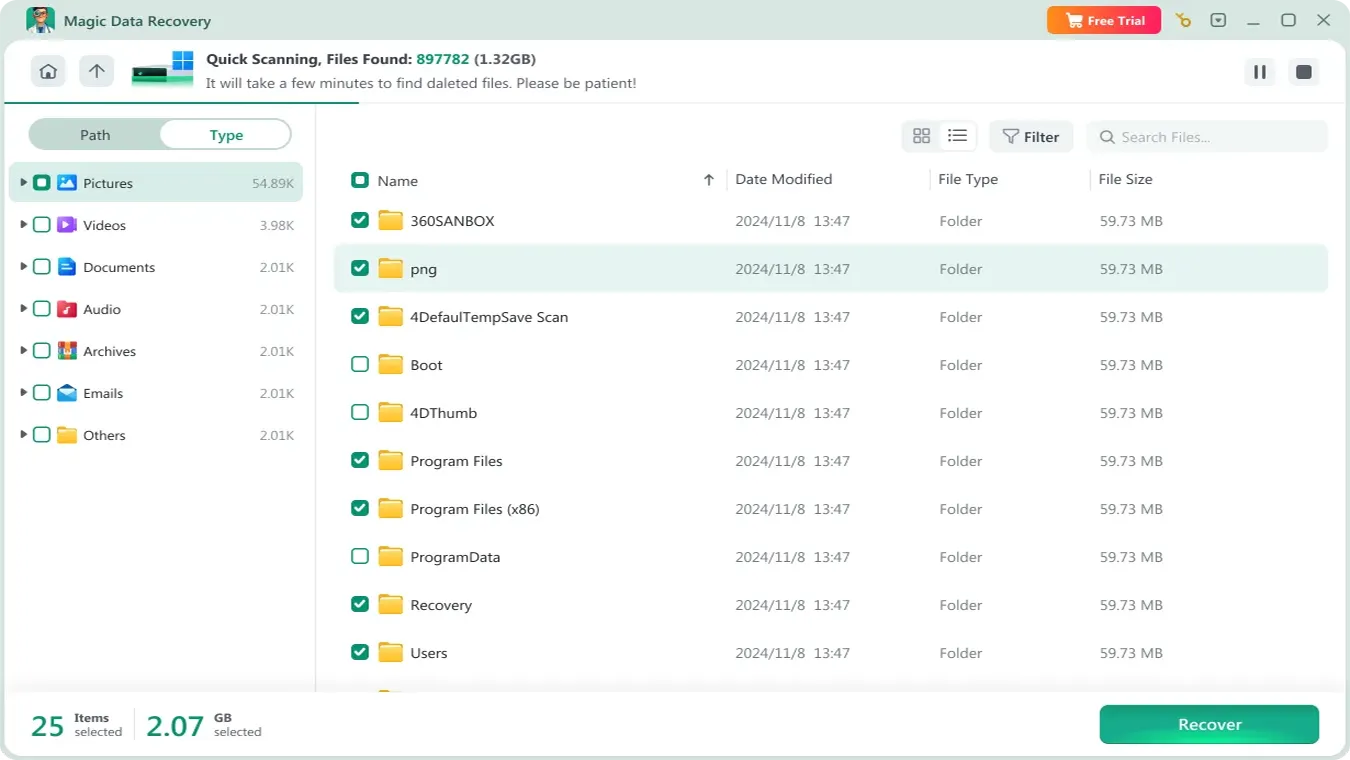
Step 4: Recover Excel Files to a Safe Location
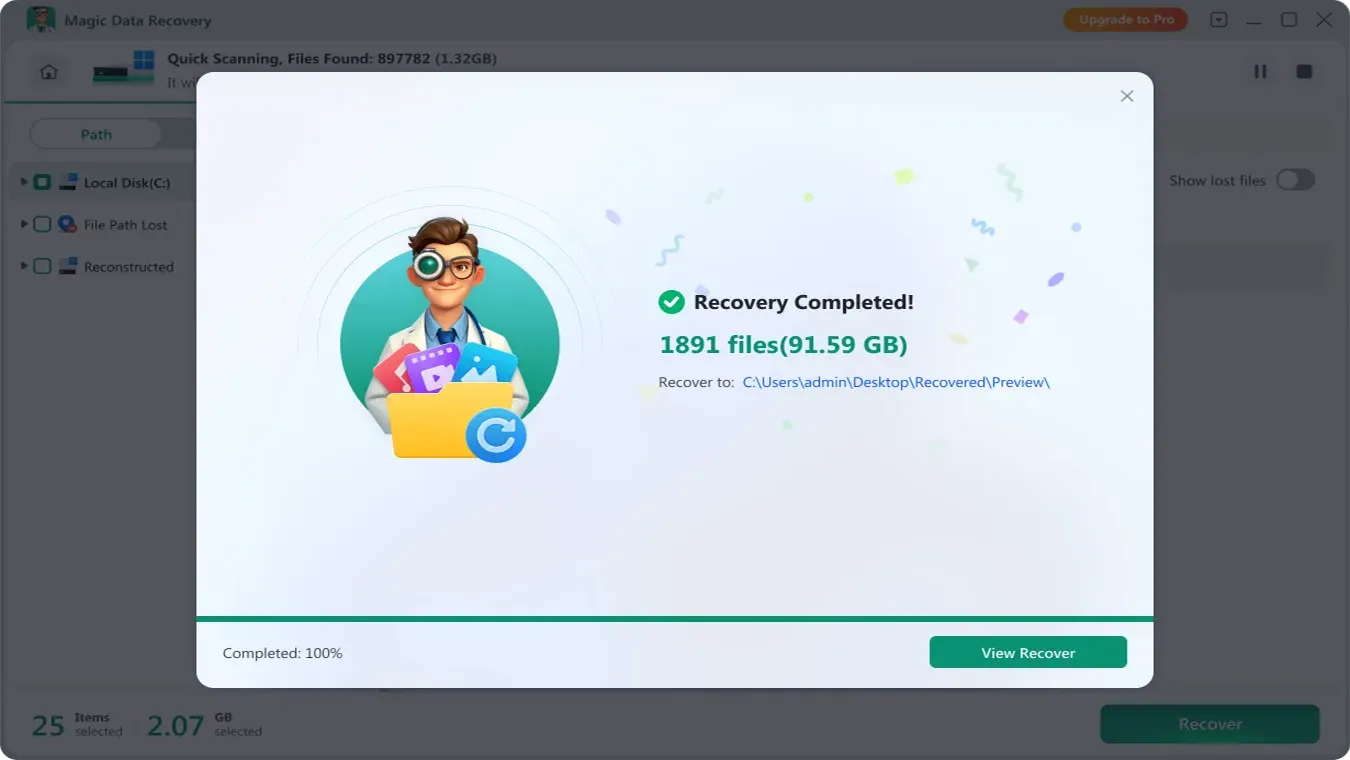
Select the Excel files you need and click Recover. Save them to a different physical drive rather than the original storage location to reduce the risk of overwriting remaining lost data.
After recovery, open each workbook in Excel and verify that its worksheets, formulas, and important data are intact. Save a separate copy once you’ve confirmed the file works correctly.
Important: Magic Data Recovery can only recover workbook data or recovery copies that previously existed on storage and remain accessible. It cannot reconstruct Excel changes that were never saved to disk.
After Recovery: Verify Your Excel Workbook
Finding an .xlsx file doesn’t necessarily mean you’ve recovered all your work.
A workbook may open but still contain missing worksheets, damaged formulas, incomplete data, or broken external references.
Before replacing your original file, perform these checks.
1. Open the workbook in Excel. Confirm that it opens without unexpected errors or file format warnings.
2. Inspect the worksheets. Verify that the expected sheet tabs, tables, and important records are present.
3. Review formulas and calculations. Check important totals, formulas, and cell references. A recovered workbook may contain valid data but still lack the latest calculations.
4. Check external links. If your spreadsheet depends on other workbooks, confirm that Excel can access the correct source files.
5. Save a verified copy. Use Save As and choose a stable folder. Don’t overwrite your only recovered file.
For example, recovering a financial spreadsheet isn’t enough if half its worksheets are missing or the formulas reference unavailable source workbooks.
Recovery is complete when the workbook opens, contains the required information, and works correctly—not merely when a recovery scan finds a filename.
What if the recovered Excel file won’t open?
The workbook may be corrupted or incomplete.
Try Excel’s built-in repair feature:
- Open Excel.
- Select File > Open > Browse.
- Choose the damaged workbook.
- Click the arrow beside Open.
- Select Open and Repair.
- Try Repair first, followed by Extract Data if available.
You can also consult Microsoft’s corrupted workbook repair instructions. Not every damaged spreadsheet can be repaired. If important content is missing, check other saved versions before continuing.
Why Unsaved Excel File Recovery Sometimes Fails
Even after checking every reasonable recovery location, a usable workbook may not exist.
Understanding the reason helps you decide whether another attempt is worthwhile.
AutoRecover Never Created a Copy
Excel creates recovery information periodically, not after every keystroke.
If the application closed before the first recovery interval, your editing session might have no usable recovery copy.
Excel Removed the Temporary Data
AutoRecover files aren’t permanent backups.
Excel may remove certain recovery copies after normal closure, while cleanup utilities can delete additional temporary files.
The Latest Changes Never Reached Storage
A new workbook may exist only in memory until Excel saves it or creates recovery information.
If that never happened, no disk recovery software can reconstruct those unsaved changes.
Original Data Was Overwritten or Trimmed
New file activity may reuse storage space that previously contained deleted data.
Once the original content has been overwritten, conventional recovery software cannot restore it.
On SSDs, TRIM can also make deleted content inaccessible.
The Storage Device Has Physical Problems
If an HDD repeatedly clicks, a drive disconnects unexpectedly, or Windows cannot detect it reliably, avoid repeated scans.
Physical problems require a different approach, often involving professional data recovery.
If recovery fails, recheck the original storage location and determine whether the missing information ever existed as a saved file. Repeating scans won’t recreate data that is no longer available.
How to Prevent Losing Unsaved Excel Files Again
Once you’ve recovered your workbook—or rebuilt the missing information—improve the way Excel protects your work.
Enable AutoRecover and Check Its Settings
On Excel for Windows:
- Open File > Options > Save.
- Enable Save AutoRecover information every.
- Consider setting the interval to five minutes.
- Enable Keep the last AutoRecovered version if I close without saving, where available.
- Verify the AutoRecover file location.
Microsoft documents a default interval of 10 minutes in supported Excel versions, but you can adjust it.
A shorter interval may preserve more recent work after a crash, although it doesn’t guarantee that every edit will survive.
Save New Workbooks Immediately
Before starting a major Excel task, assign the workbook a meaningful filename and save it to a known folder.
For example:
Monthly_Sales_Report_2026.xlsx
This makes it easier to locate the file later and reduces dependence on temporary recovery information.
Use Version History for Important Workbooks
If you frequently edit or share spreadsheets, consider storing them in OneDrive or SharePoint.
AutoSave and Version History can provide protection against accidental changes, but review previous versions before restoring or replacing anything.
Keep Independent Backups
Maintain another copy of critical workbooks using Windows File History, an external backup drive, or another reliable backup solution.
Cloud synchronization and backups protect against different problems. Using both reduces dependence on a single copy.
Keep Workbook Links and Storage Locations Stable
If your Excel files reference other workbooks, store those source files in predictable locations.
Avoid renaming or moving linked files unnecessarily. When you must change a source location, update the workbook links rather than assuming the linked data was deleted.
For important files stored on an unreliable external drive, copy the workbook to stable storage before editing it.
Conclusion
To recover an unsaved Excel file, first determine whether you lost an editing session, an earlier version, the workbook’s location, or the actual file on disk.
If Excel crashed or closed without saving, begin with Recover Unsaved Workbooks and Document Recovery. When the original workbook still exists, locate it or correct its file path. If OneDrive or Windows backups contain an earlier copy, restore that version instead.
For workbooks genuinely lost from storage, Magic Data Recovery is worth considering. Its storage-level scanning, Excel format support, and preview capabilities help users identify recoverable spreadsheet files when Excel’s built-in recovery features are no longer applicable.
However, no software can guarantee recovery when data was never saved, has already been overwritten, or is inaccessible because of serious hardware problems.
The next step depends on what still exists: locate the workbook, restore an available version, or attempt disk recovery only after confirming actual file loss.
For additional help with Excel, Word, PDF, and other missing documents, explore the Amagicsoft Document Recovery resource center.
Supports Windows 7/8/10/11 and Windows Server
FAQs About Recovering Unsaved Excel Files
Can I recover an Excel file after clicking Don't Save?
Where are unsaved Excel files stored in Windows 10 and 11?
%localappdata%\Microsoft\Office\UnsavedFilesYou can also find the configured AutoRecover directory under File > Options > Save.
The exact location may vary depending on your Excel version and settings.
Can I recover an Excel file that was never saved?
Why is my unsaved Excel file not showing in Document Recovery?
How do I recover an Excel file after restarting my computer?
Can I recover unsaved Excel files on Mac?
Can data recovery software restore an Excel file with no backup?

Erin Smith is recognized as one of the most professional writers at Amagicsoft. She has continually honed her writing skills over the past 10 years and helped millions of readers solve their tech problems.