
Where to Find Word Recovery Files (2026 Guide)

Losing an important Word document can feel frustrating—especially when it disappears due to a crash, accidental deletion, or system error. Many users immediately search for where to find Word recovery files, but the answers online are often incomplete or too technical.
This guide offers a clear, step-by-step document solution to help you find Word recovery files, recover unsaved documents, and handle more complex data loss scenarios. In addition, we’ll introduce a reliable recovery tool—Magic Data Recovery—for cases where built-in options fail.
Supports Windows 7/8/10/11 and Windows Server
Table of Contents
What Are Word Recovery Files?
Before diving into solutions, it helps to understand what recovery files are.
Microsoft Word automatically creates temporary and backup files such as:
- AutoRecover files (.asd)
- Temporary files (.tmp)
- Backup files (.wbk)
These files allow you to find auto recovery files Word creates during editing sessions.
Where to Find Word Recovery Files (Step-by-Step)
If you’re wondering where to find Word recovery files, the good news is that Microsoft Word provides several built-in recovery options. However, these files are often hidden or stored in different locations depending on the situation.
Below is a complete step-by-step guide to help you find Word recovery files, including AutoRecover files, temporary files, and unsaved documents.
1. Find AutoRecover Files in Word (Most Effective Method)
The first and most reliable method to find auto recovery files Word creates is through the AutoRecover feature.
Word automatically saves your document at regular intervals. These files are stored in a specific folder.
Steps to locate AutoRecover files:
- Open Microsoft Word
- Click File > Options
- Select Save from the left panel
- Look for AutoRecover file location
- Copy the folder path
- Open File Explorer
- Paste the path into the address bar
- Press Enter
You will see files with extensions like:
- .asd (AutoRecover files)
- .wbk (backup files)
Important tips:
- Sort files by Date Modified to find the latest version
- Rename .asd to .docx if needed
- Double-click to open and save immediately
👉 This is the primary answer to “where to find Word recovery files”, and it works in most crash scenarios.
2. Use “Recover Unsaved Documents” in Word
If Word closes unexpectedly, you can still find Word recovery files using its built-in recovery tool.
Steps:
- Open Microsoft Word
- Go to File > Info
- Click Manage Document
- Select Recover Unsaved Documents
- A folder will open containing unsaved files
- Choose the file and click Open
- Save it immediately
When this works best:
- Word crashes
- System shuts down unexpectedly
- You forget to save a file
👉 This is one of the easiest ways to find auto recovery files Word generates automatically.
3. Search for Word Recovery Files Manually (Advanced Method)
Sometimes, recovery files don’t appear in Word. In that case, you need to manually search your system.
Steps:
- Open File Explorer
- Go to This PC
- Enter the following in the search bar:
*.asd OR *.tmp OR *.wbk
- Wait for results to load
- Sort by Date Modified
- Open recent files
What these files mean:
- .asd → AutoRecover files
- .tmp → Temporary files
- .wbk → Backup copies
Pro tip:
Try searching with keywords from your file name. This increases your chances of finding the correct file.
👉 This method is especially useful when you cannot locate where to find Word recovery files through Word itself.
4. Check Default Word File Locations
Word stores recovery and temporary files in hidden system folders. Knowing these locations helps you find Word recovery files more efficiently.
Common file paths:
C:\Users\YourUsername\AppData\Roaming\Microsoft\WordC:\Users\YourUsername\AppData\Local\Temp
Steps:
- Open File Explorer
- Click View > Show > Hidden items
- Navigate to the paths above
- Look for .asd, .tmp, or .wbk files
Why this matters:
Sometimes Word cannot display recovery files, but they still exist in these directories.
👉 This is a critical step when learning how to find Word recovery files manually.
5. Check the Recycle Bin (For Deleted Files)
If your Word file was deleted, the recovery process is different.
Steps:
- Open Recycle Bin
- Search for your file name or .docx
- Right-click the file
- Select Restore
When this works:
- Accidental deletion
- File removed without permanent deletion
Important reminder:
If the Recycle Bin has been emptied, you will need professional recovery software.
👉 This step is often overlooked but essential when trying to find Word recovery files after deletion.
6. Check OneDrive or Cloud Backup (If Enabled)
Many users forget that Word may save files automatically to cloud storage.
Steps:
- Log in to OneDrive
- Navigate to Documents
- Check Version History
- Restore previous versions
Why this helps:
- AutoSave stores versions continuously
- You can recover older edits
👉 This is another practical way to find Word recovery files, especially for Office 365 users.
7. When You Still Can’t Find Word Recovery Files
Even after trying all the above methods, you may still fail to find Word recovery files.
This usually happens when:
- Files are permanently deleted
- Storage is formatted
- File system is corrupted
- Recovery files were overwritten
At this stage, built-in solutions are no longer enough. You need a deeper recovery approach.
Why Built-in Methods Sometimes Fail
While Word provides recovery options, they have limitations:
- Files overwritten by new data
- AutoRecover disabled
- Disk formatting or system crash
- File system corruption
In these cases, you need a more advanced solution.
Best Solution: Recover Lost Word Files with Magic Data Recovery
If you cannot find Word recovery files using standard methods, a dedicated recovery tool becomes essential.
Why Choose Magic Data Recovery?
Magic Data Recovery is designed to recover lost files in complex scenarios:
Core Problems It Solves
- Deleted Word documents
- Formatted drives
- Corrupted file systems
- Lost partitions
Key Advantages
- Deep scan technology for thorough recovery
- Supports multiple file types (DOC, DOCX, PDF, etc.)
- User-friendly interface for beginners
- Preview before recovery
Real Use Case
Imagine you accidentally formatted a USB drive containing important Word files. Built-in Word recovery won’t help—but Magic Data Recovery can scan the drive and restore your documents.
Why It’s More Reliable
Unlike Word’s temporary storage, this tool scans the disk directly. That means it can recover files even when no recovery file exists.
👉 If you’re looking for a more efficient solution, consider trying Magic Data Recovery.
Supports Windows 7/8/10/11 and Windows Server
How to Recover Word Files Using Magic Data Recovery
Steps:
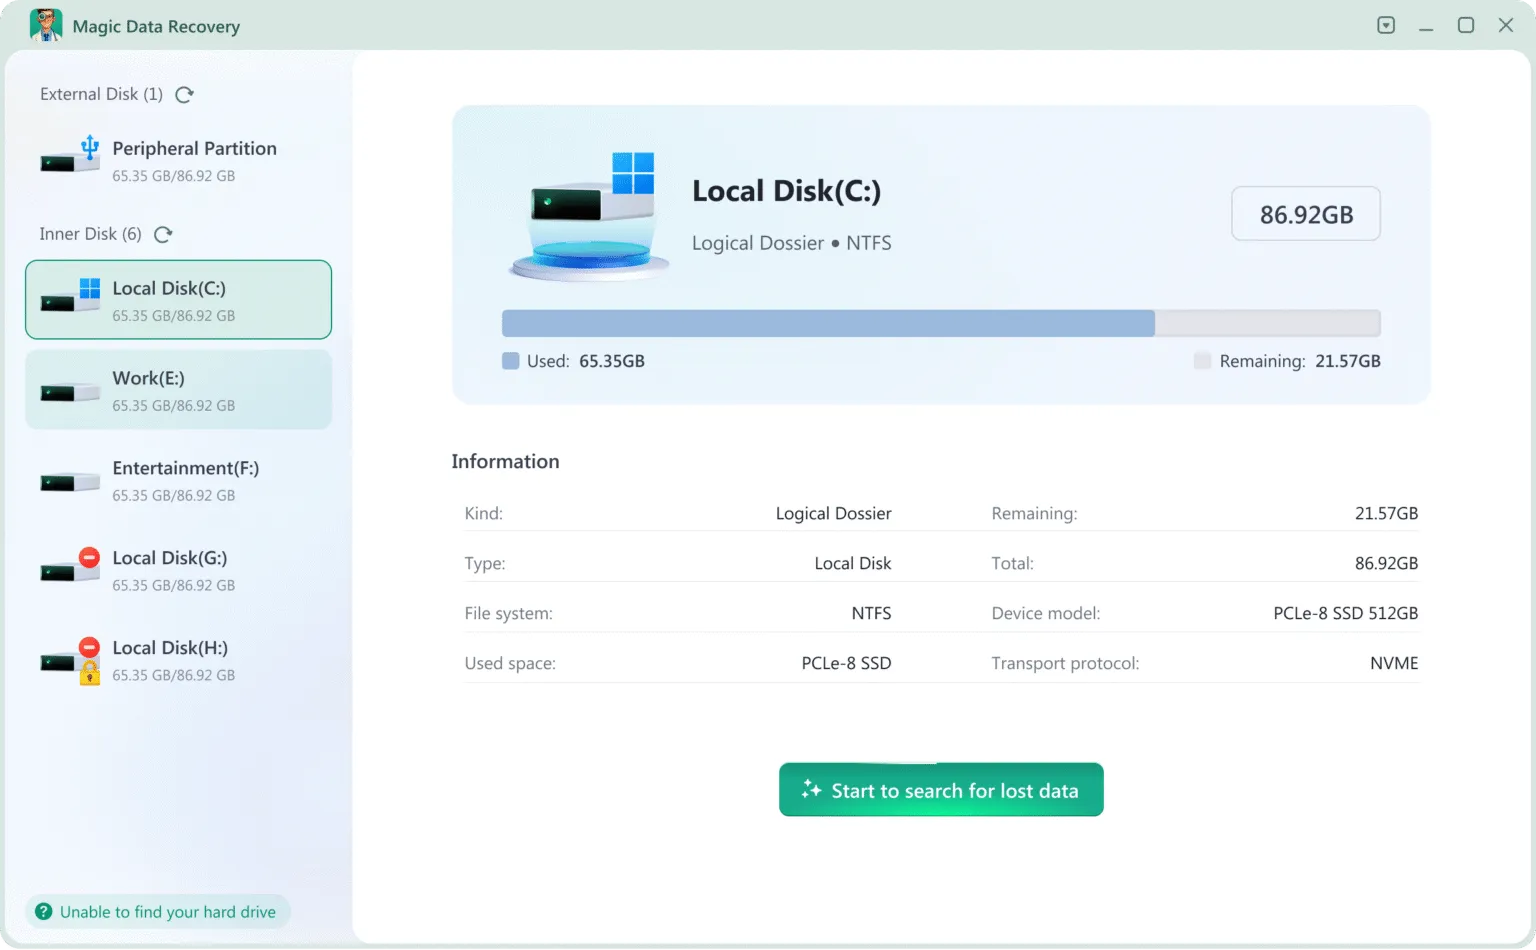
- Install and launch Magic Data Recovery
- Select the drive where files were lost
- Run a scan (quick and deep scan)
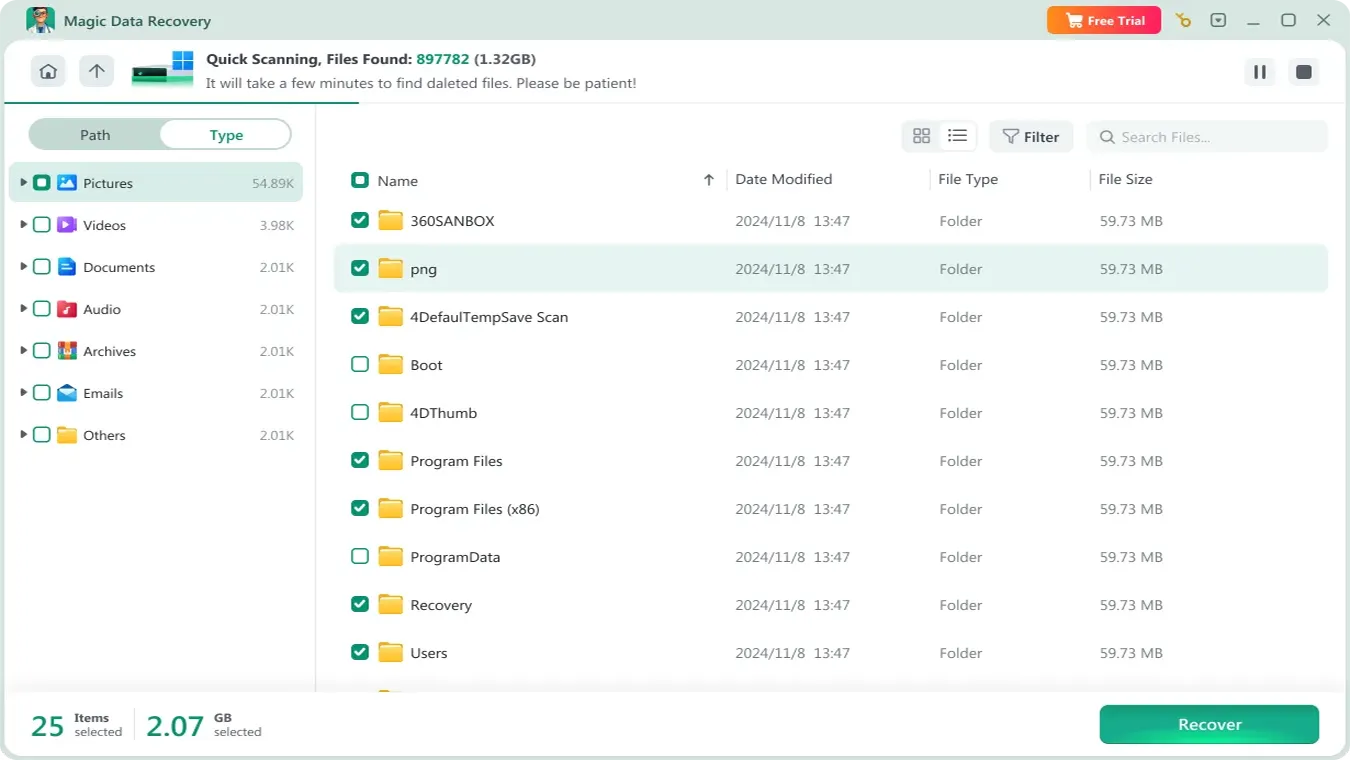
- Preview recovered Word files
- Click Recover and save to a safe location
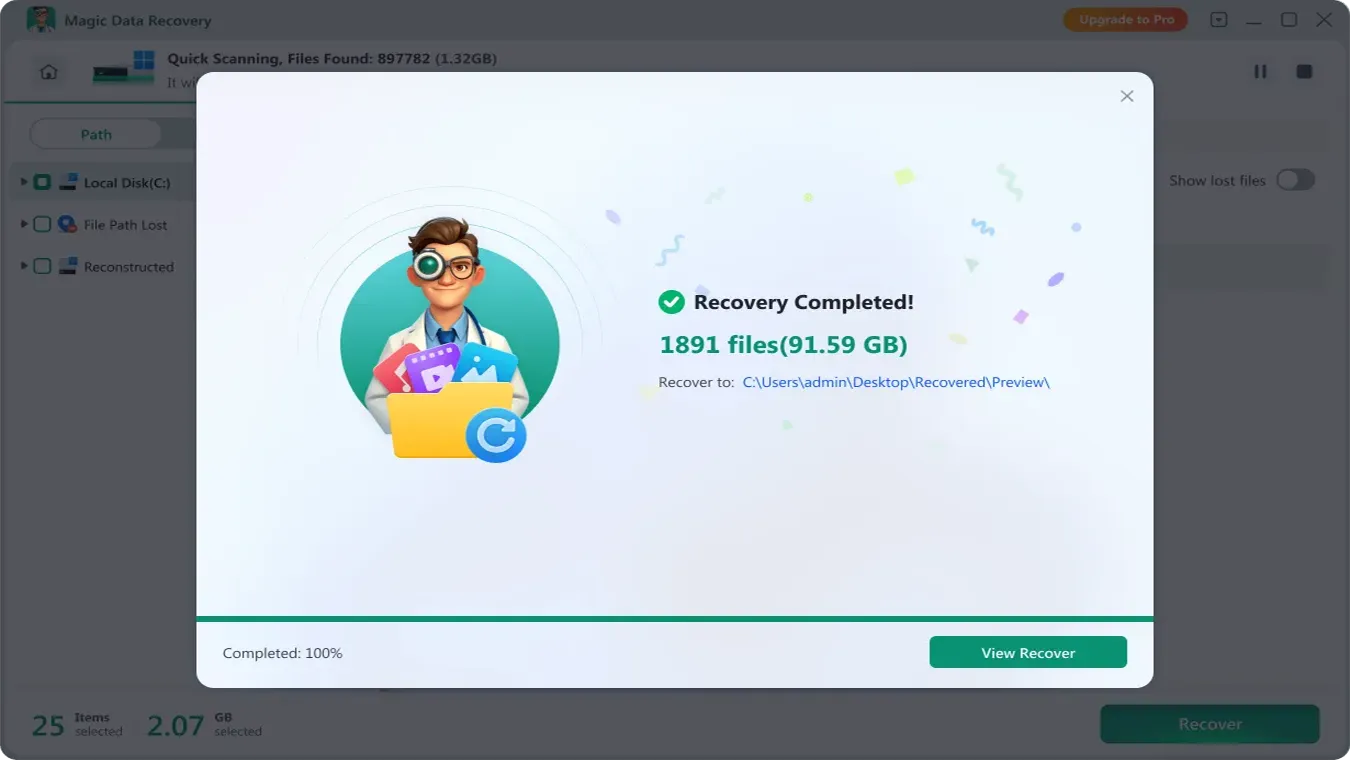
The process is simple and works even for non-technical users.
Tips to Prevent Word File Loss
Prevention is always better than recovery.
- Enable AutoSave and AutoRecover
- Save files frequently
- Use cloud storage (OneDrive, Google Drive)
- Avoid sudden system shutdowns
- Back up important documents regularly
Conclusion
Understanding where to find Word recovery files can save you time and stress. Built-in tools like AutoRecover and temporary file search are effective for minor issues.
However, for more serious cases—such as deletion, formatting, or corruption—these methods often fall short. That’s where Magic Data Recovery stands out. It offers a reliable, user-friendly solution to recover lost Word files in almost any scenario.
If you want a faster and more dependable recovery process, Magic Data Recovery is a practical choice.
Supports Windows 7/8/10/11 and Windows Server
FAQs
Where to find Word recovery files on Windows?
You can find them in the AutoRecover folder under Word settings or in paths like AppData. Use Word’s “Recover Unsaved Documents” feature or search for .asd files manually. These methods help locate temporary files created during editing sessions.
How to find auto recovery files Word creates?
Word saves AutoRecover files automatically. Go to File > Options > Save to view the file path. Then open that folder in File Explorer to locate .asd files. This is the fastest way to access unsaved documents.
Can I recover a Word file after deleting it?
Yes, first check the Recycle Bin. If it’s not there, use recovery software like Magic Data Recovery. It scans your drive and restores deleted files even if they are no longer visible in the system.
Why can’t I find Word recovery files?
This usually happens if AutoRecover is disabled, the file was overwritten, or the system crashed severely. In such cases, built-in tools may fail, and a professional recovery tool becomes necessary.
Where are Word temporary files stored?
Temporary files are often stored in the Temp folder or AppData directory. You can search for .tmp or .asd files using File Explorer. Make sure hidden files are visible to access these locations.
Does Word always save recovery files automatically?
Not always. AutoRecover must be enabled in Word settings. If it’s turned off, Word won’t create recovery files, making it harder to retrieve unsaved documents.
Can I recover files after formatting a drive?
Yes, but not with Word itself. You’ll need specialized software like Magic Data Recovery. It can scan formatted drives and recover lost Word documents effectively.
Is Magic Data Recovery safe to use?
Yes, it is designed to safely scan and recover files without overwriting existing data. It allows previewing files before recovery, ensuring you restore only the needed documents.

Jason is a data recovery and technical support specialist with over 15 years of hands-on experience. He has worked extensively with frontline users, troubleshooting difficult data loss cases and providing practical recovery solutions for accidental deletion, formatted drives, damaged file systems, lost partitions, system failures, and other recovery emergencies. His expertise also includes backup and restoration, file repair, and disaster recovery, with a strong emphasis on safe, reliable, and technically accurate guidance.