
Hitachi Hard Drive Data Recovery: How to Recover Lost Files Safely
Hitachi data recovery may still be possible after accidental deletion, a quick format, or a file system error. The next step depends on the drive’s condition: stop saving to it, check for an existing copy, and avoid scanning a disk that clicks, disconnects, or struggles to read.
For a stable drive that Windows detects, Magic Data Recovery offers a way to search for missing files when backups cannot help. This guide explains how to choose the right recovery route and check your results. For broader HDD guidance, visit our hard drive recovery guide.
Supports Windows 7/8/10/11 and Windows Server
What should you do first? Stop using the affected disk. Do not format, initialize, or run repair commands to make it accessible. If you hear new, repeated clicking or grinding, power it off and contact a recovery specialist.
Table of Contents
Is Hitachi Data Recovery Still Possible?
Yes, if the drive can still supply readable data and nothing has overwritten the missing content. Deletion usually removes the file’s reference and marks its storage space as available. It does not necessarily erase every byte immediately. Microsoft therefore recommends minimizing computer use after file loss.
However, Hitachi hard drive data recovery has limits:
- New files can overwrite deleted content.
- A completed modern Windows full format normally overwrites the formatted volume.
- Physical damage may prevent software from reading the disk.
- Encryption can block access without the correct password or recovery key.
- A recovered file may contain only part of its original data.
A quick format differs from a full format: it recreates file system structures without deliberately overwriting every data sector. That can leave content recoverable, although later writes may destroy it. For more detail, see our guide to recovering a formatted hard drive.
This article focuses on magnetic HDDs. If your device is an SSD, TRIM and controller cleanup can make deleted content unavailable even without further deliberate writes.
Diagnose the Drive Before Choosing a Recovery Method
Use this table to choose a Hitachi data recovery route. For Hitachi hard drive recovery, a missing drive letter and a physically failing disk need different responses.
What you notice | What it may mean | Safest next step |
Files disappeared, but the drive opens normally | Deletion, relocation, or a different user account | Check the Recycle Bin and backups; then consider software |
Files vanished after a quick format | Windows replaced file system information | Stop writes and scan only if the drive reads normally |
Windows requests formatting or shows RAW | Windows cannot recognize the file system; hardware trouble is also possible | Cancel formatting; assess stability before recovery |
Disk Management shows unallocated space | Missing or damaged partition information | Do not create a volume; consider recovery or specialist assessment |
The disk is absent from File Explorer but appears with plausible capacity in Disk Management | A mounting or partition issue | Record the status without making changes |
The disk clicks, disconnects, freezes the PC, or reads extremely slowly | Possible physical, electrical, or firmware trouble | Stop DIY work and seek professional help |
Windows cannot detect the disk through a suitable connection | Connection trouble or deeper device failure | Make only limited connection checks; stop if detection still fails |
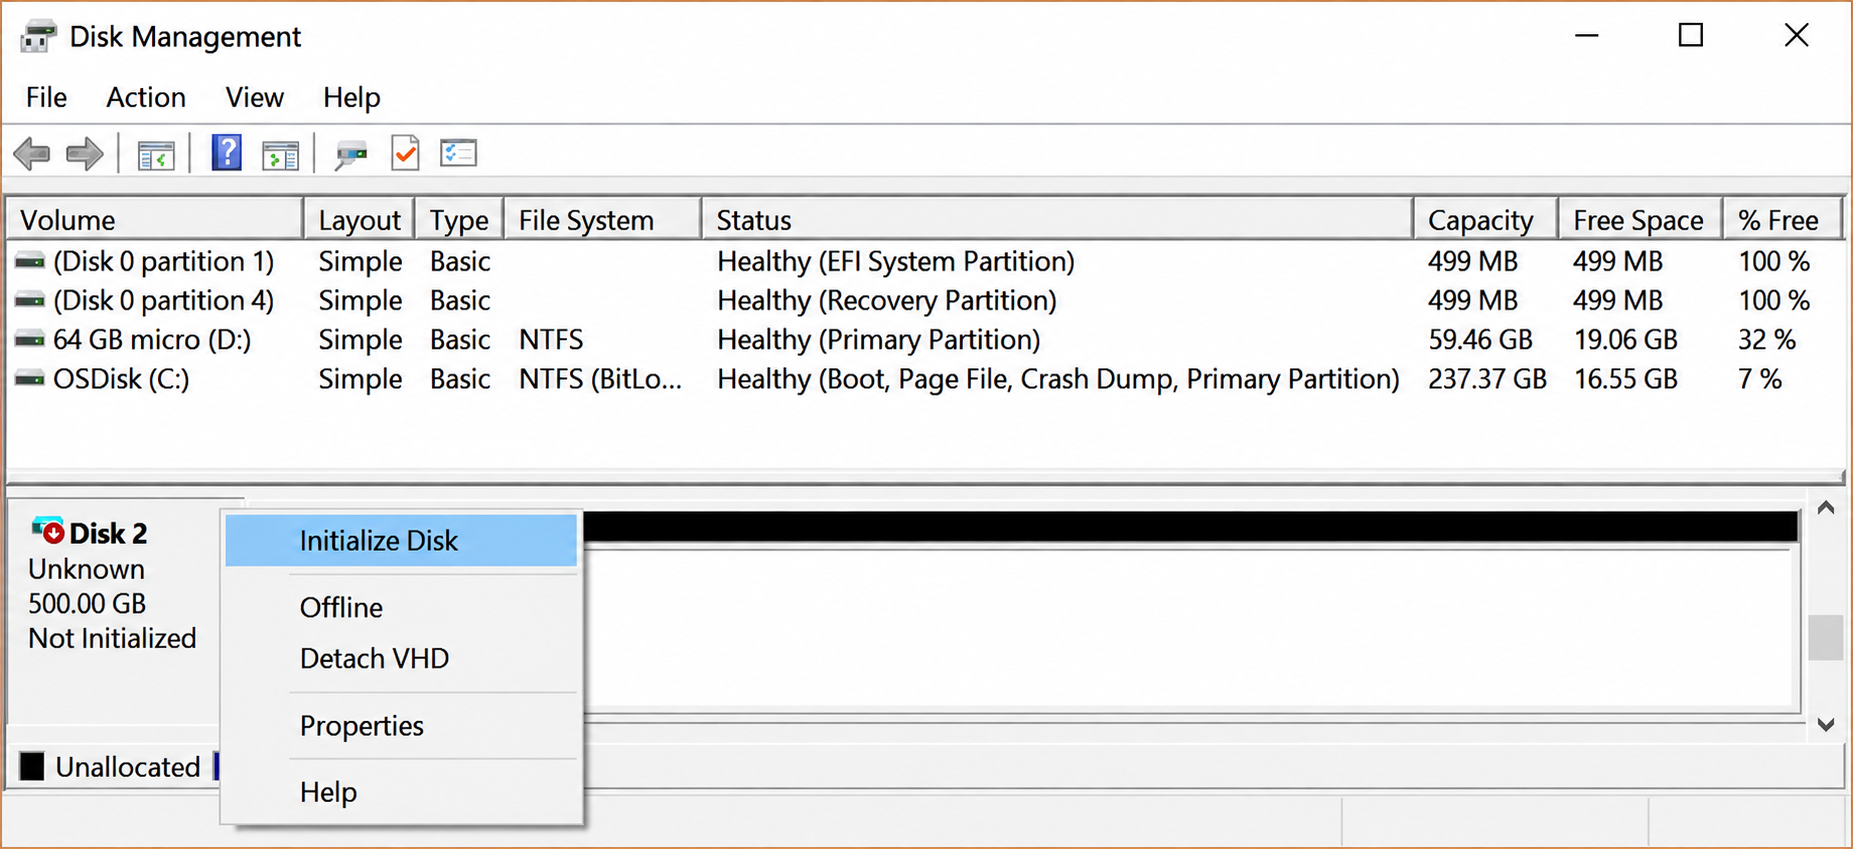
To inspect detection, right-click Start → Disk Management. Cancel any request to initialize the disk. Check its listed capacity and partition status; do not format it or create a new volume.
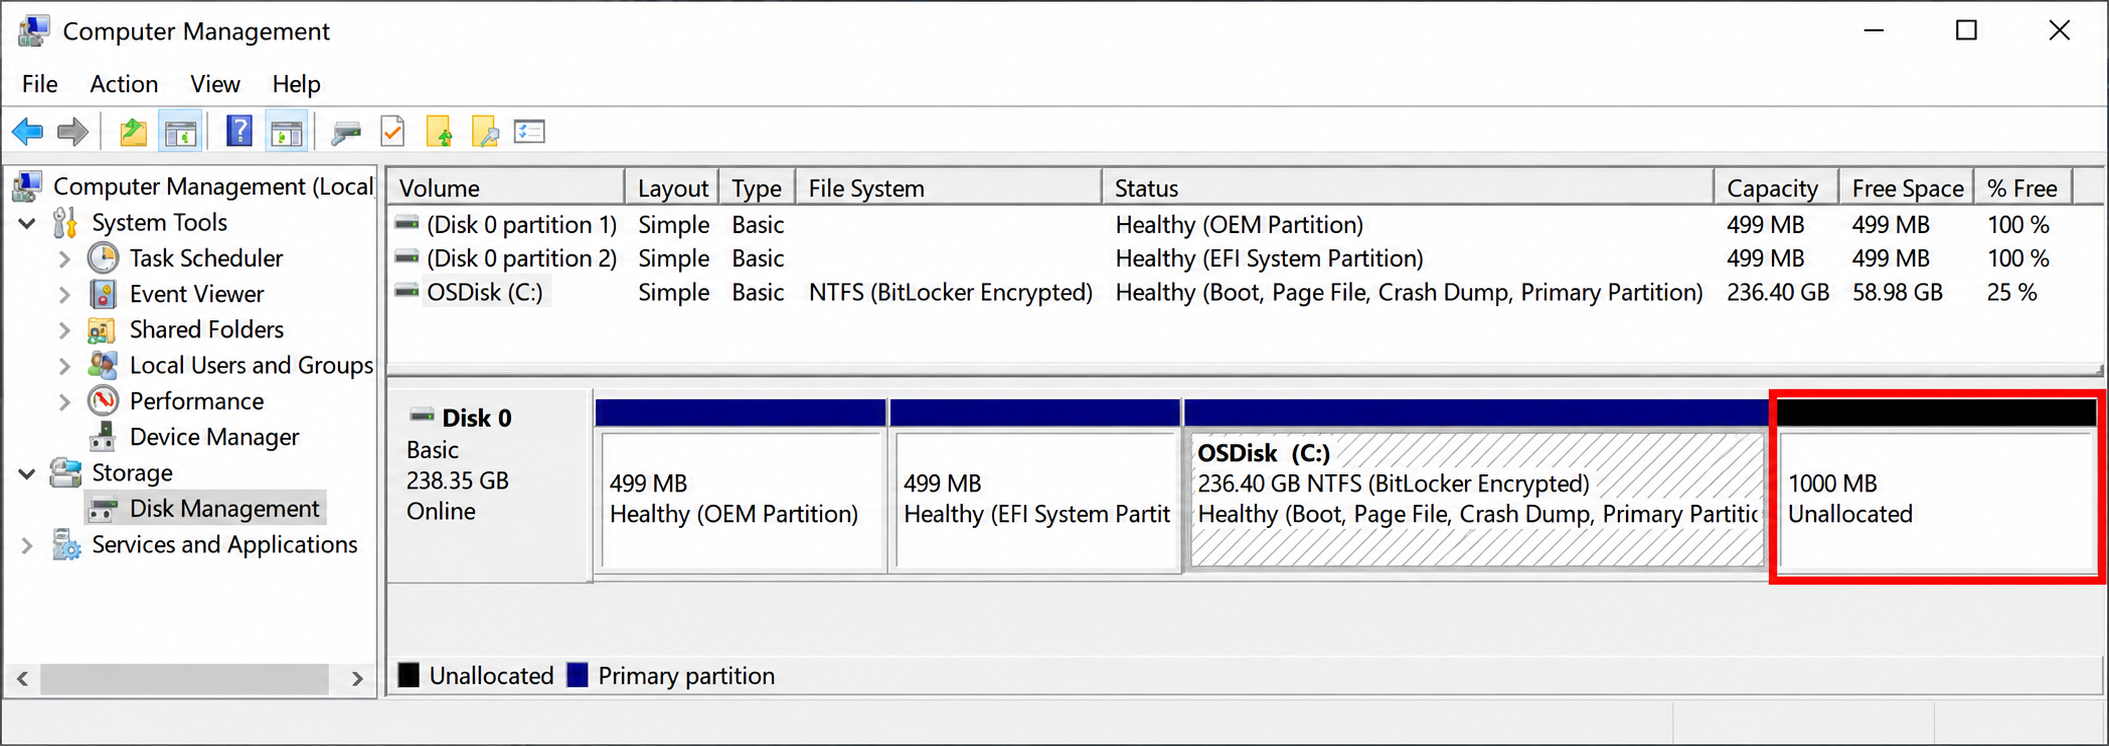
A plausible capacity is useful evidence, but it does not prove that the drive is healthy.
Hitachi, HGST, and Older Drive Connections
You may see Hitachi or HGST branding on older drives. Western Digital acquired HGST in 2012, so the label can differ across generations. For HGST data recovery, identify the exact model and interface before buying an adapter.
Check the model label for these practical differences:
- SATA: Many desktop and laptop drives use this interface.
- IDE/PATA: Some older drives need a different adapter.
- SAS: Enterprise models require a compatible controller; a basic SATA-to-USB adapter will not work.
A 3.5-inch desktop HDD also needs an appropriate external power supply when you connect it through a USB adapter. Do not assume a USB cable alone can power it.
Hitachi HDD recovery starts with these connection details, rather than software with the manufacturer’s name on it.
Protect the Source Before Hitachi Data Recovery
Before you recover data from a Hitachi hard drive, prepare another healthy physical drive with enough free space for the output.
- Stop routine use. Avoid downloads, installations, and file transfers on the affected disk.
- Protect a system disk. If Windows runs from it, shut down and use another computer or qualified assistance rather than continuing normal use.
- Decline repair prompts. Do not initialize, format, or recreate partitions to help software detect the disk.
- Separate source and destination. Another folder—or partition—on the same physical disk is a poor recovery destination.
- Set a stopping point. New noises, repeated disconnections, read errors, or long freezes mean you should stop.
For irreplaceable files, a professional Hitachi recovery assessment can be the sensible first choice even when the disk still works.
Should You Create a Disk Image First?
A sector-by-sector image preserves the readable contents of a disk for later recovery work. A specialist can attempt recovery from that copy instead of repeatedly accessing the original.
The GNU ddrescue manual recommends copying a failing drive before attempting file system repair. However, imaging itself reads the hardware and can stress a damaged drive. If the disk clicks or behaves unpredictably, let a specialist decide how to image it.
Do not assume every recovery application can create or open every image format. Confirm compatibility before choosing an imaging workflow.
Method 1: Check the Recycle Bin and Existing Backups
Best for: Recent deletion or files with an existing backup.
Limitation: These methods cannot restore a copy that never existed.
Expected result: An intact file without searching deleted sectors.
For Hitachi data recovery, an existing copy is often the quickest route.
Check the Recycle Bin
If the drive reads normally, open the Recycle Bin and search by filename or deletion date. Standard Restore returns an item to its original location.
If other missing files still need recovery, copy the available item to a different healthy disk where possible. Avoid adding files back to the affected disk before completing the remaining recovery.
Shift+Delete, some external-drive deletions, and files that exceed Recycle Bin limits may bypass it.
Look for a Backup or Cloud Copy
Check File History, your backup application, and any cloud folder that previously contained the files. Cloud storage can help only if you uploaded or synchronized the content before the loss.
With File History, locate the needed version and use Restore to to choose a healthy destination. If you only have a complete disk image backup, extract individual files where your backup tool supports it. Restoring the whole image over the source would overwrite remaining evidence.
No usable copy? Hitachi file recovery software is the next option only if the disk remains stable.
Method 2: Use Hitachi Data Recovery Software on a Stable Drive
Best for: Deleted files, quick formatting, and supported logical file system problems on a readable disk.
Limitation: Software cannot repair failed heads, reverse overwriting, or bypass encryption.
Expected result: A list of candidate files that you can inspect and recover elsewhere.
Magic Data Recovery is a practical Hitachi data recovery software option for Windows users. It supports recovery after deletion, formatting, and file system errors. Its guided interface and file preview help users assess results without command-line syntax.
The useful combination is quick and deep scanning, support for common file types, and preview before recovery. For example, someone who quick-formatted a stable archive HDD can search for documents and photos, inspect supported previews, and save candidates to another disk.
That workflow offers more evidence than formatting the source and hoping it becomes readable. It does not establish that Magic Data Recovery outperforms every competing application. Drive condition and surviving data still determine the result.
Step 1: Install on a Healthy Drive
Download Magic Data Recovery from its official product page. Keep the installer and application off the affected Hitachi disk.
Supports Windows 7/8/10/11 and Windows Server
If the source came from an old computer, connect it through an adapter that matches its interface and power requirements. Stop if Windows freezes or the disk develops unusual sounds.
Step 2: Identify the Correct Source
Open the application and compare the listed capacity and available device details. Select the affected disk or partition that held the missing files.
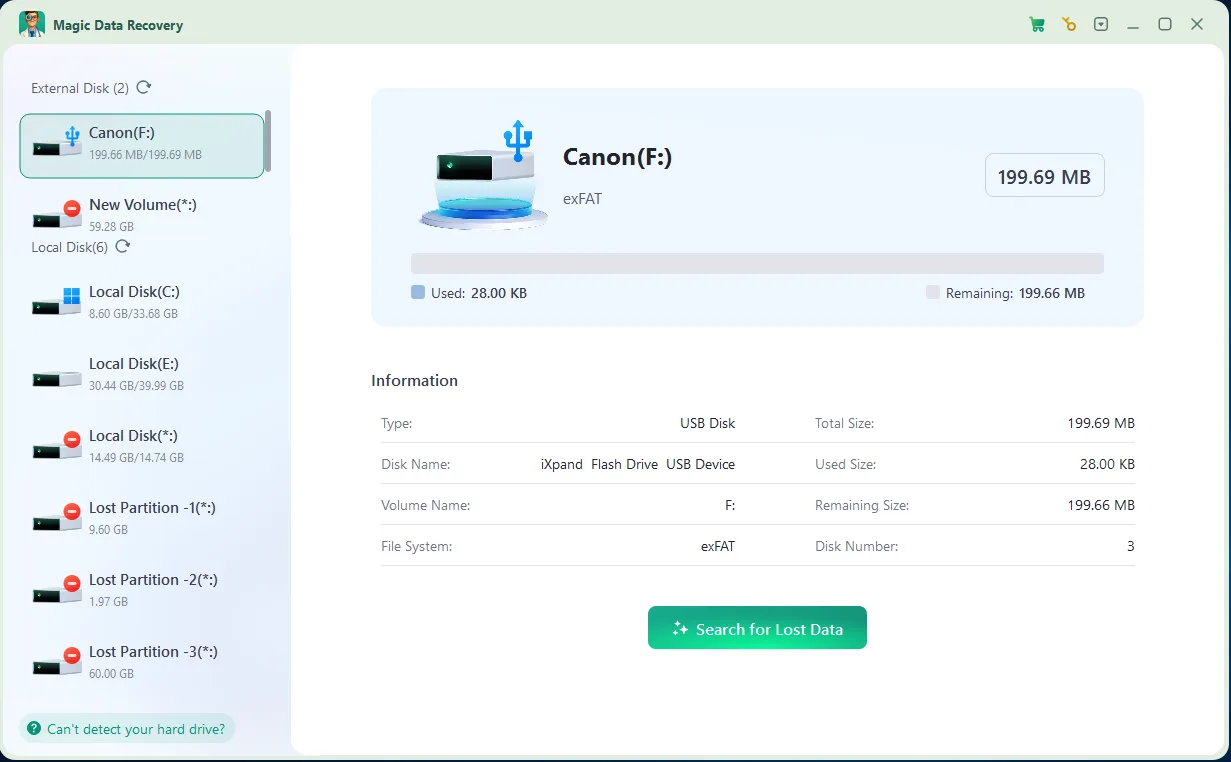
Do not rely solely on a familiar drive letter: Windows may assign a different one after reconnection. If the application cannot see the source, do not initialize it to force detection.
Step 3: Scan and Inspect the Results
Start the search for lost data. Amagicsoft’s published workflow describes a quick scan followed by a deeper scan.
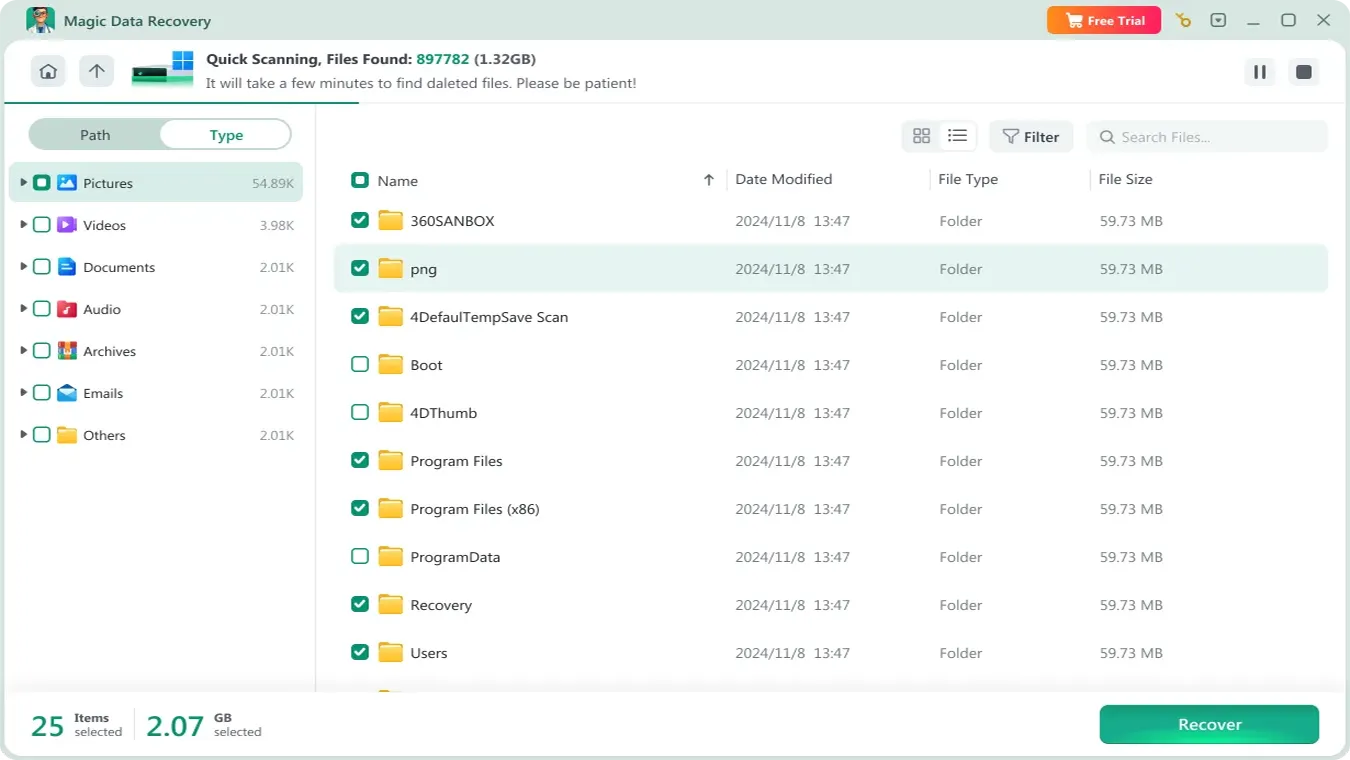
For Hitachi hard drive recovery after formatting, allow the deeper search to finish while the drive remains stable. Browse the results and preview supported files. A familiar filename alone does not prove that the content survived.
If reading becomes erratic, stop the scan and reconsider professional recovery.
Step 4: Recover to Another Physical Disk
Select the files you need and choose a destination on a healthy physical drive. Confirm the destination before starting.
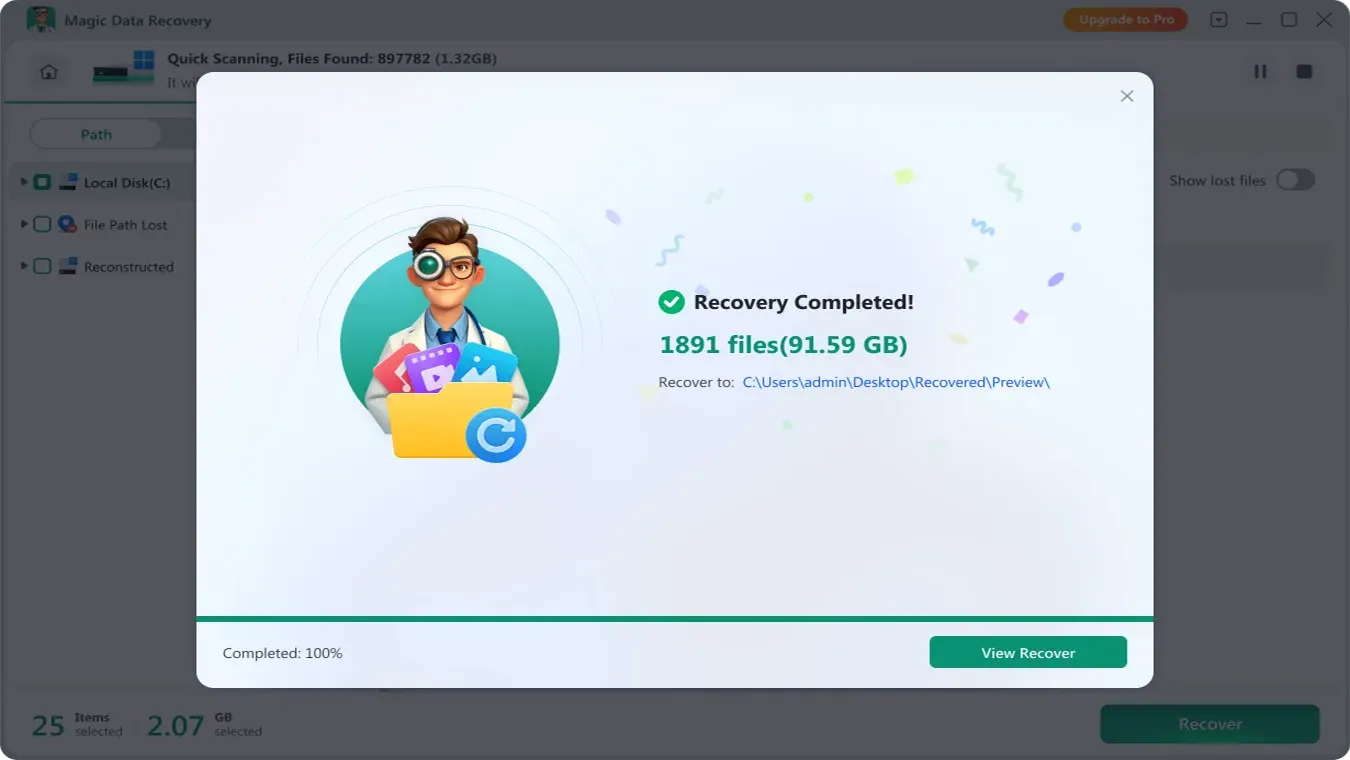
For Hitachi data recovery, this separation protects data that the scan has not yet recovered. Check the current edition’s recovery limits before committing to a paid license; do not assume a free download means unlimited free recovery.
Method 3: Consider Windows File Recovery for a Command-Line Alternative
Best for: Users comfortable with commands and a stable source volume that has a drive letter.
Limitation: It offers no graphical preview workflow and requires the correct mode and paths.
Expected result: Recovered candidates in a new destination folder.
Microsoft’s Windows File Recovery provides another Hitachi data recovery option. For a healthy NTFS source with recently deleted files, an example is:
- winfr E: F: /regular /n *.docx /n *.jpg
Here, E: represents the affected volume and F: represents a different healthy physical disk. Replace both letters after checking them carefully.
Microsoft recommends Extensive mode for older NTFS deletions, formatted or corrupted NTFS volumes, and FAT/exFAT recovery. Read its Windows File Recovery instructions before choosing a mode.
Avoid installing this tool onto the source disk. If you prefer previews and a visual selection process, Magic Data Recovery may be easier to use. Neither approach makes an unstable drive safe to scan.
Method 4: Choose Professional Hitachi Data Recovery for Hardware Trouble
Best for: Clicking, impact damage, unstable detection, repeated read failures, or an unreadable device.
Limitation: Cost and recoverability require an individual assessment.
Expected result: A diagnosis and, where feasible, recovery from controlled hardware access or an image.
Professional Hitachi data recovery becomes the appropriate route when ordinary software cannot read the device safely.
Disconnect the disk if it develops repeated abnormal clicking, grinding, or persistent connection failures. Do not open the sealed drive, freeze it, or swap circuit boards based on an online tutorial.
When requesting an assessment, provide:
- The exact model and capacity.
- What happened immediately before the failure.
- Any unusual sounds or detection behavior.
- Repairs or scans you already attempted.
- The files that matter most.
Ask about diagnostic charges, confidentiality, recovery approval, and return arrangements. A warranty replacement supplies replacement hardware; it does not substitute for recovering your files.
For a drive from RAID, a NAS, or a DVR, preserve the original configuration and disk order. Those systems may require reconstruction beyond a standalone Windows file scan.
Why CHKDSK Should Wait Until After Recovery
Hitachi data recovery and disk repair serve different goals. Recovery tries to extract files; repair tries to make a file system consistent.
Microsoft documents that CHKDSK with /f fixes file system errors, while /r includes repair functionality and checks for bad sectors. These operations can change file system information. Therefore, avoid repair commands on the only copy of important lost data.
Recover and verify the files—or obtain a suitable image—before considering repairs on a stable disk. Formatting and initialization also belong outside the recovery-first workflow.
If hardware trouble caused the loss, replace the disk rather than trusting a temporary return to normal operation.
Verify Files Before You Call the Recovery Successful
A completed scan does not prove successful Hitachi data recovery. Check the actual output on the destination drive.
File type | What to verify |
Photos | Open full-resolution images and inspect for missing areas or visual corruption |
Videos | Play the beginning, middle, and end; check audio and seeking |
Word and Excel files | Open in the original application; inspect tables, images, formulas, and multiple sheets |
Archives | Run the archive application’s integrity test |
Project files | Open the project and confirm that linked assets are available |
Compare file counts, folder coverage, and expected dates where you have a reference. A generic filename may still contain useful content; an original filename may hide damaged content.
Keep the source untouched until you have verified the important files and made another backup.
Conclusion
The safest Hitachi data recovery approach starts with the drive’s behavior. Check existing copies first. For a stable, detected disk, use recovery software and save the output elsewhere. For clicking or unstable hardware, stop and seek specialist help.
We recommend Magic Data Recovery for suitable logical-loss cases because its scan, preview, and recovery workflow helps ordinary Windows users assess missing files without command-line setup. It remains subject to the same overwrite and hardware limits as other recovery tools.
For related HDD scenarios and next steps, visit our hard drive recovery guide.
Supports Windows 7/8/10/11 and Windows Server
FAQs
Can I recover deleted files from a Hitachi hard drive?
Is Hitachi data recovery possible after formatting?
What is the best Hitachi data recovery software?
Why does my Hitachi hard drive show RAW?
What if Windows does not detect my Hitachi drive?
Can I recover files from a clicking Hitachi hard drive?
Do Hitachi and HGST drives need different recovery software?
How long does Hitachi hard drive recovery take?

Jason is a data recovery and technical support specialist with over 15 years of hands-on experience. He has worked extensively with frontline users, troubleshooting difficult data loss cases and providing practical recovery solutions for accidental deletion, formatted drives, damaged file systems, lost partitions, system failures, and other recovery emergencies. His expertise also includes backup and restoration, file repair, and disaster recovery, with a strong emphasis on safe, reliable, and technically accurate guidance.