
How to Recover a Formatted Hard Drive: Free Methods & Software
Formatted hard drive recovery may still be possible when a disk suddenly appears empty after an accidental format. If the HDD remains readable and no backup exists, software such as Magic Data Recovery can help search for surviving files. This guide focuses on formatting; our hard drive recovery covers other HDD data-loss situations.
The outcome depends on how the drive was formatted, whether anything was written afterward, and whether the device is an HDD or SSD. A quick-formatted HDD may retain file content. Overwritten sectors, a completed zero-writing full format, or SSD TRIM can make the original data unavailable.
Stop using the affected drive before trying recovery. First identify what happened, check for an existing copy, and choose a method that saves the recovered files to another physical device.
Supports Windows 7/8/10/11 and Windows Server
Table of Contents
Before You Start: Protect the Formatted Drive
Do not copy files, install programs, or save recovered data to the affected disk. Do not format it again, initialize it, or run CHKDSK to try to bring the files back. If it contained Windows, stop booting from it and use another computer for recovery. If an HDD clicks, grinds, or repeatedly disconnects, stop scanning and seek professional assessment. Prepare a separate healthy drive with enough free space for the recovered files.
Quick Answer: Can You Recover a Formatted Hard Drive?
Yes, sometimes. To recover a formatted hard drive, restore an available backup first. Without a backup, a stable, quick-formatted HDD is a reasonable candidate for recovery software. Free options include Windows File Recovery and PhotoRec. Recovery cannot reconstruct file content that has been overwritten.
Your situation | What it means | First action |
Quick-formatted HDD, with little or no subsequent use | Some original file content may remain | Check backups, then scan if needed |
Some new files were copied after formatting | Parts of the original data may be overwritten | Stop writing; prioritize the most important files |
Completed Windows full format that wrote across the volume | Original content in the overwritten area is unavailable | Look for backups or other copies |
Formatted SSD | TRIM and controller behavior may prevent recovery | Stop use; do not assume HDD recovery expectations apply |
Windows only asks to format the drive | Formatting may not have happened; the file system may be unreadable | Cancel the prompt and protect the data |
Clicking, grinding, or repeated disconnections | Possible hardware failure | Stop DIY recovery |
Confirm Which Drive Was Formatted
On a stable Windows PC, right-click Start → Disk Management. Use the disk capacity, partition layout, and available device information to identify the affected storage device. Drive letters can change when a disk is connected to another computer.
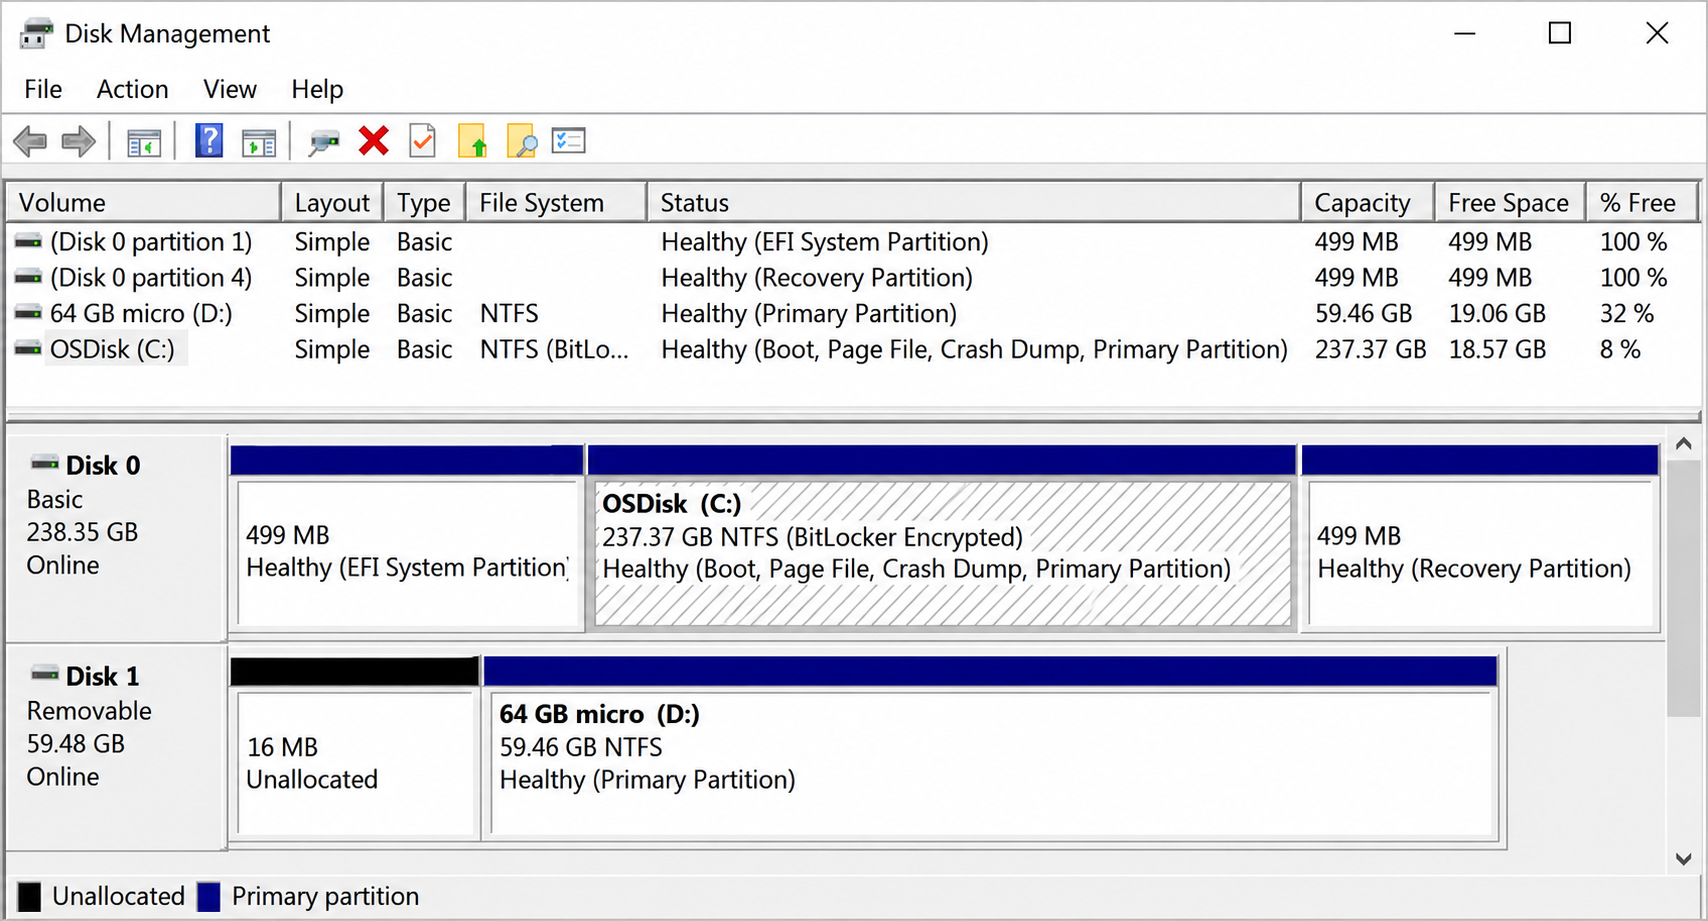
View the information only. Decline prompts to initialize or format a disk. A volume marked RAW or an area marked Unallocated does not, by itself, prove that the original file content was erased. If Windows cannot recognize the volume’s file system, follow a RAW hard drive recovery workflow before attempting repairs. If you cannot confidently identify the source drive, stop before selecting a scan or recovery destination.
What Determines Whether Formatted Files Can Be Recovered?
Quick Format Versus Full Format
A quick format creates new file-system structures without deliberately overwriting the entire volume. Some older file content may remain, although names, folders, and other metadata can be lost. Microsoft’s format command documentation describes how quick formatting replaces file-table and root-directory information.
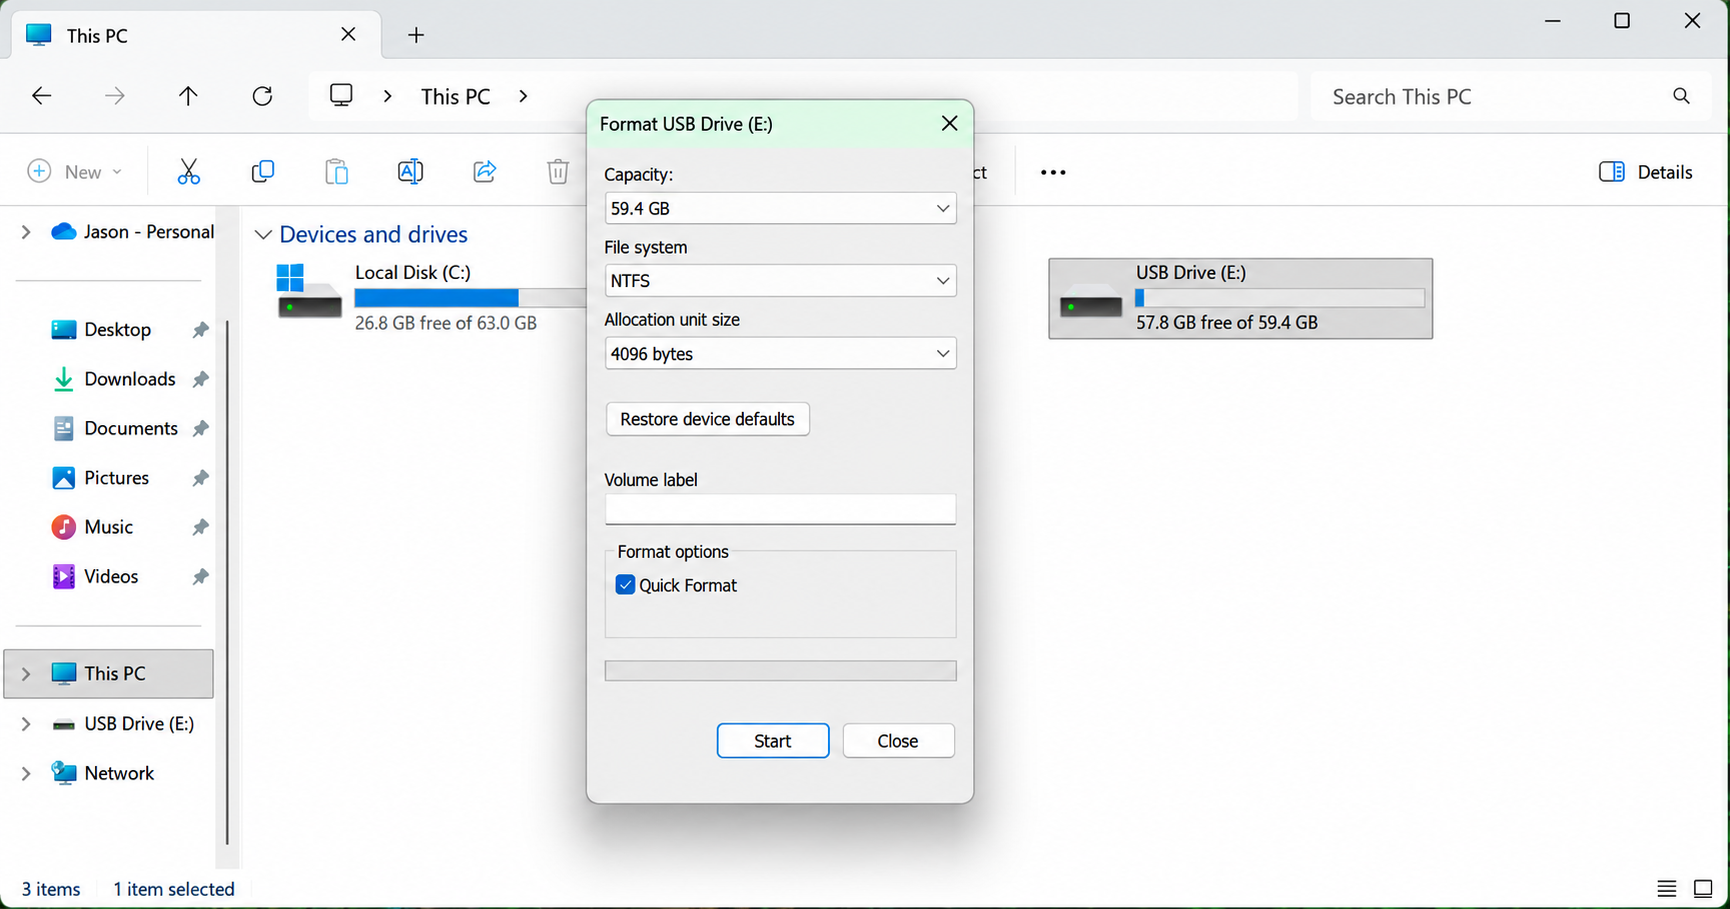
A full format is different. Microsoft documents that a full volume format writes to every sector. On current Windows systems, a completed full format that zeroes the affected volume prevents ordinary recovery of its overwritten content. A different application’s “format” or “erase” operation may behave differently, so the exact tool matters.
Practical rule: if the format type is unknown, preserve the disk rather than running another format to test it.
Overwriting and SSD TRIM
New writes may replace only some lost files, so partial recovery can still be possible. However, no recovery program can recreate the original bytes of an overwritten file just by scanning longer.
SSDs introduce another limit. TRIM tells storage that certain blocks are no longer needed; the controller may subsequently discard their contents. Microsoft’s storage documentation explains this relationship between unused sectors and TRIM/unmap hints. Whether those commands reached a particular SSD depends on its connection and configuration. Disabling TRIM afterward cannot undo commands already processed.
Choose a Recovery Method
Use an existing copy before scanning the original disk. If no usable copy exists and the device reads normally, choose between a command-line tool, an open-source recovery tool, and a graphical workflow.
Method | Best for | Free recovery | Main limitation |
Existing backup or independent copy | Files saved elsewhere before formatting | No recovery-software purchase needed | The backup must contain the required files |
Windows File Recovery | Windows users comfortable with commands | Free Microsoft utility | Requires correct drive letters and command syntax |
Magic Data Recovery | Users who want to browse and preview scan results | Up to 500 MB for testing | Larger recovery requires a paid license |
PhotoRec | Users who accept sorting files after recovery | Free and open source | Original names and folder organization are generally lost |
Professional service | Unstable devices or irreplaceable data | Paid assessment/service terms vary | Cannot reverse actual overwriting |
Method 1: Restore Files from an Existing Backup
Best for: anyone with a backup or independent copy made before the format.
A backup avoids trying to reconstruct data from the affected drive. Check a backup disk, NAS, cloud account, another computer, and shared copies before beginning a full-disk scan. An enabled backup feature is useful only if it actually included the missing files.
- Open the backup location from a healthy computer.
- Locate a backup date before the formatting operation.
- Select the missing folders or files.
- Copy or restore them to a separate healthy drive.
- Open the restored files and confirm their contents.
For File History or another backup application, use its browsing or restore interface to access the earlier version. Check cloud content through the provider’s website as well; an online copy may still exist even when the local disk is empty.
Expected result: a readable copy of the required files from the backup date. If files are missing or outdated, keep the formatted disk untouched and recover only what the backup does not cover.
Method 2: Try Windows File Recovery for Free
Best for: Windows users comfortable with command-line recovery. Microsoft’s Windows File Recovery instructions recommend Extensive mode for formatted NTFS volumes and for FAT/exFAT recovery.
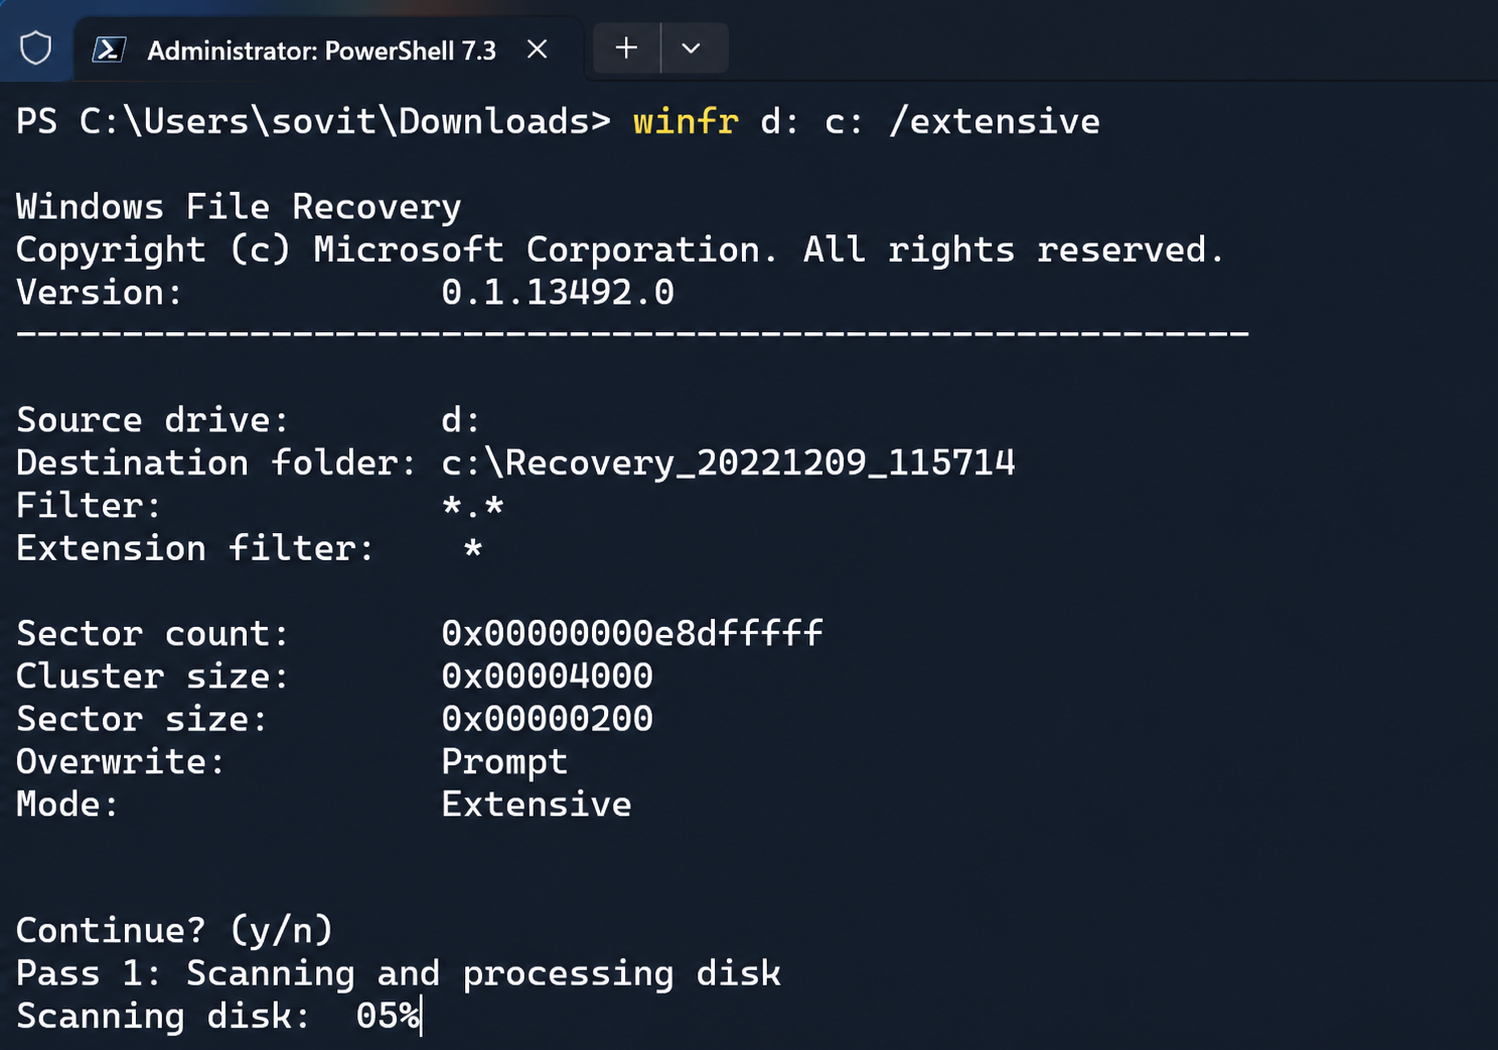
- Install Windows File Recovery from Microsoft Store on a healthy Windows computer.
- Connect the source disk and a separate destination drive.
- Open Windows File Recovery and approve the administrator prompt.
- Replace the example drive letters below with your actual source and destination:
- winfr D: E: /extensive
Here, D: is the formatted source; E: is the destination on another physical device. Confirm both before continuing.
To target common document and photo types:
- winfr D: E: /extensive /n *.docx /n *.xlsx /n *.pdf /n *.jpg
- Confirm the operation, then inspect the recovery folder on the destination.
Expected result: recovered files saved separately. This method does not guarantee intact files. If it finds nothing useful, recheck the source selection and format history before choosing another approach.
Method 3: Recover Files with Magic Data Recovery
Best for: a readable formatted hard disk with no complete backup, when a graphical scan-and-preview workflow is preferable to commands.
Magic Data Recovery supports formatted-drive recovery and lets users preview supported file types. Its free allowance provides up to 500 MB of recovery for testing; larger recovery requires an upgrade. Scanning or previewing files does not mean every result will be intact.
Supports Windows 7/8/10/11 and Windows Server
Step 1: Prepare a Separate Recovery Destination
Connect another healthy physical drive with enough available space. A different partition on the same affected disk is not a suitable destination. If the formatted device was the Windows system disk, connect it to another computer rather than reinstalling Windows on it.
Step 2: Install and Select the Source
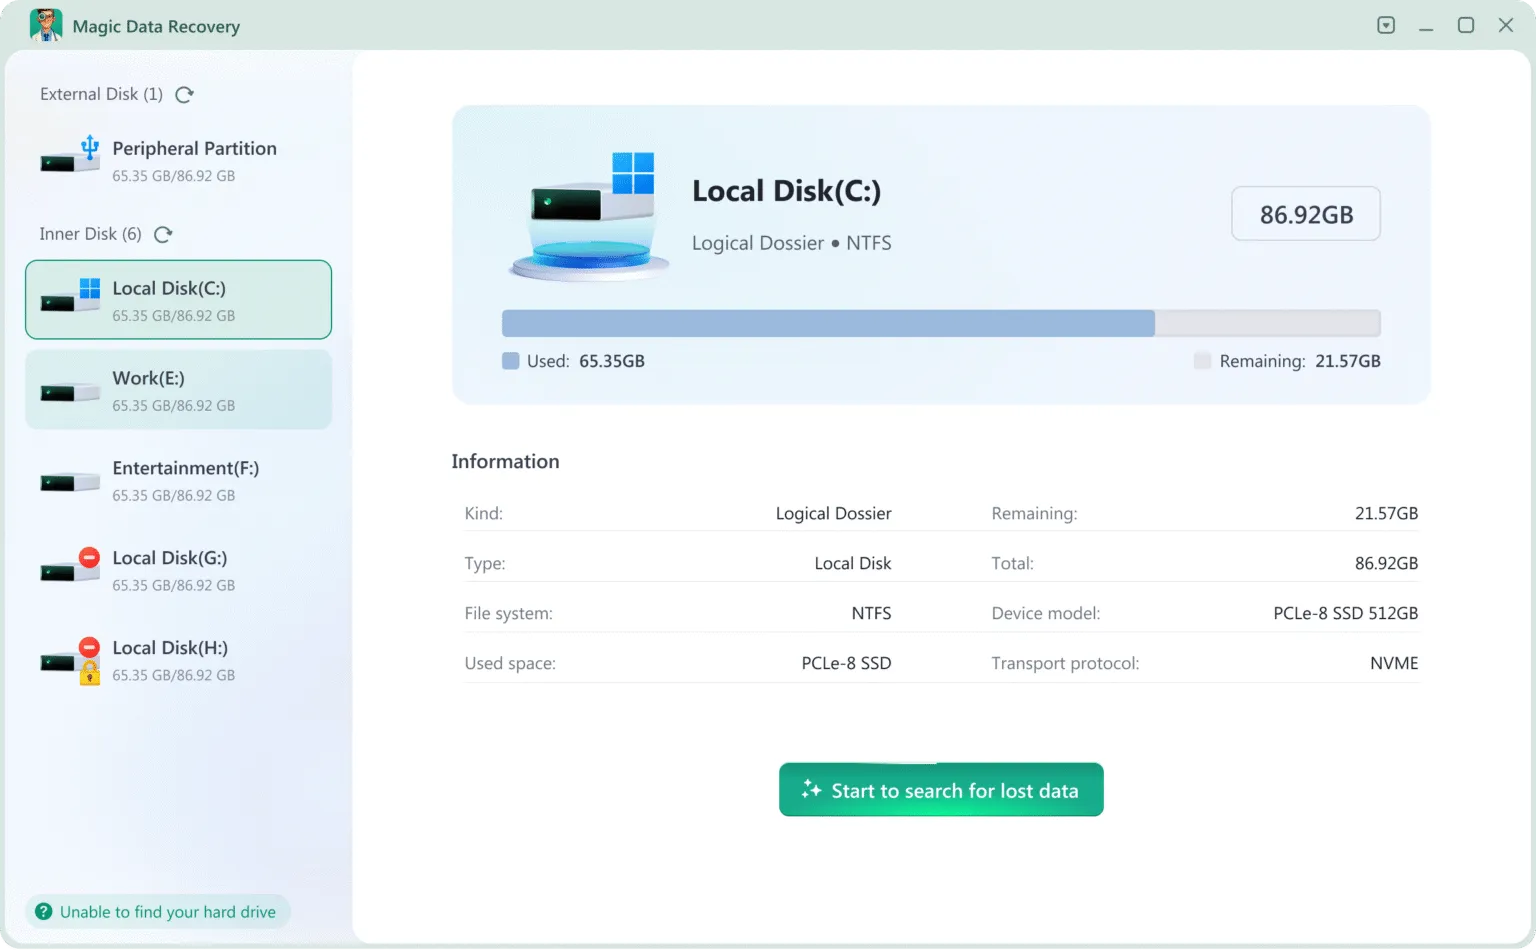
Install the program on the healthy computer. Open it and identify the formatted drive by capacity and device information. Start its scan only after confirming that the selected source is the device that held the missing files.
Step 3: Review the Scan Results
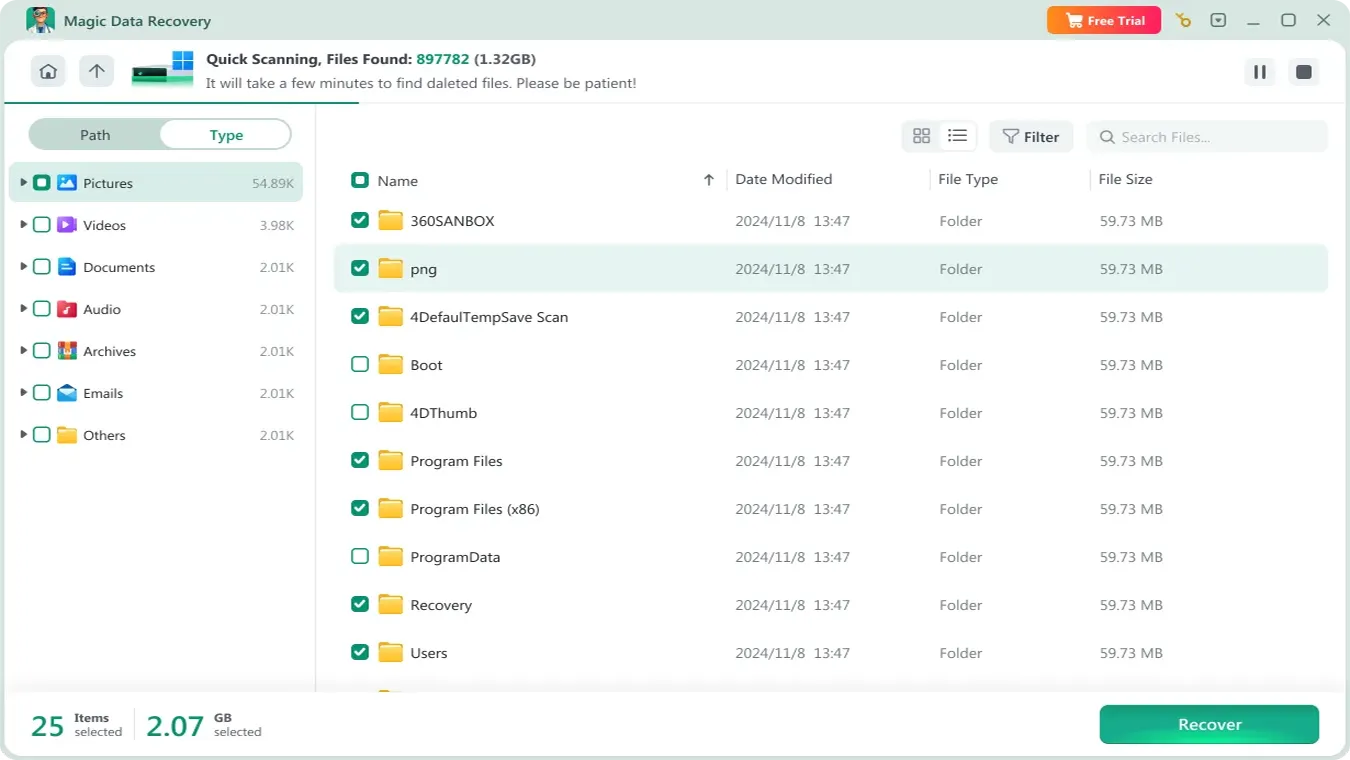
Allow the scan to finish on a stable drive. Browse the results and use the available search or file-type filters to locate priority files. If original names are missing, check results organized by file type as well. Duplicate entries may represent different records or versions of the same file.
Step 4: Preview Representative Files
Check several important documents, photos, and videos where preview is supported. A recognizable filename alone is insufficient. A failed preview can indicate damage or an unsupported preview format; save a sample to the separate destination and open it in its normal application before drawing a conclusion.

Step 5: Save and Validate the Recovery
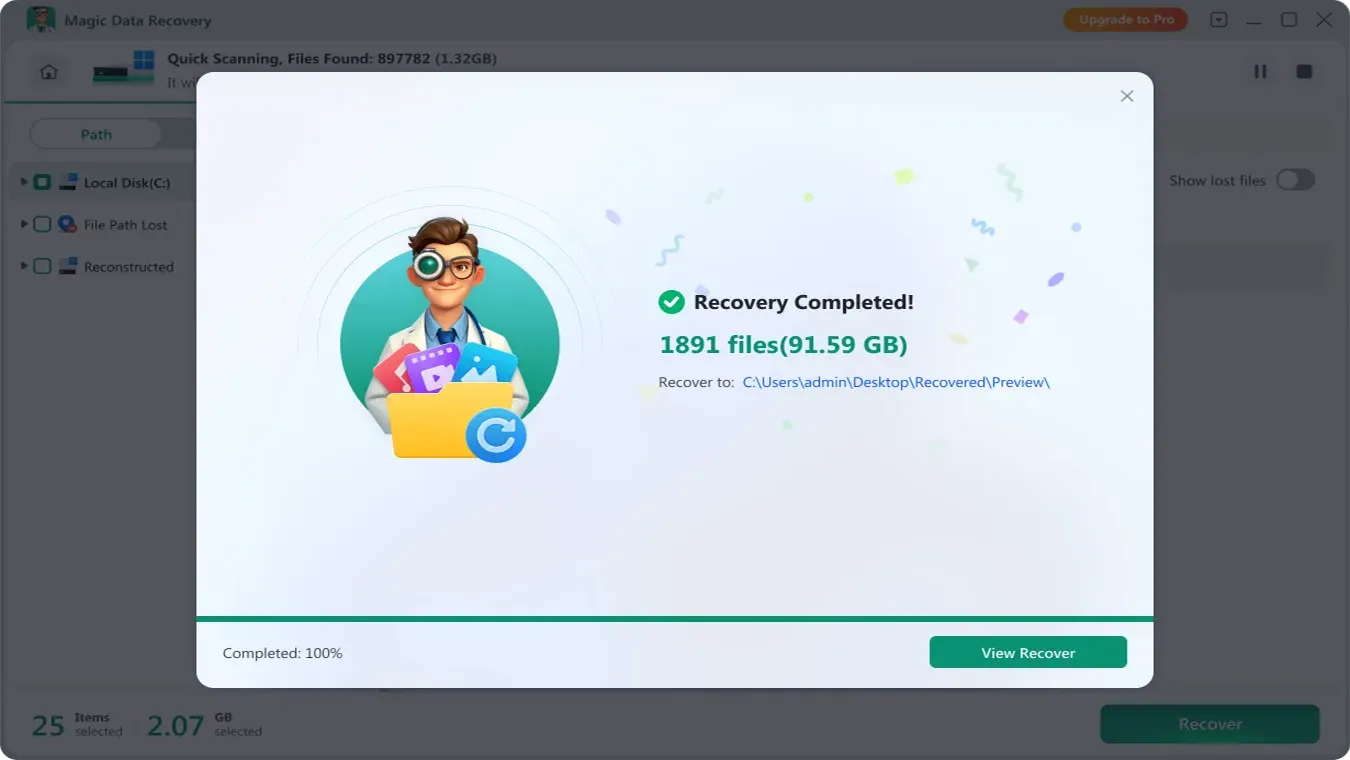
Select the required files and recover them to the prepared destination. Use the free allowance to check usable results before deciding whether to recover a larger amount. Keep the source disk unchanged until the important files have been verified.
If recovery fails: confirm that the correct disk was scanned. Stop if the device becomes unstable. Software cannot repair mechanical damage or recover content already overwritten or discarded by the SSD controller.
Try Magic Data Recovery when the drive is stable and a preview-based workflow fits your situation.
Method 4: Use PhotoRec as an Open-Source Alternative
Best for: users who want a free tool and can accept manually sorting recovered files. PhotoRec searches underlying file content rather than relying on an intact file system. It generally does not preserve original filenames or folders.
- Download the TestDisk/PhotoRec package from CGSecurity to a healthy drive.
- Run PhotoRec with the permissions needed to read the source disk.
- Identify the affected disk and select the formatted partition.
- Choose the appropriate file-system family; for NTFS, FAT, and exFAT, select Other.
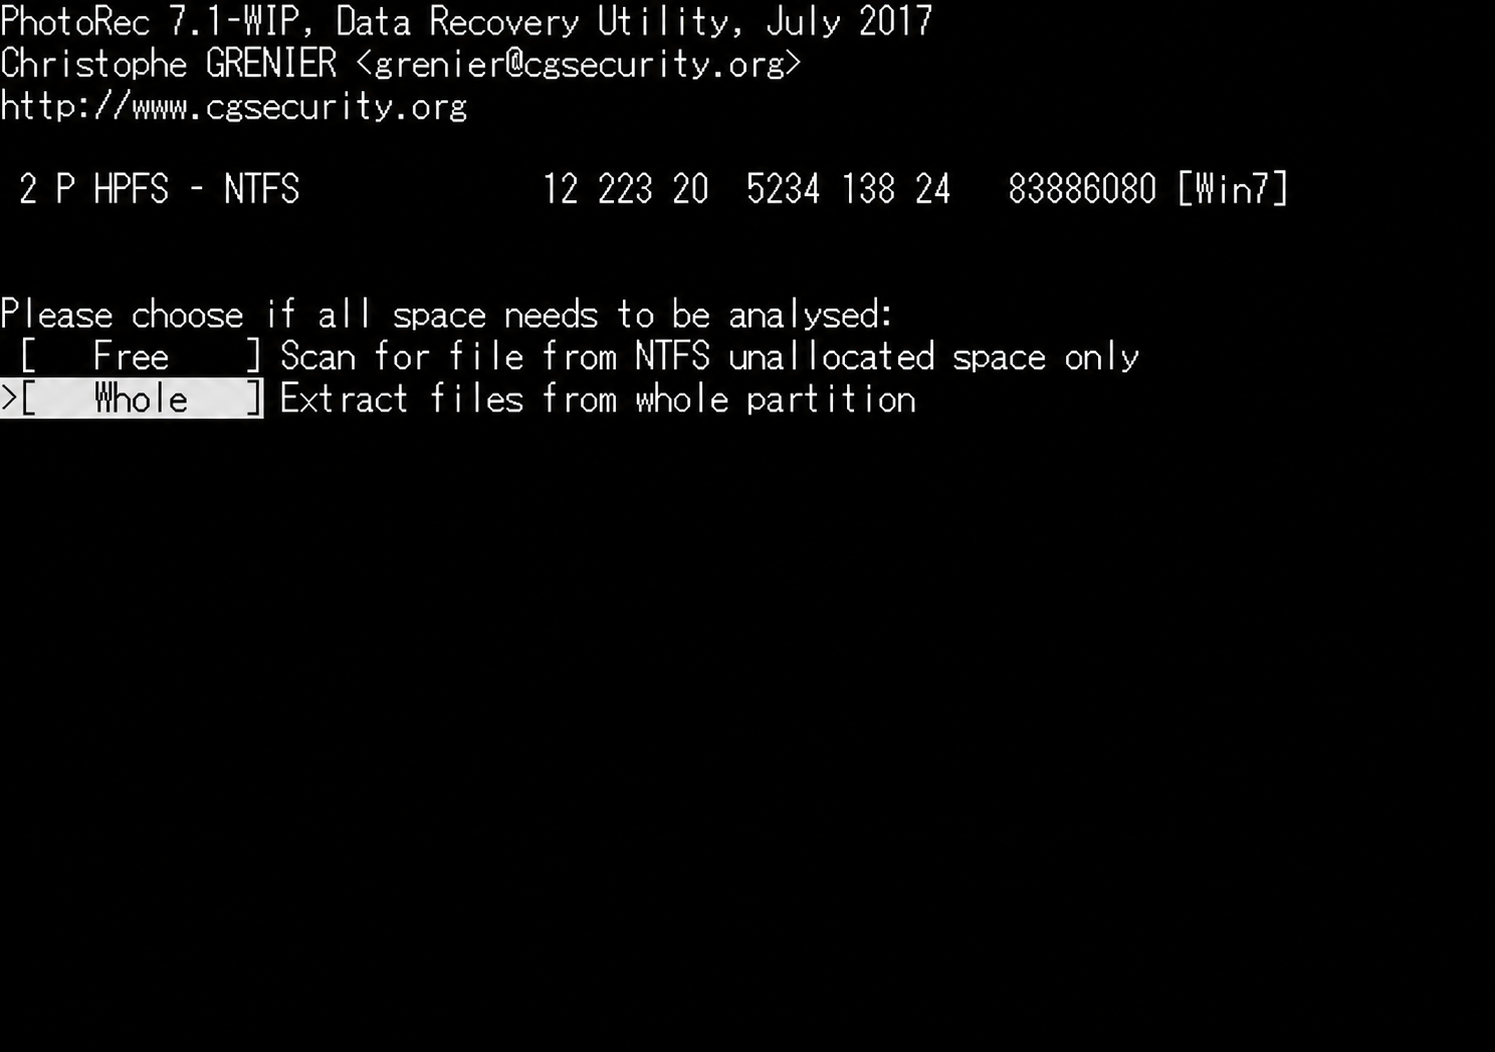
- Select Whole to search the partition, then choose an output folder on another physical drive.
The official walkthrough explains these selections. Results are saved in numbered recovery directories. Check file contents rather than relying on generated names.
If it fails: reconsider overwriting, format type, and device health. Repeated scans cannot restore data that no longer exists.
Verify That the Recovered Files Actually Work
A recovery count measures files found or saved, not necessarily usable files. Before reusing the source disk, check the files that matter most.
File type | What to verify |
Word documents and PDFs | Open them; inspect multiple pages, text, tables, and images |
Excel workbooks | Check worksheets, formulas, and required values |
Photos | Open at full size; look for missing or corrupted areas |
Videos | Play through the complete clip; check picture, sound, and duration |
ZIP and other archives | Run the application’s integrity test and extract important contents |
Compare the recovered set with a known file list or backup if one exists. Keep damaged copies separate from verified files. Once the essential files are confirmed, make another independent copy before repairing or reformatting the source.
When to Stop DIY Formatted Hard Drive Recovery
Stop if the disk develops unusual mechanical sounds, repeatedly disappears, reports the wrong capacity, or produces persistent read errors. A drive damaged by impact, liquid, or electrical failure should be assessed before more scanning.
Professional assessment is also reasonable when the disk contains the only copy of irreplaceable work. A specialist may address access or hardware problems, but cannot promise to reverse overwriting, secure erasure, or unavailable SSD blocks.
Do not use CHKDSK, initialization, partition rebuilding, or another format as shortcuts to file recovery. These operations can change disk structures. Restore and verify important data before considering repairs or reuse.
Prevent Another Formatting Loss
Keep an independent backup of important folders, and test that you can open files from it. Before any future format, confirm the target disk by capacity and device identity rather than drive letter alone.
Disconnect unrelated removable drives when preparing installation media or formatting a device. Keep the recovery destination separate from the source, and retain a second verified copy of recovered work. Cloud synchronization can be useful, but a synced deletion may spread to other devices; versioned backups provide additional protection.
Conclusion
To recover a formatted hard drive, first stop writing to it and check for an existing backup. If a healthy HDD was quick-formatted, recovery software may locate surviving files. A completed overwrite or an SSD’s processed TRIM commands can prevent recovery even when the device still appears normally in Windows.
Choose the next action by the condition of the data and the disk: restore a usable backup, try a suitable free tool, or use Magic Data Recovery to scan and preview a stable drive. Stop DIY attempts when hardware symptoms appear. Save every recovery to another physical device and verify the contents before reusing the original.
For related situations beyond formatting, visit our hard drive recovery.
Supports Windows 7/8/10/11 and Windows Server
Formatted Hard Drive Recovery FAQs
Can I Recover Files Months After Formatting?
Can I Undo an Accidental Format with Ctrl + Z?
Will Recovery Restore the Original Folder Structure?
Is Free Scanning the Same as Free Recovery?
Can I Recover Files After Reinstalling Windows?
What If the Formatted Drive Was BitLocker-Encrypted?
Does This Guide Apply to a Formatted External Hard Drive?
Can I Use the Same Methods on a Mac?

Vasilii is a data recovery specialist with around 10 years of hands-on experience in the field. Throughout his career, he has successfully solved thousands of complex cases involving deleted files, formatted drives, lost partitions, and RAW file systems. His expertise covers both manual recovery methods using professional tools like hex editors and advanced automated solutions with recovery software. Vasilii's mission is to make reliable data recovery knowledge accessible to both IT professionals and everyday users, helping them safeguard their valuable digital assets.