
Recovery Documentation Guide for Lost Files
Losing a file rarely feels “small.” One moment your report, contract, or thesis looks fine. Next, it disappears after a mistaken delete, a quick format, a crash, or a drive that suddenly shows “RAW.” In those moments, guessing can make things worse. A clear recovery documentation process helps you stop risky actions, pick the right Document recovery method, and track what worked.
This guide shows a practical recovery documentation workflow for everyday users. You’ll learn how to handle document recovery, file recovery, and tricky cases like recover unsaved documents or file system error recovery. You’ll also see where built-in options end and where a dedicated tool like Magic Data Recovery becomes the safer next step.
Supports Windows 7/8/10/11 and Windows Server
Table of Contents
What recovery documentation is
Recovery documentation is a simple record of what happened and what you did to fix it. Think of it as a short playbook you can follow under stress.
It typically answers:
- What did you lose (file names, types, folders)?
- Where did it live (disk, partition, USB, SD card, cloud folder)?
- What happened (deleted, formatted, crash, file system error)?
- What actions did you already take (important for avoiding repeats)?
- Which recovery path did you choose and why?
When you follow recovery documentation, you reduce repeated attempts, avoid overwriting data, and improve the odds of successful file recovery.
The first 10 minutes: rules that protect your recovery chances
Most failed recoveries happen because people keep using the affected drive. Even “normal” activity can overwrite the space your file used.
Follow these rules before any data recovery software scan:
- Stop writing to the affected drive right now.
Don’t download files, don’t install apps, and don’t copy large folders.
- Save recovered files to a different location.
Use another internal drive, an external drive, or a large USB.
- Don’t run repair tools first.
Utilities like CHKDSK can change disk structures. Recover data first, then repair later.
- Write down the timeline.
Note when you noticed the loss and any steps you took since then.
- If you suspect hardware damage, stop.
Clicking sounds, repeated disconnects, or a burning smell call for professional help.
These basics belong in every recovery documentation template because they prevent the most common “unforced errors.”
Copy-and-use recovery documentation template
Use this template as-is and fill it out while you work:
- Incident summary (one sentence):
- Device & OS (Windows/macOS, laptop/desktop, external/USB):
- Storage type (HDD/SSD/USB/SD):
- File system (NTFS/exFAT/APFS, if known):
- Loss scenario (deleted / formatted / crash / file system error):
- What you already tried (be honest and specific):
- Chosen recovery path and reason:
- Tool used (if any) + scan mode:
- Recovery destination (different drive):
- Verification checklist results:
- Prevention action after recovery:
This structure keeps your recovery documentation consistent and makes repeat incidents easier to solve.
Choose the right recovery path (quick decision guide)
Different problems need different fixes. Use this decision guide before you start scanning.
If you deleted files (or emptied the Recycle Bin)
Choose a recover deleted files path when:
- You used Delete or Shift+Delete
- You emptied Recycle Bin
- A cleanup tool removed files
Start with simple checks, then move to data recovery software if needed.
If you formatted a drive or reinstalled the OS
Choose a recover formatted drive path when:
- You formatted the wrong partition
- A reinstall “wiped” a data volume
- An external disk shows empty after format
Formatting often removes references, not the entire content, so deep scanning helps.
If you see file system errors (RAW / “You need to format”)
Choose a file system error recovery path when:
- The drive becomes RAW
- “Location is not accessible” appears
- The system asks you to format to use the disk
Do not format. Recover files first.
If a document was never saved (crash, power loss, app freeze)
Choose a recover unsaved documents path when:
- Word/Excel crashed
- The system shut down mid-edit
- You closed without saving by mistake
Try built-in autosave options first. If they fail, scan for temporary fragments.
Path A: Recover deleted documents safely
Deleted does not always mean gone. First, try the fastest options:
- Check Recycle Bin or Trash
- Check cloud recycle bins (OneDrive/Google Drive/Dropbox)
- Search by file type and recent date (DOCX, PDF, XLSX)
- If nothing appears, stop searching on the same drive for too long
When quick checks fail, document recovery often requires scanning the disk for recently removed entries. At this point, a focused file recovery tool helps because it can locate deleted records, preview results, and restore files to a safe destination.
Path B: Recover a formatted drive without making it worse
A format usually rebuilds file system structures. The original data may still sit on the disk until new writes overwrite it. That’s why speed and restraint matter.
Do this:
- Stop using the formatted drive
- Avoid copying “test files” onto it
- Use deep scan on another machine if possible
- Recover to a different drive
Deep scanning can take longer, but it often finds more files and more file types during file recovery. In many cases, a deep scan is the most practical way to recover formatted drive data without guessing.
Path C: Fix file system errors by recovering first
When a disk suddenly becomes RAW or unreadable, many people click “Format.” That step can reduce your options.
Instead:
- Disconnect and reconnect once (avoid repeated attempts)
- Try a different USB port or cable for external drives
- If the disk still shows errors, start recovery, not repair
A file system error recovery workflow focuses on extracting data before trying to “fix” the structure. This approach protects documents, photos, and project folders. After you recover files, you can reformat and rebuild the disk safely.
Path D: Recover unsaved documents after a crash
Unsaved files behave differently from deleted files. The content might exist as:
- AutoRecover files
- temporary files
- cached drafts
- crash recovery sessions
Try these steps first:
- Reopen the app and look for a recovery panel
- Search for AutoRecover or “.asd/.tmp” equivalents
- Check “Recent” and “Unsaved” areas (Office apps often provide them)
- Search your system for the file name or recent DOCX backups
If the app offers nothing and the work mattered, treat it as recover unsaved documents and move to scanning. A good tool can find fragments and temporary versions that manual browsing misses.
Where Magic Data Recovery fits
Built-in options work for simple mistakes. They struggle when you face:
- Recycle Bin emptied or Shift+Delete
- A formatted partition
- A drive with file system errors
- Missing autosave drafts after a crash
That’s where Magic Data Recovery becomes useful. It targets the core pain point: you need a clear way to scan, preview, and restore files without writing more data to the damaged location.
What problems Magic Data Recovery helps solve
Magic Data Recovery supports recovery in scenarios such as:
- deleted data
- formatted drives
- file system errors
- unsaved documents
- file loss caused by logical issues (not hardware repair)
This coverage matters because real-world incidents rarely stay “clean.” A crash can happen after an accidental delete. A file system issue can appear right after a failed transfer. One tool that handles these paths keeps your recovery documentation simpler.
Unique selling points that matter in real use
- Clear workflow: select location → scan → preview → recover
- Preview-first approach: confirm documents before restoring
- Fits multiple scenarios: recover deleted files, recover formatted drive, file system error recovery, and recover unsaved documents
- Helps reduce risky trial-and-error: you follow steps and record outcomes
Example use cases (what people actually do)
- You delete a client contract, empty Recycle Bin, and need document recovery today
- You format an SD card during a camera import, then need file recovery for RAW photos and PDFs
- Your external drive turns RAW and prompts a format, so you run file system error recovery first
- Word crashes during editing, autosave fails, and you try to recover unsaved documents
Why it can feel more reliable than common alternatives
Command-line recovery tools can work, but many users make mistakes with paths and destinations. Manual searching can also miss temporary files. Magic Data Recovery reduces those failure points by guiding you through a consistent process you can document.
If you want a more efficient solution that matches your recovery documentation workflow, consider trying Magic Data Recovery and follow the steps in this guide.
Supports Windows 7/8/10/11 and Windows Server
Step-by-step: how to document recovery while you recover
Use these steps and update your template as you go:
1. Record the scenario
Write “deleted,” “formatted,” “file system error,” or “unsaved.”
2. Choose the scan target
Pick the exact partition or device that held the files.
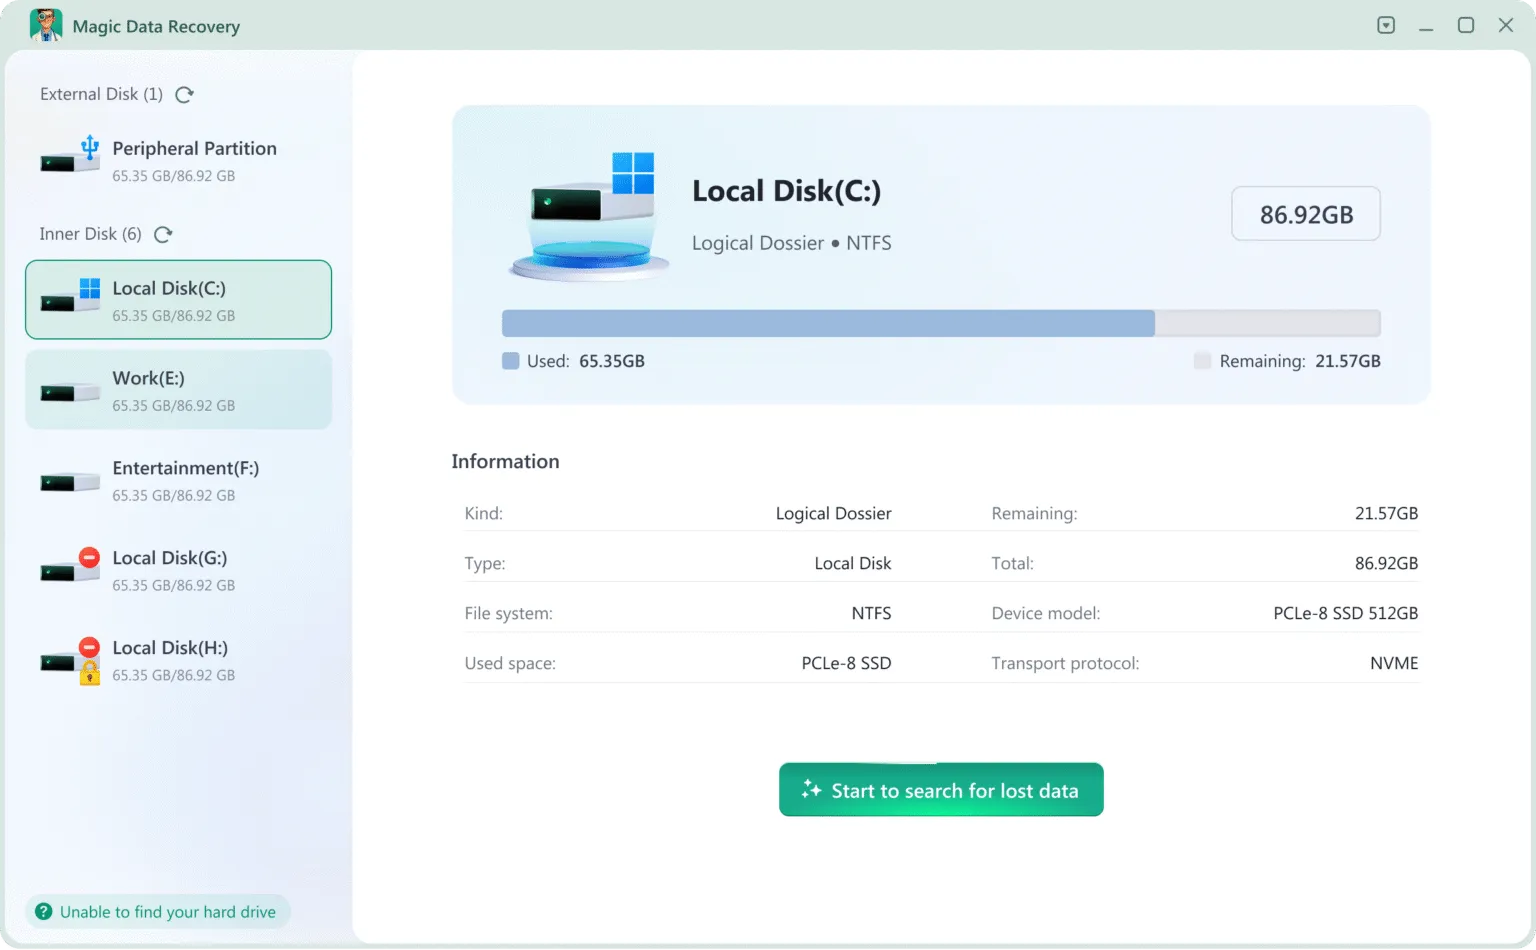
3. Select scan mode
Magic Data Recovery starts the quick scan first then continue the deep scan, you can stop the scanning if your lost files have been found after the quick scan.
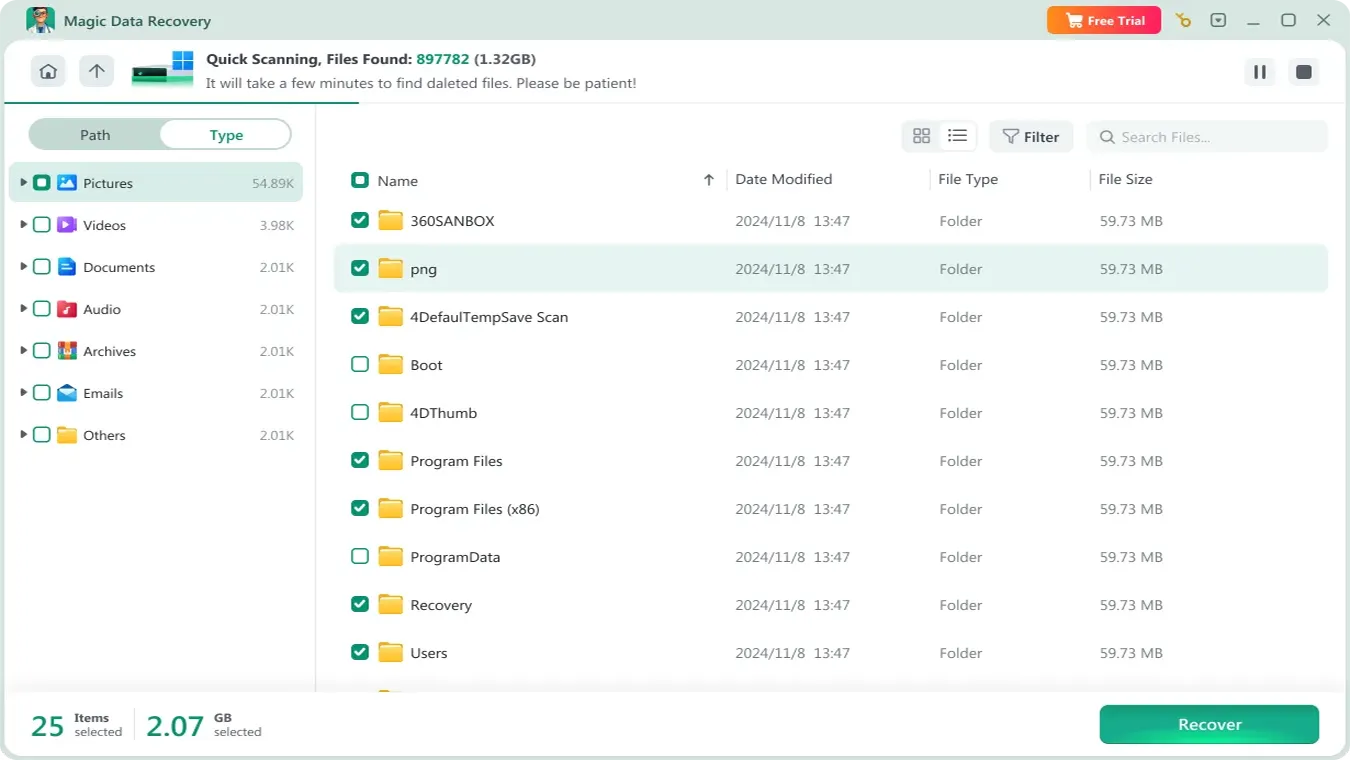
4. Preview files before recovery
Preview helps validate document recovery results quickly.
5. Recover to a different destination
This step protects remaining recoverable data.
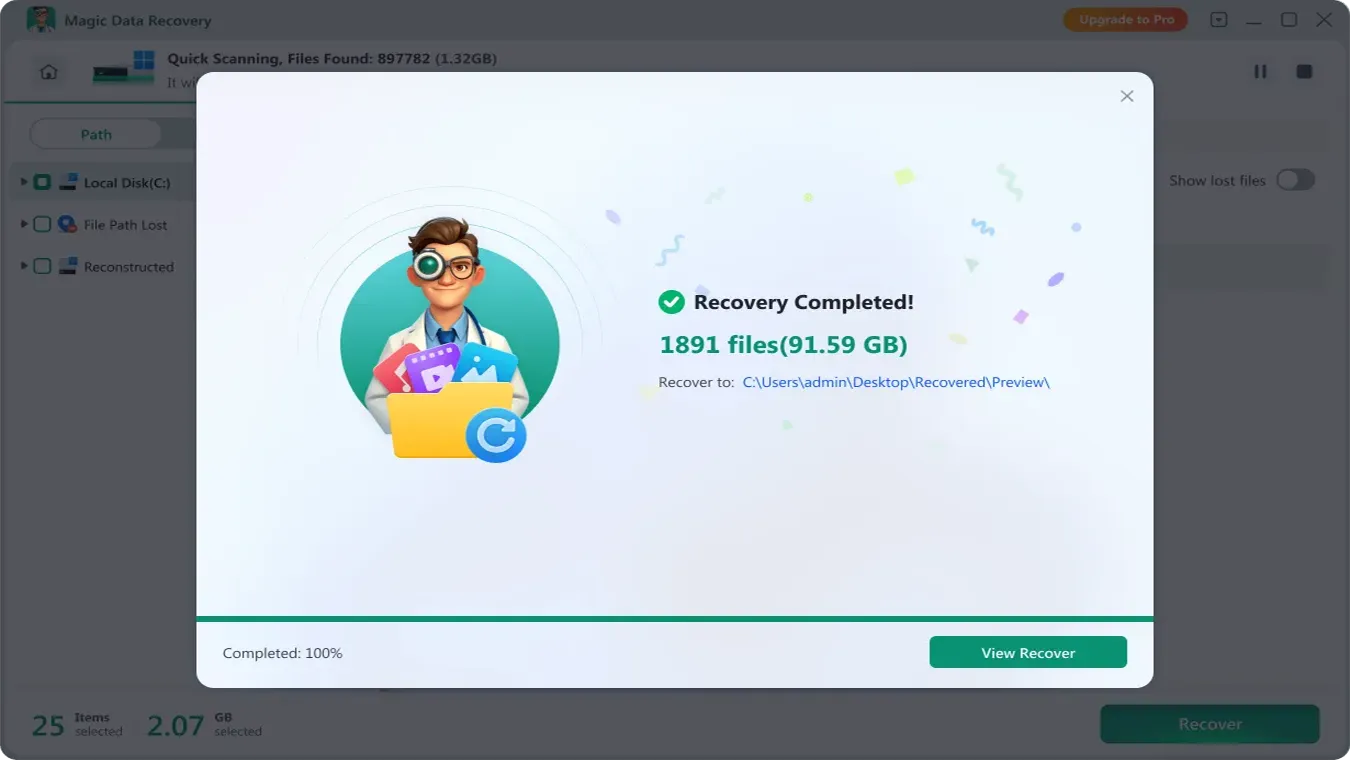
6. Verify and close the loop
Open key files. Check file sizes. Confirm you recovered the right version.
This method keeps recovery documentation actionable instead of theoretical.
Common mistakes that ruin recovery (and how to avoid them)
- Installing recovery tools on the affected drive
Install on another disk to avoid overwriting.
- Restoring files back to the same partition
Always recover elsewhere.
- Running repair utilities too early
Recover first. Repair second.
- Keeping the drive in heavy use while “thinking”
Pause normal work until you finish file recovery.
Each mistake is easy to avoid when you follow recovery documentation and stick to a single recovery plan.
Conclusion
A reliable recovery outcome depends more on your process than on luck. With recovery documentation, you avoid panic clicks, protect recoverable space, and pick the correct path for your scenario. You also keep a record you can reuse next time.
When you need help beyond built-in options, Magic Data Recovery provides a straightforward Data Recovery way to handle recover deleted files, recover formatted drive incidents, file system error recovery, and recover unsaved documents in one guided workflow. That makes it easier to recover, verify, and document results without overcomplicating the steps.
Supports Windows 7/8/10/11 and Windows Server
FAQs
How do I know if I should use recovery software or built-in tools?
Start with built-in tools when the loss is simple and recent, such as Recycle Bin or an app’s “Recover Unsaved” panel. Move to data recovery software when you emptied the bin, formatted a drive, hit file system errors, or can’t locate autosave drafts. This decision reduces overwrite risk and keeps your recovery documentation clean.
Can I recover deleted files after I kept using the computer?
Sometimes, yes. Continued use can overwrite deleted data, so results vary. Stop writing to the affected drive as soon as possible, then run a scan. For the best odds, recover to a different disk and verify key files immediately. A structured recover deleted files workflow prevents extra damage during file recovery.
What should I do right after formatting the wrong drive?
Stop using that drive immediately. Avoid copying “test files” onto it. Choose a deep scan approach and recover to another storage device. Formatting often removes directory references rather than fully erasing content, so quick action helps. Add each step to recovery documentation so you don’t repeat risky actions during recover formatted drive attempts.
The drive shows RAW and asks to format. Should I click format?
No. Formatting can reduce your options. Treat this as file system error recovery: stop using the drive, check cables or ports once, then focus on recovering files first. After you secure your data, you can reformat and rebuild the disk. This sequence protects documents and avoids turning a recoverable issue into a harder document recovery case.
Can unsaved Word or Excel documents be recovered after a crash?
Often, yes, but it depends on autosave settings and whether temporary files still exist. Check the app’s recovery panel, AutoRecover folders, and recent files first. If nothing appears and the work matters, scanning can sometimes locate temporary fragments. A recover unsaved documents process works best when you act quickly and avoid heavy disk activity.
Is it safe to run CHKDSK or other repair tools before recovery?
In many cases, you should recover first. Repair tools can modify file system structures, which may complicate file recovery. Use recovery documentation to record symptoms and choose extraction before repair. Once you recover your important files and verify them, you can run repairs or reformat with less risk to your data.
Why do recovered files sometimes lose names or folder structure?
After formatting or severe file system issues, the system may lose directory metadata. Recovery tools may then rebuild files by signatures, which can reduce original names and folders. Deep scan may still retrieve content, but organization can vary. Good recovery documentation helps you map what you recovered and restore order using timestamps and file previews.
How do I verify recovered documents so I can trust them?
Open critical files and check for missing pages, corrupted sections, or wrong versions. Compare file sizes with older backups if available. Spot-check spreadsheets for formulas and charts, and check PDFs for readable pages. Then save a backup immediately. Verification belongs in every recovery documentation workflow because recovery without checking can create false confidence.

Jason is a data recovery and technical support specialist with over 15 years of hands-on experience. He has worked extensively with frontline users, troubleshooting difficult data loss cases and providing practical recovery solutions for accidental deletion, formatted drives, damaged file systems, lost partitions, system failures, and other recovery emergencies. His expertise also includes backup and restoration, file repair, and disaster recovery, with a strong emphasis on safe, reliable, and technically accurate guidance.