
Unsaved Excel File Not in Recovery Fixes

If you are facing unsaved excel file not in recovery, the situation can feel worse than a normal file loss. You reopen Excel after a crash, forced shutdown, or accidental close, expecting the recovery panel to appear, but nothing shows up. At that point, many users assume the workbook is gone for good.
In reality, that is not always the case. Sometimes Excel still keeps an unsaved copy, a temporary version, or a recoverable file in a location that is easy to miss. In other cases, the workbook is no longer missing because of an unsaved session alone. It may have been deleted, lost after formatting, or affected by a file system error. That is why solving unsaved excel file not in recovery starts with understanding what actually happened to the workbook and then following the right recovery path in the right order.
This guide explains how to fix unsaved excel file not in recovery step by step. It begins with Excel’s built-in recovery methods, then moves to deeper document recovery solutions for situations where the problem has already gone beyond Excel itself. If standard recovery options stop helping, Magic Data Recovery can provide a more practical way to scan the device and recover lost Excel files.
Supports Windows 7/8/10/11 and Windows Server
Table of Contents
Why Unsaved Excel File Not in Recovery Happens
The phrase unsaved excel file not in recovery sounds very specific, but several different problems can lead to the same result.
A common cause is that Excel closed before AutoRecover had time to save a backup version. For example, if Excel crashed only a few minutes after you started editing, there may be no recovery copy yet. Another possibility is that the Document Recovery pane did not open automatically after Excel restarted, even though a temporary version still exists somewhere on the computer. In some situations, AutoRecover was disabled, the save interval was too long, or the file was stored in a place where Excel could not protect it well.
It is also important to understand the difference between AutoSave and AutoRecover. AutoSave mainly works for files stored in OneDrive or SharePoint and keeps saving changes while you work. AutoRecover is different. It creates backup information at intervals so you may be able to restore work after a crash or unexpected closure. If neither feature produced a usable version, Excel will have nothing to show in recovery.
Sometimes the problem is not really an unsaved-session problem at all. Users often search for unsaved excel file not in recovery because the workbook disappeared after an Excel incident, but the real cause may be that the file was deleted, the drive was formatted, or the storage device developed a file system error. From the user’s point of view, it still feels like an Excel recovery issue. In practice, though, it may already be a wider data loss problem.
How to Fix Unsaved Excel File Not in Recovery
The best approach is to start with Excel’s own recovery options and work from the safest method to the deeper ones. That way, you do not miss an easy recovery path or make changes too early that could complicate recovery later.
Use Recover Unsaved Workbooks
This should usually be your first step because it is the most direct built-in method for unsaved excel file not in recovery.
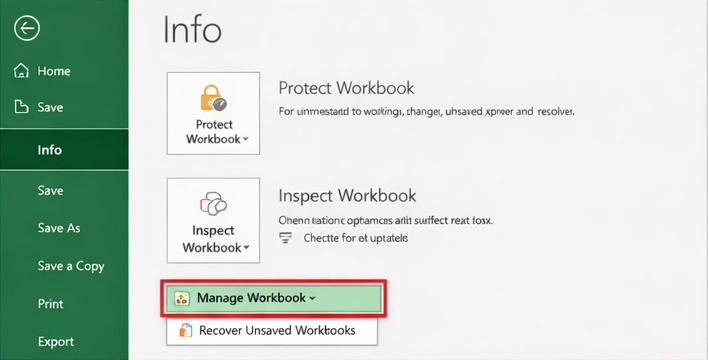
First, open Excel normally. You do not need to open another workbook before doing this. Once Excel opens, click File in the upper-left corner. In the left-side menu, select Info. On that page, look for Manage Workbook. Depending on your Excel version, it may also appear as Manage Document. Click it and then choose Recover Unsaved Workbooks.
When you click this option, Excel opens a folder or dialog window that contains unsaved workbook copies still available on your system. Take your time here. Do not open only the first file you see and assume it is the right one. Look at the file names, modified dates, and times if those details are available. Choose the files that match the time when you were working on the lost workbook.
Open one likely match. Once the workbook appears in Excel, do not continue working in that temporary file as if nothing happened. Instead, review the content carefully. Check the latest worksheet you edited, the last rows you entered, any formulas you added, and any formatting changes you remember making. If it looks correct, click Save As immediately and save it to a safe location with a clear new name.
If the first file you open is incomplete, go back and open the next one. Sometimes Excel stores more than one temporary version, and a different copy may contain more recent edits. If the window is empty, that does not mean recovery is impossible. It only means this specific Excel recovery path did not find an unsaved copy.
Check the Document Recovery Pane Carefully
Many users only glance at the Document Recovery pane and move on too fast. That can lead to missed recovery opportunities.
After Excel crashes or Windows shuts down unexpectedly, reopen Excel and look carefully at the left side of the screen. If the Document Recovery pane appears, you may see one or more versions of the workbook listed there. These versions may include a last saved copy, an AutoRecovered copy, or another temporary version created by Excel.
Do not click the first available file and stop there. Instead, review the timestamps or labels shown for each version. Excel may show a more recent copy lower down in the list, or it may label one version as AutoRecovered and another as Original. Open the most recent version first, then inspect the workbook in detail. Check whether the latest changes are present. Look at the specific sheet tabs you edited most recently. Scroll to the bottom of any tables you updated. Review formulas, inserted rows, comments, and formatting changes.
If the version is the one you need, save it immediately under a new file name. If it is missing some work, close it and return to the Document Recovery pane to test the other listed versions. This step matters because the most complete version is not always the first one users open.
If the recovery pane does not appear at all, continue to the next method. The absence of the pane does not mean there are no temporary or backup files on the system.
Review AutoRecover Settings Before Moving On
If unsaved excel file not in recovery happens and Excel shows nothing useful, the next step is to check whether AutoRecover was set up in a way that could actually protect your work.
Open Excel and go to File > Options > Save. In this section, you will find several settings related to recovery. The first thing to check is whether Save AutoRecover information every X minutes is turned on. If it is disabled, Excel may never have created a recovery copy during your session. If it is enabled, check the number of minutes.
This part is important. Many users assume Excel saves backup versions constantly, but that is not how AutoRecover works. If the interval is set to 10 minutes and Excel closed after 3 minutes of work, there may be no recovery file yet. In that case, Excel did not fail. It simply did not have enough time to create the backup.
You should also look at the AutoRecover file location shown in the same settings area. Copy that location or write it down. Even if Excel does not automatically show the file, this path may point you to a folder that still contains a recoverable version.
While you are here, it is also a good idea to decide whether the save interval should be shorter going forward. For users who work with frequently changing Excel data, a shorter interval often makes recovery more realistic the next time something goes wrong.
Search the UnsavedFiles Folder Manually
If the built-in recovery screens did not help, the next logical step is to check the common folder where Excel stores unsaved files.
Open File Explorer and click into the address bar. Paste this path:
C:\Users\[Username]\AppData\Local\Microsoft\Office\UnsavedFiles
Replace [Username] with your Windows account name if necessary. If the folder opens, look through every file shown there. Do not rely only on familiar file names. Some recovery files use generic names or long temporary names that do not clearly identify your workbook.
Sort the folder by Date modified if possible. This makes it easier to find files created or changed around the time you lost the workbook. Open the most likely files in Excel one by one. When a workbook opens, compare it against what you remember editing. Check whether the sheets, values, formulas, and last edits match your missing file.
As soon as you find the right workbook, save it as a new file to a different safe folder. Avoid leaving it in the temporary or unsaved location.
If the UnsavedFiles folder is empty, do not stop yet. Excel recovery files are not always limited to this one folder. You may still find helpful files in other temporary locations.
Search Windows Temporary Files More Thoroughly
When unsaved excel file not in recovery continues to block recovery, Windows temporary folders are worth checking more carefully.
Press Windows + R on your keyboard, type %temp%, and press Enter. This opens one of the main temporary folders used by Windows and applications. Once you are there, sort the files by date so the newest items appear first. Look for files created or modified around the time you were working in Excel.
You may not always see obvious Excel workbook names. Some temporary files use shortened names, random strings, or temporary extensions. That is why it helps to look for files that were created at the right time, not just files with familiar names. You can also search within File Explorer for .tmp files or search for part of the workbook name if you remember it.
If you find a likely file, try opening it with Excel. Some temporary files will not open correctly, but some will. When one of them contains your lost workbook data, save it immediately as a new .xlsx file in a healthy folder.
This method requires patience, but it often helps users who cannot find anything through the standard Excel recovery menu.
Check Version History for OneDrive or SharePoint Files
If the workbook was saved in OneDrive or SharePoint before the incident, version history can be one of the most useful options.
Start by locating the workbook in its cloud location or synced local folder. Right-click the file and choose Version History. Excel or OneDrive will show a list of earlier saved versions, usually with timestamps. Open the versions one by one, starting with the most recent version that predates the loss or error.
As you review each version, check for the missing data rather than assuming the newest earlier version is correct. In some cases, the most recent version may already contain the unwanted change or corruption, while a slightly older one still contains the correct workbook content.
When you find the right version, save a copy before making new edits. That protects the recovered state and gives you a fallback if you need to compare versions later.
This method is especially useful when the issue looks like unsaved excel file not in recovery, but the file was actually saved before and later overwritten, damaged, or changed.
When Excel Recovery Is No Longer Enough
Sometimes users go through all the Excel-based methods and still cannot find the workbook. When that happens, it is important to stop repeating the same steps and reassess the situation.
For example, the workbook may have been stored on a USB flash drive, memory card, external hard drive, or another storage device that later became unstable. After the incident, Windows may say the drive needs to be formatted, show an access error, or fail to open the folder where the workbook was stored. In that case, the workbook may still exist, but Excel can no longer reach it through normal recovery paths.
The same applies when the file was deleted by mistake, when the drive was formatted, or when the partition started showing a file system error. At that stage, the missing workbook is not simply an unsaved Excel file anymore. It is part of a broader data loss scenario, and Excel’s built-in recovery methods are usually not designed for that kind of problem.
That is the point where a storage-level recovery tool becomes much more relevant.
Why Magic Data Recovery Makes Sense in This Scenario
When Excel cannot restore the workbook through AutoRecover, temporary files, or version history, the next useful step is to scan the storage device directly. This is where Magic Data Recovery fits naturally into the workflow.
Supports Windows 7/8/10/11 and Windows Server
Instead of depending on Excel to show a previously created backup copy, Magic Data Recovery searches the affected drive for lost files that are no longer visible in normal folders. That makes it especially helpful when the workbook was deleted, lost after formatting, or affected by a file system error.
From a user’s point of view, the symptom often looks the same: the Excel file is missing, the recovery pane shows nothing, and the usual recovery paths no longer help. The difference is that the real cause may already be outside Excel. In that situation, using Magic Data Recovery is more practical because it works at the storage level rather than relying on Excel’s backup behavior.
How to use Magic Data Recovery in a practical way
Start by stopping any unnecessary activity on the affected drive. Do not save new files to it, and do not install software onto that same location if you can avoid it. New data may overwrite recoverable content and reduce the chance of success.
Next, install and launch Magic Data Recovery on a healthy drive or system location. Once it opens, select the storage device or partition where the missing Excel workbook was originally stored. This could be an internal hard drive, SSD, USB drive, memory card, or another device that held the file.
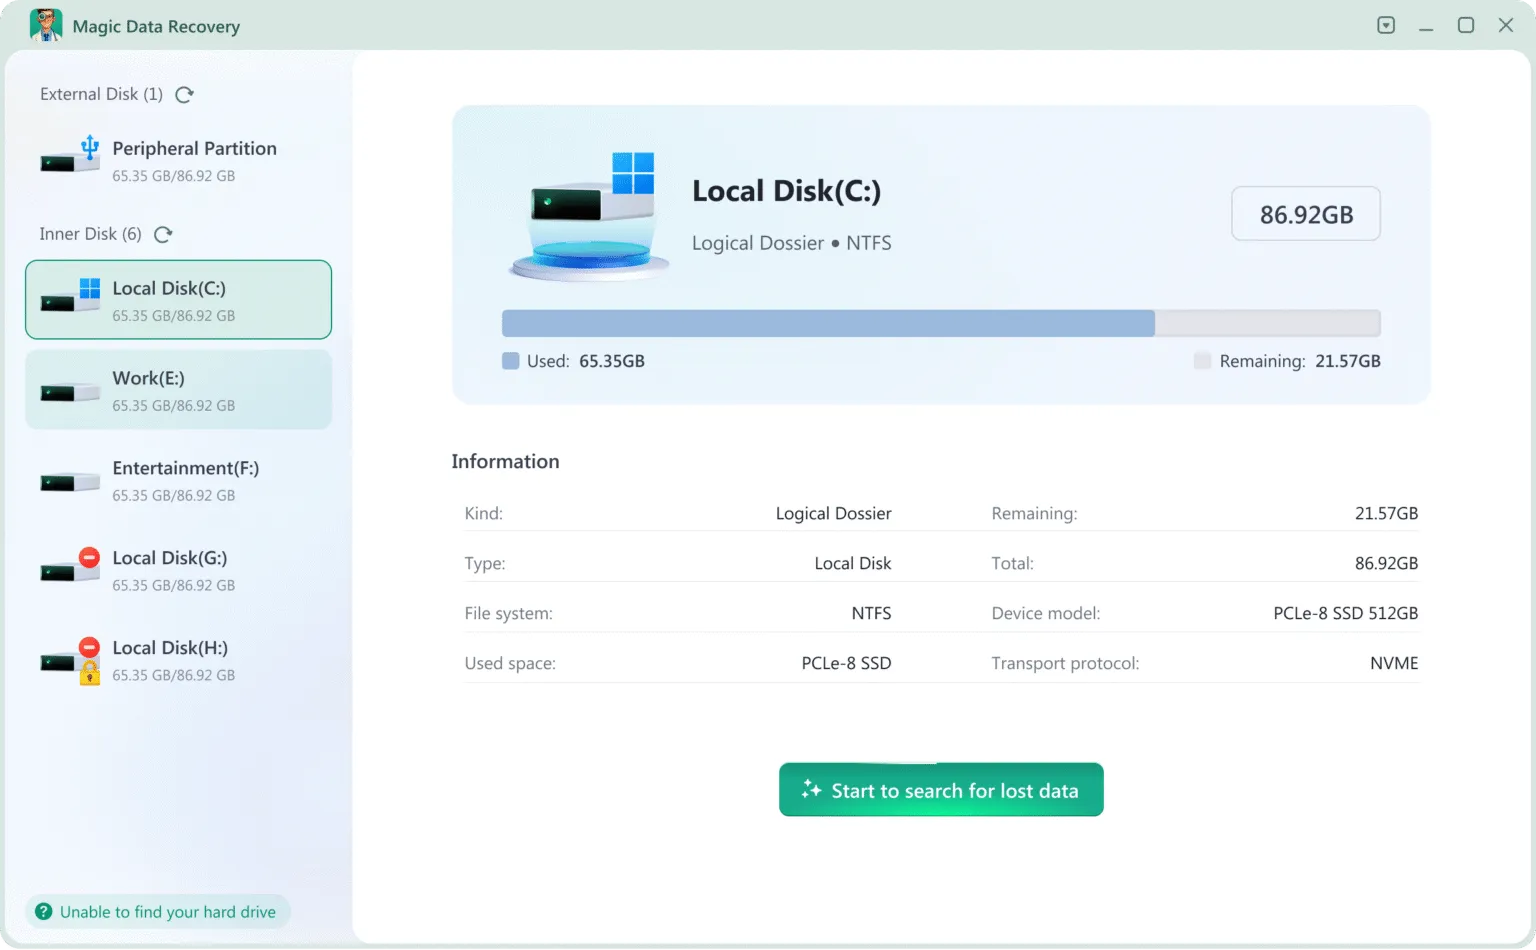
Begin the scan and wait for the program to analyze the drive. Depending on the device size and condition, this may take some time, so it is better to let the scan finish properly rather than stopping early. When the scan results appear, look through the recoverable files and search for your Excel workbook by name, extension, folder path, or modification time if those details are available.
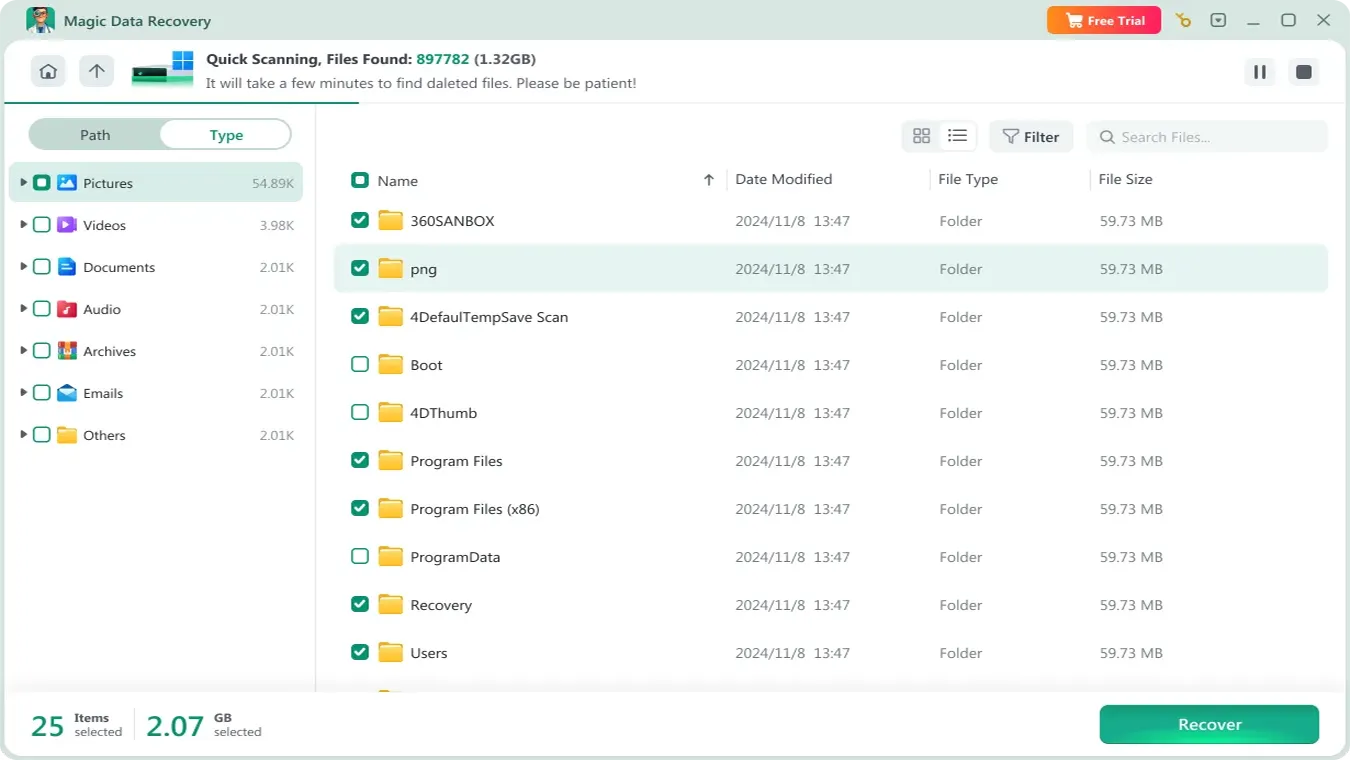
When you find likely Excel files, use the preview feature if available to confirm that the workbook is the one you need. This step helps reduce guesswork and makes recovery more reliable. Once you confirm the correct file, recover it to a different healthy location. Do not restore it back to the same affected drive immediately, because that can increase the risk of overwriting other recoverable data.

A realistic example
When you were editing an Excel workbook on a USB drive. Excel closed unexpectedly, and when you reopened the program, nothing appeared in recovery. You tried Recover Unsaved Workbooks, checked the Document Recovery pane, reviewed AutoRecover settings, and searched temporary folders, but still found nothing. Then Windows started showing an error for the USB drive or asked you to format it before use.
At that point, the issue is no longer just unsaved excel file not in recovery. The workbook may still exist on the device, but the storage itself has become the real problem. In this situation, Magic Data Recovery gives you a more practical recovery path because it scans the USB drive directly and looks for recoverable Excel files that Excel can no longer access.
If you need a solution that goes beyond AutoRecover and temporary files, Magic Data Recovery is a natural next step.
Common Mistakes That Make Recovery Harder
When people panic, they often make choices that reduce the chance of successful recovery.
One common mistake is continuing to use the same drive as if nothing happened. Saving new files, exporting reports, or copying large amounts of data onto the affected device can overwrite the workbook you are trying to recover. Another mistake is installing recovery software onto the same damaged or affected drive, which creates the same risk.
Some users also format a drive too early because Windows suggests it. That may seem like the fastest way to fix the device, but it can make recovery more complicated if important Excel files were still recoverable before the format. It is also easy to misunderstand Excel’s own features. Many users assume AutoSave and AutoRecover are the same thing, or they never check how frequently AutoRecover was set to save backup copies.
A slower, more careful approach usually gives you a better chance of getting the workbook back.
How to Prevent the Problem Next Time
The best long-term strategy is to reduce the chance of dealing with unsaved excel file not in recovery again.
Saving active workbooks in OneDrive or SharePoint gives you access to AutoSave and version history, which adds an extra safety layer. It also helps to shorten the AutoRecover interval in Excel so backup information is created more frequently. Even so, manual saving still matters. Pressing Ctrl + S during important edits remains one of the simplest habits for preventing data loss.
It is also wise to keep backup copies of important Excel files, especially when they contain business records, financial data, or work that would be difficult to recreate. Finally, if an external drive has shown signs of instability, avoid editing directly from that device. Copy the workbook to a stable local or cloud location first, then work on that copy instead.
Conclusion
The unsaved excel file not in recovery problem feels serious because it usually appears right after important work seems to disappear. Still, the situation is often more recoverable than it first looks. Sometimes Excel has already created an unsaved or temporary copy, and a careful check of the built-in recovery paths is enough to restore the workbook. In other cases, the file is no longer missing because of an unsaved session alone, but because it was deleted, lost after formatting, or affected by a file system error.
That is why the most effective recovery approach is to identify where the problem now exists. If the workbook is still within Excel’s recovery reach, the built-in methods above are the right place to start. If the problem has already moved to the storage level, Magic Data Recovery gives you a more practical way to scan the device and recover lost Excel files that Excel itself can no longer find. For users who need more than AutoRecover, that makes it a sensible recommendation rather than a forced product mention.
Supports Windows 7/8/10/11 and Windows Server
FAQs
Why does unsaved excel file not in recovery happen?
This issue usually happens because Excel did not create a recovery copy before the session ended. The program may have closed too quickly, AutoRecover may have been disabled, or the save interval may have been too long. In some cases, the workbook was not simply unsaved. It may have been deleted or affected by a storage-level problem instead.
Can I recover an unsaved Excel file after closing it?
Yes, sometimes you can. Excel may still keep an unsaved or temporary version that appears in Recover Unsaved Workbooks, the Document Recovery pane, or a temporary folder. However, success depends on whether Excel had enough time to create that backup version before the workbook was closed.
Where are Excel unsaved files usually stored?
A common location is the UnsavedFiles folder inside your Windows user profile. You may also find related files in temporary folders or in the AutoRecover file path shown in Excel settings. If Excel’s recovery menu shows nothing, checking these locations manually can still be worthwhile.
What is the difference between AutoSave and AutoRecover?
AutoSave continuously saves changes for cloud-based files, usually in OneDrive or SharePoint. AutoRecover works differently. It creates backup information at intervals so that users may be able to restore work after a crash or unexpected closure. Knowing the difference helps you choose the right recovery method faster.
What should I do if Excel recovery options show nothing?
If Excel recovery options show nothing, check the AutoRecover settings, the UnsavedFiles folder, and general Windows temporary folders. If those steps still do not help, consider whether the workbook may have been deleted, lost after formatting, or affected by a file system error. At that point, a storage-level recovery solution is often more effective.
Can deleted Excel files still be recovered?
Yes, deleted Excel files can often be recovered if the original data has not been overwritten. That is why it is important to stop using the affected drive as soon as possible. The less new data written to it, the better the chance that the missing workbook can still be found and restored.
When should I use Magic Data Recovery?
You should consider Magic Data Recovery when Excel’s own recovery features cannot find the workbook and the loss may involve deletion, formatting, or a file system error. It is especially useful when the file is no longer accessible through normal folders or standard Excel recovery paths.
Is it safe to recover Excel files from a damaged drive?
Yes, but you need to be careful. Avoid writing new data to the damaged drive and do not install software onto that same location. A safer recovery process is to scan the affected device, preview the recoverable files, and save them to a different healthy location.

Jason is a data recovery and technical support specialist with over 15 years of hands-on experience. He has worked extensively with frontline users, troubleshooting difficult data loss cases and providing practical recovery solutions for accidental deletion, formatted drives, damaged file systems, lost partitions, system failures, and other recovery emergencies. His expertise also includes backup and restoration, file repair, and disaster recovery, with a strong emphasis on safe, reliable, and technically accurate guidance.