
Recover Files from Recycle Bin: 6 Proven Ways
Accidentally deleting a work document, family photo, project folder, or downloaded file can be stressful. Fortunately, Windows offers several ways to recover files from Recycle Bin, whether the files are still visible or the bin has already been emptied. This deleted file recovery guide explains which method fits each situation, what to avoid after permanent deletion, and when Magic Data Recovery can scan the original drive for recoverable data.
Supports Windows 7/8/10/11 and Windows Server
Table of Contents
Quick Answer: Can You Recover Files from Recycle Bin?
Yes. When the files are still in the Recycle Bin, select them and click Restore. Windows returns each item to its original folder. If the Recycle Bin has been emptied, you may still recover files from Recycle Bin through File History, Previous Versions, OneDrive, Windows File Recovery, or professional recovery software.
To recover files from Recycle Bin successfully, match the method to the deletion scenario instead of scanning the disk immediately. Recovery is not guaranteed. The result depends on the drive type, backup availability, time since deletion, and whether new data has overwritten the deleted file.
Therefore, stop writing data to the affected drive before trying any recovery method.
What Happens When You Delete a File in Windows?
A normal deletion usually moves a file from its original folder to the Recycle Bin. The file remains accessible until you restore it, delete it from the bin, or empty the entire bin.
After permanent deletion, Windows removes the file’s active reference and marks its storage space as available. The underlying data may remain readable until another file uses that space. This explains why software can sometimes recover files from Recycle Bin after emptying it. Microsoft also recommends minimizing computer use because new activity can overwrite the freed space.
However, an SSD may handle deletion differently. TRIM can notify the SSD that specific blocks are no longer needed, allowing internal cleanup to make deleted data unavailable sooner. As a result, deleted-file recovery is generally less predictable on a TRIM-enabled SSD than on a traditional HDD.
Before You Try to Recover Files from Recycle Bin
Your first actions can affect the recovery result. Follow these rules before you install software or copy files:
- Stop saving, downloading, or creating files on the affected drive.
- Do not install a recovery program on the same partition that contained the deleted data.
- Do not recover restored files to the source drive.
- Check whether the original location was an HDD, SSD, cloud-synced folder, network location, or removable device.
- Disconnect a removable drive if the lost files were stored there.
- If the drive clicks, disappears, overheats, or cannot be detected, stop using it and consult a professional service.
These precautions reduce avoidable overwriting. They also help you choose the safest way to recover files from Recycle Bin or from the original storage device.
Choose the Right Recycle Bin Recovery Method
Situation | Best First Method | Software Required? |
Files are still visible in Recycle Bin | Restore directly | No |
Deletion happened moments ago | Ctrl + Z | No |
File History was enabled | Restore Previous Versions | No |
File was synced to OneDrive | Check OneDrive Recycle Bin | No |
No backup is available | Windows File Recovery | Yes, command-line app |
Bin was emptied and you prefer a visual tool | Magic Data Recovery | Yes |
Files came from a removable device | Scan the original device | Usually |
Source was a TRIM-enabled SSD | Stop use and scan promptly | Usually |
Start with the least invasive method. This approach helps recover files from Recycle Bin while preserving the source. Move to disk scanning only when direct restoration and backups cannot recover files from Recycle Bin.
Method 1: Restore Files Directly from Recycle Bin
This is the simplest solution when the deleted items remain in the bin.
- Double-click Recycle Bin on the Windows desktop.
- Use the search box or sort by Date Deleted, Original Location, or Item Type.
- Select one or more files.
- Right-click the selection and choose Restore.
- Open the original folder and verify the recovered files.
Windows restores each item to its previous location. To place a file somewhere else, drag it from the Recycle Bin to a folder of your choice instead of using Restore.
This method is the safest way to recover files from Recycle Bin because it does not scan the disk, reconstruct file records, or overwrite the source.
Recycle Bin Icon Is Missing
A missing icon does not mean the bin or its files were deleted.
To restore the icon:
- Open Settings.
- Select Personalization.
- Go to Themes.
- Select Desktop icon settings.
- Enable Recycle Bin.
- Click Apply, followed by OK.
You can also type shell:RecycleBinFolder into the Run dialog to open the folder directly.
Method 2: Undo a Recent Deletion with Ctrl + Z
If you deleted the file moments ago and have not performed many other file operations, return to the original folder and press Ctrl + Z.
You can also right-click an empty area and choose Undo Delete when that option appears.
This shortcut can recover files from Recycle Bin without opening the bin, but it is temporary. Restarting Windows, closing the relevant File Explorer session, or completing later file operations may remove the undo state.
Therefore, use this method immediately after accidental deletion.
Method 3: Recover Files from Recycle Bin with File History
File History can restore an earlier copy when it was configured before the deletion.
- Open File Explorer.
- Go to the folder that previously contained the missing file.
- Right-click the folder and select Restore previous versions.
- Choose a version dated before the deletion.
- Select Open to inspect it.
- Choose Restore or Restore to.
Use Restore to when you want to preserve the current folder contents. File History is a strong way to recover files from Recycle Bin because it restores a backup copy rather than relying on undeleted disk sectors.
The limitation is simple: File History cannot produce a backup that never existed. If the feature was disabled, the backup drive was disconnected, or the deleted file was outside protected locations, try another method.
Method 4: Check OneDrive or Another Cloud Backup
Files from Desktop, Documents, or Pictures may have been synchronized to OneDrive. In that case, the Windows Recycle Bin is only one place to check.
- Sign in to OneDrive on the web.
- Open Recycle bin.
- Select the missing files or folders.
- Click Restore.
- Check the original cloud folder.
- Allow the desktop sync client to update.
Personal OneDrive accounts normally retain deleted items for up to 30 days. Work or school accounts normally retain them for up to 93 days unless an administrator changes the policy. Online-only files may appear in the OneDrive Recycle Bin without appearing in the local Windows bin.
The same principle applies to Dropbox, Google Drive, or a company backup platform. Before scanning a disk, verify whether a synchronized or versioned copy can recover files from Recycle Bin with its original filename and folder structure intact.
Method 5: Use Windows File Recovery
Windows File Recovery is Microsoft’s command-line application for files that are no longer available through the Recycle Bin or a backup.
It supports local storage devices, including:
- Internal HDDs and SSDs
- External hard drives
- USB storage devices
- Other locally connected drives
However, Windows File Recovery does not recover data directly from cloud storage or network file shares.
Install Windows File Recovery from the Microsoft Store, connect a different destination drive, and run a command in this format:
winfr source-drive: destination-drive: [/mode] [/switches]
For example, the following command searches the C: drive for PDF and DOCX files and saves the results to the E: drive:
winfr C: E: /regular /n *.pdf /n *.docx
Use a destination drive that differs from the source. Regular mode suits recently deleted NTFS files, while Extensive mode is more appropriate for older deletion, non-NTFS file systems, or more difficult cases.
Windows File Recovery can recover files from Recycle Bin, but it requires accurate commands and does not provide a graphical preview. Therefore, it suits users who are comfortable with Command Prompt, drive letters, file paths, and extension filters.
Method 6: Recover Files from Recycle Bin with Magic Data Recovery
When the Recycle Bin is empty, no usable backup exists, and command-line recovery feels too complex, Magic Data Recovery provides a visual workflow for scanning the original drive.
For users asking how to recover files from Recycle Bin after permanent deletion, the software addresses several related pain points:
- Files removed after emptying the Recycle Bin
- Shift + Delete removal
- Deleted files that bypassed the bin
- Data loss after formatting
- Inaccessible data caused by file-system errors
- Lost documents, photos, videos, archives, emails, and other file categories
Unlike direct Restore or File History, Magic Data Recovery scans the storage device for deleted file records and recognizable file data. It works with HDDs, SSDs, USB drives, memory cards, and other Windows-accessible storage.
The official product page states that Magic Data Recovery supports more than 5,000 file formats. Users can also test the recovery process with a 500 MB free recovery allowance.
Supports Windows 7/8/10/11 and Windows Server
How to Use Magic Data Recovery
Step 1: Download and Install Safely
Install the program on a different drive from the one containing the lost files.
For example, when recovering data from the C: drive, install the software on another partition or external drive when possible. This reduces the risk of overwriting deleted sectors.
Step 2: Select the Original Drive
Launch Magic Data Recovery and choose the partition where the deleted files were stored before they entered the Recycle Bin.
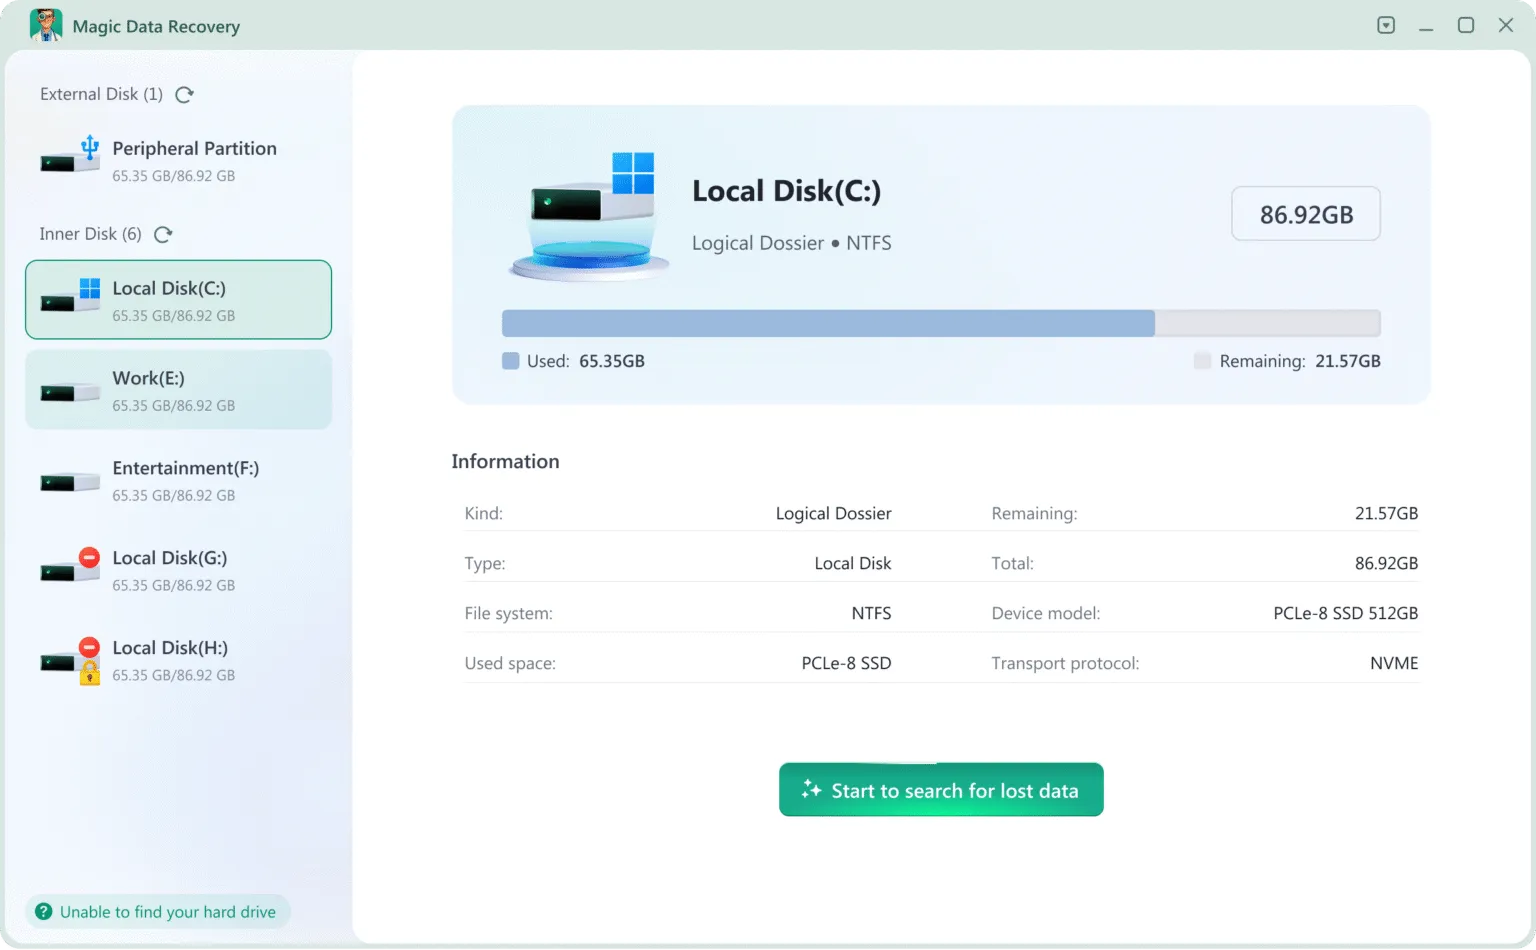
Do not select the Recycle Bin itself if the software displays physical disks and partitions. Select the original storage location.
Step 3: Start the Scan
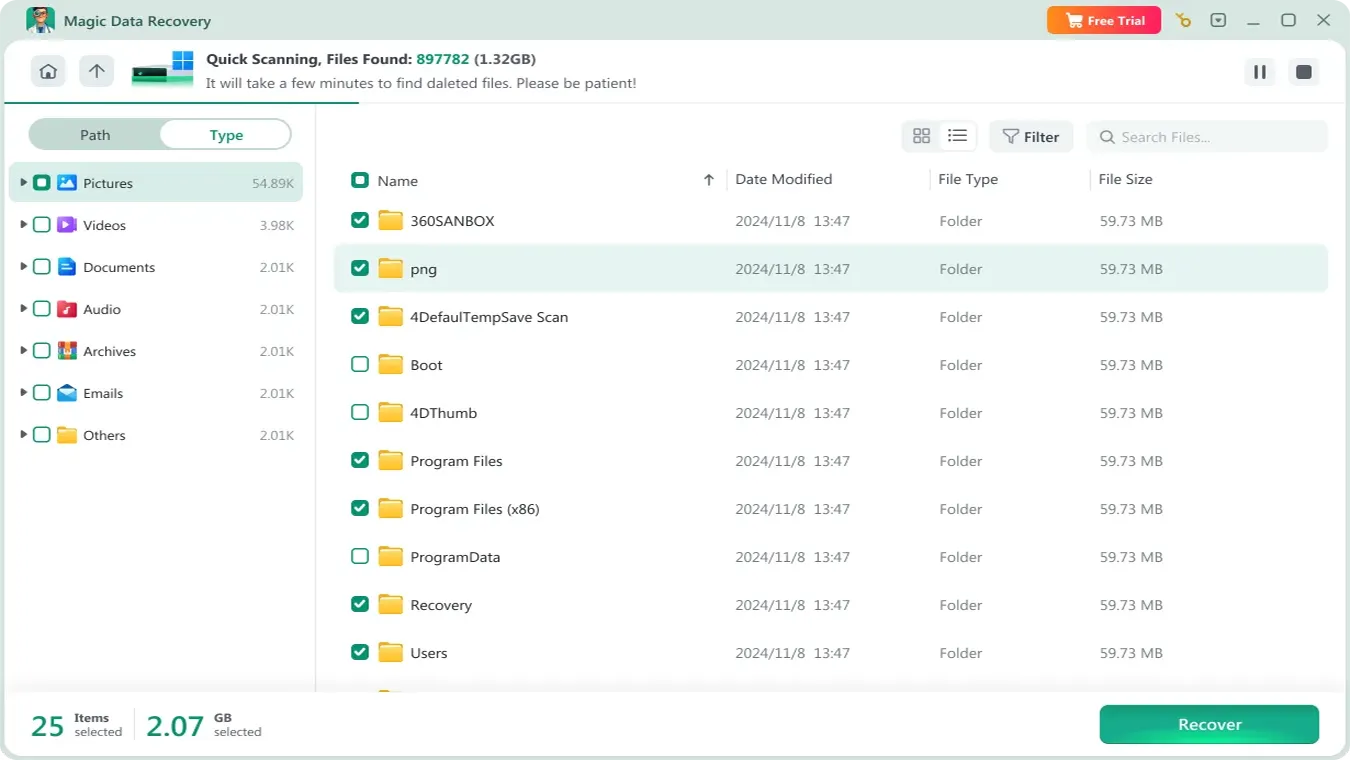
Begin scanning the selected drive. Although files can appear before the scan finishes, allowing the process to complete normally provides a more comprehensive result.
Step 4: Filter the Results
Use the available search and filtering options to narrow the results by:
- Filename
- File extension
- File type
- File size
- Modification date
These tools are especially useful when the scan finds thousands of deleted and existing files.
Step 5: Preview Important Files
Preview documents, images, videos, or other supported content before recovery when the preview feature is available.

A correct filename does not always mean the underlying file is intact. Previewing helps verify whether the recovered content is usable.
Step 6: Recover to Another Drive
Select the required files and save them to a different partition or external storage device.
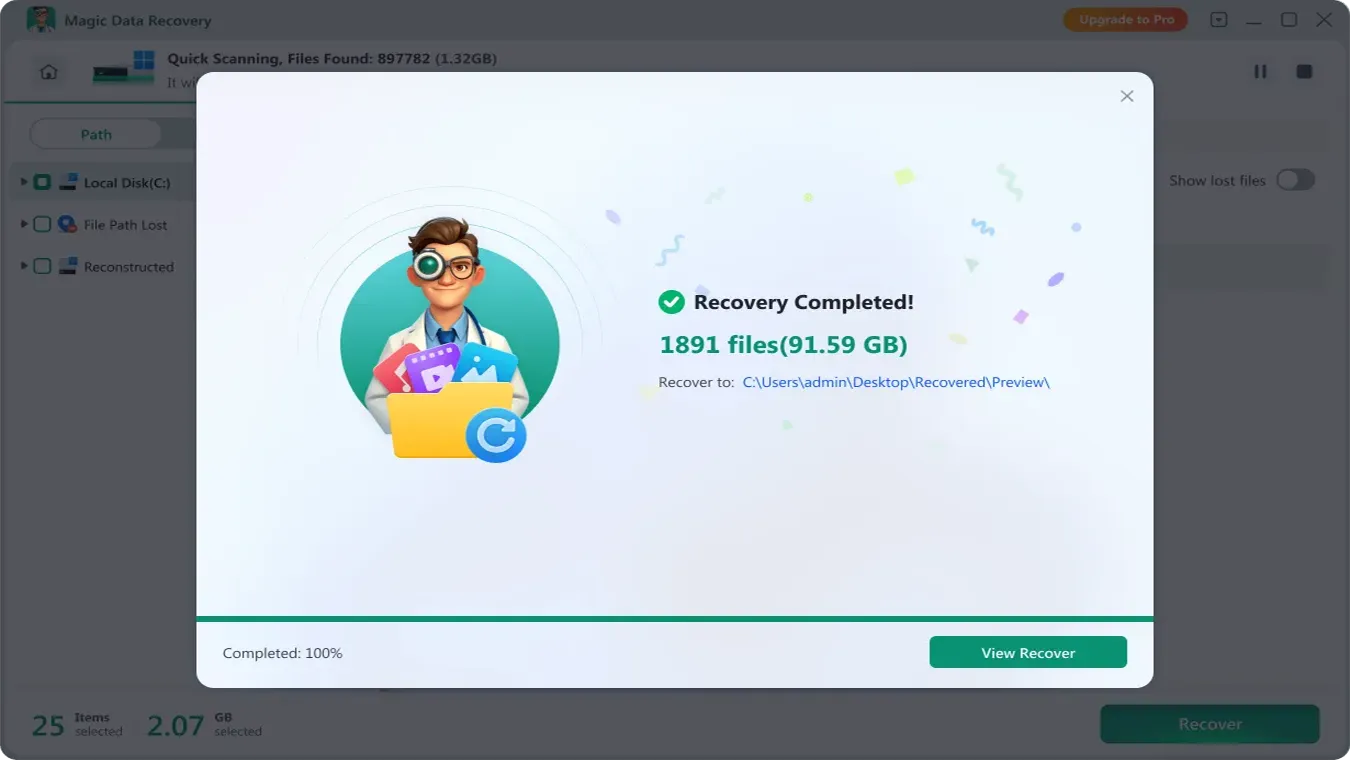
Never restore deleted files to the same drive being scanned. Doing so may overwrite other files that have not yet been recovered.
The Magic Data Recovery user guide provides additional instructions for selecting disks, searching scan results, filtering files, and handling drives that do not appear correctly.
Why Magic Data Recovery Is a Practical Choice
Magic Data Recovery is useful when you need to recover files from Recycle Bin but Windows no longer lists them.
Its graphical interface reduces command errors. Meanwhile, search, filtering, preview, and selective recovery help users focus on important data instead of restoring every scan result.
The software also supports several data-loss situations within one workflow:
- Accidental deletion
- Emptied Recycle Bin
- Shift + Delete
- Drive formatting
- File-system errors
- Inaccessible partitions
- Lost files on external storage
This makes it more versatile than a method that works only when a backup was enabled.
Nevertheless, no recovery tool can restore data that has already been overwritten, securely erased, or cleared by SSD maintenance. The reliable approach is to stop using the source drive and evaluate the scan results before saving recovered files.
Why Deleted Files May Not Appear in Recycle Bin
Sometimes users try to recover files from Recycle Bin but discover that the files never entered it.
Common explanations include the following.
Shift + Delete Was Used
The Shift + Delete shortcut bypasses the Recycle Bin and removes the active file reference immediately.
In this situation, check File History, cloud backups, Windows File Recovery, or scan the original storage device.
The File Was Too Large
Windows may display a warning that an oversized file will be permanently deleted instead of being moved to the Recycle Bin.
This can happen when the file exceeds the available Recycle Bin allocation for that drive.
Recycle Bin Settings Were Changed
Each drive can have its own Recycle Bin allocation.
The Don’t move files to the Recycle Bin. Remove files immediately when deleted option causes files to bypass the bin.
To check the setting:
- Right-click the Recycle Bin.
- Select Properties.
- Choose the relevant drive.
- Review the selected configuration.
Storage Sense Removed Older Items
Storage Sense can automatically remove Recycle Bin content according to the period configured in Windows settings.
Check Settings > System > Storage > Storage Sense to review when Windows deletes files from the bin.
The File Came from a Network Location
Deleting a file from a network share normally bypasses the local Recycle Bin.
Check server snapshots, company backups, shared-drive version history, or contact the system administrator. Microsoft confirms that files deleted from non-local resources do not normally enter the local Recycle Bin.
The File Came from Removable Storage
Files deleted from many USB flash drives and memory cards do not appear in the desktop Recycle Bin.
In this case, scan the original removable device rather than the computer’s C: drive. Avoid copying new data to the device before recovery.
HDD vs. SSD: What Affects Recovery?
Recovering Files from an HDD
On an HDD, permanently deleted data can remain in available disk space until new writes reuse the same sectors.
Therefore, immediate action often leaves a realistic opportunity to recover files from Recycle Bin. However, continued downloads, software installations, updates, and normal computer use can overwrite the deleted data.
Recovering Files from an SSD
On an SSD, Windows may issue TRIM notifications for deleted blocks. The SSD controller can then clear those blocks through internal garbage collection.
Recovery may still be possible in some configurations, but the result is less predictable. Avoid continued use, do not run drive optimization, and check backups before attempting a scan.
Physically Damaged Drives
Software recovery is appropriate for a logically healthy drive.
Stop DIY recovery if the device:
- Makes clicking or grinding noises
- Repeatedly disconnects
- Overheats
- Reports an incorrect capacity
- Cannot be detected in BIOS or Disk Management
- Causes the computer to freeze when connected
Further scanning may worsen a physical problem. A professional recovery laboratory is more appropriate in these cases.
Common Mistakes That Reduce Recovery Chances
Avoid these actions while trying to recover files from Recycle Bin:
- Installing recovery software on the affected partition
- Downloading large files
- Installing Windows updates
- Recovering files to the source drive
- Running disk cleanup
- Optimizing or defragmenting the affected drive
- Formatting a drive because Windows asks you to do so
- Using CHKDSK before recovering important data
- Repeatedly powering a physically failing drive
- Assuming every scan result is intact without previewing it
A recovery process should preserve the source first. That principle matters whenever you recover files from Recycle Bin after emptying it. Repair, formatting, cleanup, and file-system modification can wait until essential files are safely copied elsewhere.
How to Prevent Future Recycle Bin Data Loss
Use multiple protection layers rather than relying on the Recycle Bin alone.
Enable File History
Connect an external drive or network location, then enable File History through Control Panel. File History can preserve earlier versions of files stored in protected folders.
Use Cloud Synchronization
Back up important Desktop, Documents, and Pictures folders through OneDrive or another reliable cloud platform.
Cloud synchronization can provide another recycle bin or version history when the local copy disappears.
Keep an Offline Backup
Maintain at least one copy of irreplaceable files on a disconnected external drive.
An offline copy remains available when ransomware, account errors, synchronization mistakes, or hardware failures affect the computer.
Review Storage Sense
Check when Storage Sense removes Recycle Bin content. Select a retention period that gives you enough time to notice accidental deletion.
Avoid Routine Shift + Delete
Use normal deletion for routine cleanup. The Recycle Bin provides a valuable second chance when you remove the wrong file.
Test Your Backups
A backup is useful only when it can be restored. Periodically open files from the backup drive and confirm that new folders are included.
These habits make it easier to recover files from Recycle Bin and protect files when the computer, drive, cloud account, or user profile fails.
Conclusion
The correct way to recover files from Recycle Bin depends on what happened.
Restore files directly when they remain in the bin. Use Ctrl + Z for an immediate mistake, File History or OneDrive when backups exist, and Windows File Recovery when you are comfortable with command-line instructions.
When the Recycle Bin has been emptied and no backup is available, Magic Data Recovery offers a more accessible way to recover files from Recycle Bin through a scan, filter, preview, and recovery workflow.
It is recommended because it handles permanent deletion as well as formatted-drive and file-system-error scenarios without requiring command-line expertise. However, users should still stop writing data to the source drive and save recovered files elsewhere.
For broader prevention, recovery principles, and related Windows solutions, review Amagicsoft’s deleted file recovery resources.
Supports Windows 7/8/10/11 and Windows Server
FAQs About How to Recover Files from Recycle Bin
Can I recover files from Recycle Bin after emptying it?
Yes, recovery may remain possible because Windows can mark the occupied space as available without immediately overwriting every data block. Stop using the source drive, check File History and cloud backups, and then scan the original disk if necessary. Results depend on overwriting, drive health, file fragmentation, and SSD TRIM behavior.
How do I recover permanently deleted files without software?
Use File History, Previous Versions, OneDrive, another cloud recycle bin, or an existing external backup. These methods can recover files from Recycle Bin without sector-level recovery software, but they require a copy created before deletion. Ctrl + Z may also work immediately after a normal deletion if later operations have not cleared the undo state.
Where do restored Recycle Bin files go?
The Restore command returns a file or folder to its original location. Check the Original Location column in the Recycle Bin before restoring if you are unsure. Alternatively, drag the item from the bin to a chosen folder. Cloud services may restore files to their previous online folders and then synchronize them back to the computer.
Why are my deleted files not in Recycle Bin?
Files may bypass the bin when you use Shift + Delete, delete from a network share, remove data from some removable devices, exceed the bin’s capacity, or enable immediate deletion in Recycle Bin properties. Storage Sense may also clear older content. Check backups or scan the original storage device rather than searching only the Windows bin.
Can Windows File Recovery restore an emptied Recycle Bin?
Windows File Recovery can search local storage for deleted files that the Recycle Bin can no longer restore. It uses Command Prompt and requires a different destination drive. Correct source paths, file filters, and recovery modes matter. It cannot retrieve data directly from cloud storage or network file shares, and it cannot restore overwritten sectors.
Can I recover files from Recycle Bin on an SSD?
Possibly, but SSD recovery is less predictable because TRIM can notify the drive that deleted blocks are free for cleanup. Stop using the SSD, check backup and cloud copies first, and avoid optimization or software installation. A scan may find recoverable files, although no tool can guarantee recovery after the relevant blocks have been cleared.
Is Magic Data Recovery safe for Recycle Bin recovery?
Magic Data Recovery scans storage media to locate deleted or lost data and lets you choose which files to save. Install it on another drive and recover files to a different destination. Preview important items when possible. If the source drive shows signs of physical failure, stop scanning and use a professional recovery service instead.
How can I improve the chance of recovering deleted files?
Stop using the affected storage device, avoid downloads and updates, do not format or repair it, and never save recovered data to the source. Start with direct Restore and backups, then use an appropriate recovery tool. Acting early matters because new writes can reuse deleted space, while SSD TRIM and internal cleanup can further reduce recoverability.

Jason has over 15 years of hands-on experience in the computer data security industry. He specializes in data recovery, backup and restoration, and file repair technologies, and has helped millions of users worldwide resolve complex data loss and security issues.