
DMDE How to Recover Files: Complete Guide
When an important folder disappears after Shift+Delete, formatting, or a file system error, the first few actions can determine whether recovery succeeds. This DMDE how to recover files guide explains the safest workflow for deleted, formatted, and inaccessible storage. For a broader overview before you begin, review Amagicsoft’s deleted file recovery guide. You will learn when to use DMDE Quick Scan, when to run a Full Scan, how to avoid overwriting data, and when a simpler tool such as Magic Data Recovery makes more sense.
Table of Contents
Quick Answer: DMDE How to Recover Files Safely
For a recently deleted file on a healthy drive, use this basic process:
- Stop using the affected drive immediately.
- Download and extract DMDE to another drive or a USB device.
- Run DMDE with administrator access.
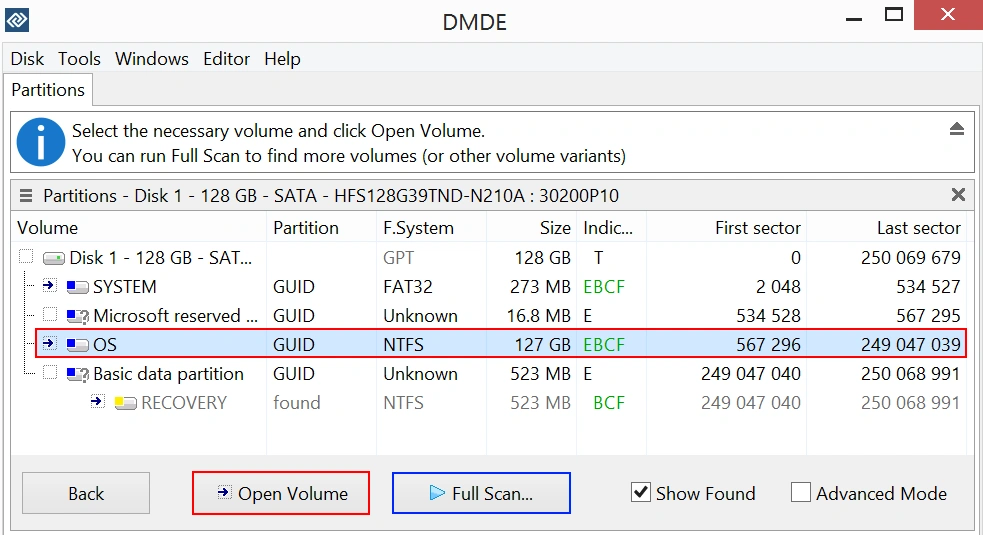
- Choose Logical Disks, select the affected volume, and click Open.
- Select the volume and click Open Volume.
- Run Quick Volume Scan if DMDE offers it.
- Find items marked with deleted-file or trash icons.
- Preview and select the required files.
- Click Recover and save them to a different physical drive.
- If the files do not appear, run a Full Scan and inspect the best volume result.
DMDE’s official deleted-file workflow follows the same core sequence: select the logical disk, open the volume, run Quick Volume Scan when available, mark deleted files, and recover them to a chosen destination. DMDE also warns users to avoid writing to the source disk.
Can DMDE Recover Your Lost Files?
DMDE, or DM Disk Editor and Data Recovery Software, combines file recovery, file-system reconstruction, disk imaging, partition tools, RAID reconstruction, and direct disk inspection. It supports Windows, macOS, Linux, and DOS, along with many common file systems. These capabilities make DMDE data recovery useful for both ordinary deletion and more technical storage problems.
A practical DMDE how to recover files workflow can help in these situations:
- Files deleted with Shift+Delete
- Files removed after emptying the Recycle Bin
- Data lost from an HDD, USB drive, memory card, or external drive
- Files missing after a quick format
- A partition that appears RAW or inaccessible
- A damaged or missing file-system structure
- Data stored on a disk image or cloned drive
However, no software can recover data that new information has overwritten. Recovery from many SSDs may also fail after TRIM clears the deleted blocks. In addition, a physically failing drive requires a different strategy because repeated scanning can worsen the damage.
DMDE’s documentation recommends cloning a failing device first or contacting a specialist when the drive shows I/O errors, severe slowness, disconnections, or other physical symptoms.
Before Using DMDE: Protect the Source Drive
Many recovery failures happen before the scan begins. Users continue browsing, download software to the affected partition, run repair commands, or restore files to the same disk. Each write can replace file records or content that recovery software still needs.
Follow this checklist before starting the DMDE how to recover files process:
Action | Why It Matters |
Stop using the affected storage | New files, updates, caches, and temporary data may overwrite deleted content. |
Do not install DMDE on the source drive | Extract and run it from another disk or removable device. |
Avoid CHKDSK, formatting, and repair tools | These operations may change file-system metadata before you copy important files. |
Recover to another physical drive | Saving to the source can overwrite files that have not yet been recovered. |
Clone an unstable drive first | Repeated scans place extra stress on hardware that already has read errors. |
Confirm the correct disk by capacity and model | Scanning or editing the wrong disk wastes time and can create additional risk. |
DMDE explicitly advises users not to write anything to the disk containing lost data and to run the operating system and recovery software from another disk when possible.
DMDE How to Recover Files: Step-by-Step Guide
The following DMDE how to recover files instructions use the graphical interface. Button names may vary slightly by operating system or version, but the recovery logic remains consistent.
Step 1: Download and Run DMDE from a Safe Location
Download the current version from DMDE’s official website. On Windows, DMDE commonly arrives as a compressed package rather than a traditional installer.
Extract the complete package to a USB drive, secondary internal disk, or another safe location. Then run the executable as an administrator so the program can access physical storage devices. DMDE’s installation documentation confirms that users can extract the package to a single folder and run it directly.
Do not extract DMDE to the partition that contains the missing files. For example, if data disappeared from drive C:, place DMDE on drive D: or an external USB drive.
Step 2: Select the Correct Source
DMDE displays physical devices, logical disks, disk images, and other tasks. Choose the source according to the data-loss scenario:
- Recently deleted files on a visible partition: Choose Logical Disks and select the original drive letter.
- Formatted, RAW, missing, or damaged partition: Choose the physical device so DMDE can inspect the whole disk and locate volume structures.
- Failing drive already cloned: Open the image or healthy clone instead of repeatedly reading the original hardware.
Check the disk model, capacity, partition size, and file system before proceeding. This verification prevents one of the most common DMDE how to recover files mistakes: scanning the wrong device.
Step 3: Open the Volume
For an intact logical partition, highlight the expected volume and click Open Volume. DMDE will build a virtual file-system view and display folders in its file panel. The $Root directory usually represents the root of the selected volume.
If the volume does not open correctly, do not use disk-editing commands or write changes. DMDE is a recovery and disk-analysis tool, not an automatic file-system repair utility. Instead, return to the partitions window and run a Full Scan.
Step 4: Run Quick Volume Scan First
When DMDE offers Quick Volume Scan, start there. A quick scan searches available file-system records and often finds recently deleted items without reading the entire device.
It works best when:
- The partition still opens normally
- The files were deleted recently
- The drive was not formatted
- The file system has little or no structural damage
This stage makes the DMDE how to recover files procedure faster and reduces unnecessary reads. If the expected folders or files do not appear, continue to the Full Scan section rather than repeatedly running the same quick scan.
Step 5: Find Deleted Files and Folders
Open the original folder path and look for deleted-file indicators. DMDE uses trash-style icons and status marks to distinguish deleted, found, and reconstructed items. A folder may also carry a marker when it contains deleted files.
Use these techniques to locate data efficiently:
- Browse the original folder structure first.
- Check the Recycle Bin folder when files were deleted through Windows.
- Use All Found / Virtual FS if the normal directory view does not show the files.
- Enable deleted items in the reconstruction or file-category options.
- Filter by name, extension, size, or date when the result set is large.
- Inspect Raw or file-category results only when the original structure is missing.
Files recovered from the Windows Recycle Bin may have altered names, so previewing becomes especially important.
Step 6: Preview and Evaluate the Results
Preview a representative sample before recovering a large folder. Open several photos, documents, videos, or archives from different parts of the result list.
A correct filename does not prove that the content remains intact. The file record may survive even when some data clusters have already been overwritten.
For the best DMDE deleted file recovery decision, prioritize results that retain:
- Original folder structure
- Original filenames
- Reasonable file sizes
- Valid previews
- Expected creation or modification dates
File-system-based results usually preserve names and folders better than Raw results. Raw recovery identifies files by signatures, so it may lose original names, dates, and directory paths.
Step 7: Select Files and Click Recover
Mark the required files or folders with their checkboxes. Then click Recover or choose Tools > Recover.
Select a destination on a different physical disk. DMDE’s official recovery instructions also direct users to recover selected items to another disk.
For example:
- Recover files from an external HDD to the computer’s internal drive.
- Recover an SD card to an HDD or SSD.
- Recover a system SSD to an external drive.
- Recover a USB flash drive to a separate internal or external disk.
Saving recovered files to another partition on the same physical disk still carries a risk. A different physical device provides the safer destination.
Step 8: Review Recovery Options
DMDE may display options for categories, filters, damaged files, path handling, and duplicate names. Beginners should avoid changing advanced options without a clear reason.
Keep the original directory structure when it appears reliable. In addition, recover a small test group before processing everything.
This controlled DMDE how to recover files approach reveals corrupted results early. It also prevents users from spending hours copying thousands of unusable files.
Step 9: Verify the Recovered Files
After recovery, open the output from the destination drive. Check different file types, large files, and items from several folders. Do not judge success by the number of recovered files alone.
Confirm that:
- Documents open without repair warnings
- Photos display at full resolution
- Videos play beyond the first few seconds
- Archives pass an integrity test
- Database or project files load in their original applications
Keep the source drive unchanged until you verify the important files and create a second backup.
What to Do When Quick Scan Finds Nothing
A Quick Scan depends heavily on usable file-system records. Formatting, partition damage, or serious metadata corruption may remove or disconnect those records.
In that case, the DMDE how to recover files process should continue with a Full Scan.
Run a DMDE Full Scan
Return to the partitions or device window. Select the relevant physical disk or partition range, and then choose Full Scan.
DMDE searches for file-system structures and can also identify files through Raw signatures. The software may display several possible volume versions when it detects old and current structures.
Use the following workflow:
- Scan the correct physical device or partition range.
- Allow the scan to complete when the case involves formatting or structural damage.
- Review the detected volume versions.
- Open the result that matches the expected file system, size, and folder structure.
- Preview several files.
- Recover a small test group to another drive.
- Try another volume version if names, folders, or previews look wrong.
Choose File-System Results Before Raw Results
File-system reconstruction uses metadata to rebuild folders, names, timestamps, and fragmented file chains. Raw recovery searches for recognizable file signatures without relying on the original directory structure.
Therefore, Raw results work as a fallback, not the first choice.
For example, after a quick format, DMDE may locate an older NTFS or exFAT volume with much of the original structure. That result usually offers a better DMDE how to recover files outcome than a generic list of JPG, MP4, and DOCX files grouped only by type.
Save the Full Scan Log
A large disk can take considerable time to scan. Save the scan log when DMDE offers the option, especially before closing the program or testing another volume result.
A saved log lets you return to the scan results without starting from zero.
DMDE How to Recover Files After Formatting or a RAW Error
Formatting and file-system errors require more caution than ordinary deletion. Windows may show messages such as:
- “You need to format the disk before you can use it.”
- “The file or directory is corrupted and unreadable.”
- “The drive is not accessible.”
- “The volume does not contain a recognized file system.”
Do not accept the format prompt before recovering the data. Amagicsoft’s guide to fix file system errors also recommends recovering important files before attempting repairs.
For a quick-formatted or RAW drive:
- Stop using the device.
- Open the physical disk in DMDE.
- Run Full Scan across the relevant range.
- Compare detected volume versions.
- Open the version with the most coherent directory structure.
- Preview files from several folders.
- Recover the data to another disk.
- Reformat or repair the original device only after verifying the recovered copy.
A full format, secure erase, extensive reuse, or SSD TRIM can make recovery impossible. The DMDE how to recover files method cannot reconstruct content that no longer exists on the storage medium.
Common DMDE Problems and How to Fix Them
Problem | Likely Cause | Recommended Fix |
Deleted files do not appear | Wrong volume, deleted items hidden, or damaged metadata | Open the correct volume, enable deleted files, inspect All Found / Virtual FS, and then run Full Scan. |
Recovered files will not open | Overwriting, wrong volume result, fragmentation, or incomplete Raw recovery | Preview first, try another file-system result, and compare alternative volume versions. |
Original names are missing | DMDE found files through Raw signatures | Search file-system results first. Use size, preview, and content to rename Raw files. |
The free edition will not recover a full folder tree | Free recovery works from the active panel and restricts nested processing | Open each required directory and recover files in separate operations, or use an appropriate paid edition. |
The scan is extremely slow | Large disk, USB bottleneck, read errors, or failing hardware | Check the connection and drive health. Stop repeated scans and clone the disk if errors or disconnections occur. |
DMDE shows many volume versions | Old partitions or damaged file-system structures remain on disk | Compare size, file system, folder structure, dates, and preview quality before recovering. |
Files from an SSD are empty or missing | TRIM may have cleared the deleted blocks | Stop using the SSD, check backups, and understand that software recovery may not succeed. |
The source drive clicks or disconnects | Possible physical failure | Power it down and consult a professional data recovery service instead of scanning repeatedly. |
Is DMDE Free for File Recovery?
DMDE’s Free Edition includes its basic tools, but each recovery operation can process up to 4,000 files from the active panel. Users generally need to open a specific subdirectory and recover the files visible there.
Paid editions remove this restriction and allow nested directory recovery.
That policy can work well when you need a limited number of files from one folder. However, it becomes time-consuming when a lost directory contains many subfolders.
Before purchasing a license, test several important files in the free version. A paid edition removes workflow restrictions, but it cannot repair data that the free edition already recovers as corrupted. DMDE states this clearly in its FAQ and purchase guidance.
DMDE vs Magic Data Recovery: Which Tool Should You Use?
DMDE offers advanced control, broad platform support, disk editing, imaging, partition analysis, Raw signatures, and RAID reconstruction. Those features appeal to technicians and experienced users.
Independent reviews also recognize its recovery capability while noting that its interface and advanced options create a steeper learning curve.
Magic Data Recovery takes a more guided, Windows-focused approach. It targets common problems such as accidental deletion, formatting, and file-system errors.
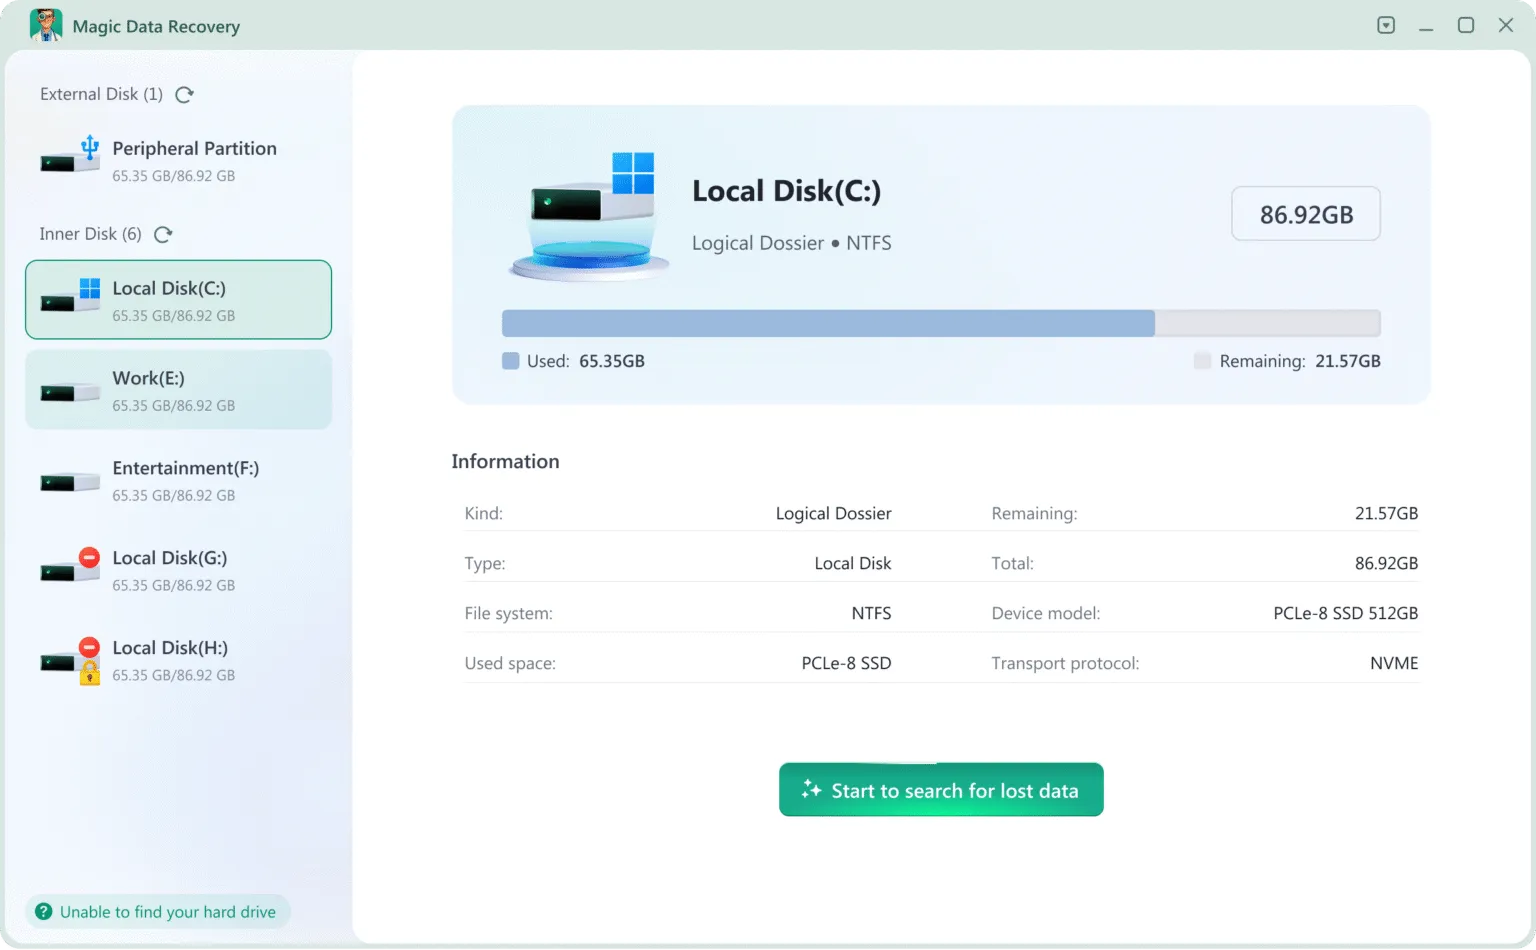
The software scans supported storage devices, organizes results, previews recoverable files, and supports more than 5,000 file types.
Comparison | DMDE | Magic Data Recovery |
Best for | Technical users who want granular disk and file-system control | Windows users who want a straightforward recovery workflow |
Common recovery cases | Deletion, formatting, lost volumes, damaged file systems, images, and RAID | Deletion, formatting, file-system errors, inaccessible storage, and common removable devices |
Interface | Powerful but dense, with many technical options | Guided selection, scan, preview, and recovery process |
Advanced tools | Disk editor, partition tools, imaging, RAID constructor, and custom signatures | Focused primarily on practical file recovery rather than disk editing |
File discovery | File-system reconstruction plus Raw signatures | Automated scanning and file-type organization |
Learning curve | Moderate to high | Lower for ordinary Windows users |
Platform | Windows, macOS, Linux, and DOS | Windows |
Neither tool can guarantee recovery after overwriting, secure erasure, severe physical damage, or completed SSD TRIM. The better choice depends on your skill level and the storage problem.
Why Magic Data Recovery Is a Practical DMDE Alternative
The main pain point behind a DMDE how to recover files search is often not scan capability. Instead, it is uncertainty.
Users may not know:
- Which volume they should open
- Whether to select a logical disk or physical device
- Which reconstruction result they should trust
- Whether to choose file-system or Raw results
- Which advanced recovery options they should change
- Whether the source drive is safe to scan repeatedly
Magic Data Recovery reduces that complexity through a simpler workflow:
- Install it on a drive other than the affected one.
- Select the original disk, partition, USB drive, SD card, or external storage.
- Start the scan and allow it to complete.
- Filter or search the results.
- Preview important files.
- Save selected data to another drive.
This approach suits a user who accidentally deleted work documents, formatted a camera card, or connected an external drive that became inaccessible after a file-system error.
The product page describes a three-stage process—select, scan, and preview/recover—and lists support for more than 5,000 file types.
Magic Data Recovery does not replace DMDE’s disk editor, custom RAID tools, or forensic-level controls. Instead, it offers a more accessible solution for the data-loss cases most home and office users encounter.
For another practical workflow, see how to recover hard drive deleted files.
If you are looking for a more efficient Windows solution and do not need advanced disk editing, try Magic Data Recovery. Preview the scan results and recover a small test set before committing to a full restoration.
Supports Windows 7/8/10/11 and Windows Server
Best Tips to Improve File Recovery Results
Use these rules with DMDE, Magic Data Recovery, or any reputable recovery tool:
- Act quickly. Continued use increases the chance of overwriting.
- Separate source and destination. Never recover files to the device being scanned.
- Start with the least intensive method. Check backups and the Recycle Bin, and then use Quick Scan before Full Scan on a healthy drive.
- Preview representative files. Test different types, sizes, and folders.
- Prefer file-system results. They usually preserve names, paths, dates, and fragmented files better than Raw recovery.
- Do not repair first. Recover important data before formatting, CHKDSK, partition edits, or file-system fixes.
- Clone unstable hardware. Work from the image or clone instead of repeatedly scanning the original disk.
- Keep multiple copies. After recovery, store verified data in at least two locations.
These DMDE how to recover files tips also apply when you recover accidentally deleted files.
When to Stop DIY Recovery
Stop using software and contact a professional service when the drive:
- Makes clicking, grinding, or repeated spin-up sounds
- Disconnects during reads
- Reports the wrong capacity
- Disappears from BIOS, Disk Management, or system information
- Becomes unusually slow across multiple computers or cables
- Contains irreplaceable business, legal, research, or family data
- Has suffered fire, water, impact, or electrical damage
A DMDE how to recover files scan repeatedly reads the source. That is reasonable for healthy media, but risky for unstable hardware.
DMDE’s own guidance recommends cloning failing drives and notes that repeated access can worsen device damage.
Conclusion
This DMDE how to recover files guide provides a safe sequence: stop writing to the source, open the correct volume, try Quick Volume Scan, inspect deleted items, recover to another disk, and use Full Scan only when the simple path fails.
DMDE remains a strong choice for users who understand partitions, file systems, disk images, and advanced recovery options.
For ordinary Windows users, Magic Data Recovery offers a clearer alternative for deleted files, formatted storage, and file-system errors. Its guided scan, filtering, preview, broad file-type support, and straightforward recovery process reduce the chance of choosing the wrong technical option.
Start with a small test recovery, verify the results, and keep the source unchanged. For more methods and safety guidance, return to the deleted file recovery guide.
Supports Windows 7/8/10/11 and Windows Server
FAQs
Is DMDE free to recover files?
DMDE Free Edition can recover up to 4,000 files from the active directory panel in one operation, and users can repeat the process. However, it restricts nested folder recovery, so restoring a large directory tree may require many separate operations. Test several important files first because buying a license removes limits but does not improve already corrupted data.
Why does DMDE not show my deleted files?
You may have opened the wrong volume, hidden deleted entries, or relied only on a quick file-system view. Enable deleted items, inspect All Found or Virtual FS, and verify the original partition. If the records are damaged or the drive was formatted, run a Full Scan and compare the detected volume versions before choosing Raw results.
Can DMDE recover files after formatting?
DMDE may recover files after a quick format when the old file-system structures or file content remain on the disk. Open the physical device, run a Full Scan, and test the most coherent volume result. Recovery becomes unlikely after a full overwrite, secure erase, extensive reuse, or SSD TRIM because software cannot restore data that no longer exists.
Can DMDE recover deleted files from an SSD?
Sometimes, but the probability may be low because SSDs commonly use TRIM. After deletion, the operating system can tell the SSD that the relevant blocks are no longer needed, and the controller may clear them. Stop using the SSD immediately, check backups, and scan from another system or boot environment. Empty previews may indicate that the content has already gone.
What is the difference between DMDE Quick Scan and Full Scan?
Quick Scan relies mainly on accessible file-system records and suits recently deleted files on a healthy, visible volume. Full Scan searches more broadly for file-system structures and Raw file signatures, so it helps after formatting, partition loss, or metadata damage. Start with Quick Scan to save time, and then use Full Scan when expected files or folders remain missing.
Where should I save files recovered by DMDE?
Save recovered data to a different physical drive, not merely another folder on the same disk. For example, recover an external HDD to an internal drive or another external device. Writing to the source may overwrite files that the scan has not yet copied. Keep the original storage unchanged until you verify the recovered files and create a backup.
Why are files recovered by DMDE corrupted or unable to open?
The file record may remain while some content clusters have been overwritten, fragmented, or read incorrectly. You may also have selected an inaccurate volume version or a partial Raw result. Preview several files, try another reconstructed volume, and prefer file-system results over Raw categories. Physical read errors can also damage output, so clone unstable drives before further recovery.
Is Magic Data Recovery a good alternative to DMDE?
Magic Data Recovery is a practical alternative for Windows users who want a simpler process for deletion, formatting, and file-system errors. It guides users through drive selection, scanning, filtering, preview, and recovery without requiring disk-editor knowledge. DMDE remains better for advanced partition analysis, custom RAID work, and granular controls, while Magic Data Recovery better suits many routine recovery cases.

Jason has over 15 years of hands-on experience in the computer data security industry. He specializes in data recovery, backup and restoration, and file repair technologies, and has helped millions of users worldwide resolve complex data loss and security issues.