
How to Recover Files from an Emptied Recycle Bin
Accidentally emptying the Windows Recycle Bin can remove work documents, family photos, project folders, or downloaded files in seconds. However, “permanently deleted” does not always mean immediately erased. This guide explains how to recover files from emptied recycle bin safely, starting with backup-based methods and moving to disk-level recovery when no backup exists. For a broader overview of deletion scenarios, see Amagicsoft’s deleted file recovery guide.
If your goal is to recover files from emptied recycle bin, the most important rule is simple: stop using the affected drive. Installing programs, downloading files, copying data, or even normal Windows activity can overwrite the disk space that still contains traces of your deleted files.
Table of Contents
Can You Recover Files from an Emptied Recycle Bin?
Yes, it is often possible to recover files from emptied recycle bin, especially when the files were stored on a hard disk drive and little new data has been written since deletion. Windows normally marks the deleted file’s storage space as available instead of immediately erasing every byte. Recovery software can scan those areas and reconstruct files that remain intact.
Your chances depend on four factors:
- How much time has passed since deletion
- How heavily the drive has been used
- Whether the storage device is an HDD or SSD
- Whether a usable backup, cloud copy, or previous version exists
Recovery is never guaranteed. Still, a careful attempt to recover files from emptied recycle bin is worthwhile before the affected space is reused. If Windows or another program has overwritten the deleted sectors, no software can restore the original content from those sectors.
What Happens After You Empty the Recycle Bin?
To understand how to recover files from emptied recycle bin, it helps to know what Windows changes during deletion.
When a file moves to the Recycle Bin, Windows keeps the file data and records its original location. Emptying the Recycle Bin removes the normal restore reference and tells the file system that the occupied space can be reused. On an NTFS drive, the file’s metadata entry may be marked as deleted while some or all of the underlying data remains available until overwritten.
Microsoft gives the same practical warning in its Windows File Recovery guidance: deleted space becomes free space, and continued computer use can overwrite it at any time.
HDD vs. SSD Recovery
Storage type | What usually happens after deletion | Recovery outlook |
HDD | Deleted sectors may retain data until Windows reuses them | Often better when recovery starts quickly |
SSD | TRIM may notify the drive that deleted blocks are no longer needed | Often more difficult and time-sensitive |
External HDD | Similar to an internal HDD, provided no new files are copied to it | Often reasonable if the drive is healthy |
USB flash drive | Results vary by controller, file system, and later writes | Possible, but avoid reconnecting unnecessarily |
TRIM does not make every SSD recovery case identical. The controller, operating system, encryption, timing, and garbage collection behavior all matter. Nevertheless, SSD users who need to recover files from emptied recycle bin should act immediately because deleted blocks may become inaccessible much sooner than on an HDD.
What to Do Before Starting Recovery
Before you try to recover files from emptied recycle bin, take these precautions:
- Stop saving data to the affected drive. Do not download, install, update, export, or copy files to it.
- Avoid restarting repeatedly. Windows can create temporary files, logs, updates, and cache data during startup.
- Prepare another drive. Use a separate internal partition, external drive, or USB device as the recovery destination.
- Check for physical warning signs. Stop DIY recovery if the drive clicks, disconnects, spins down, overheats, or disappears from Disk Management.
- Do not run CHKDSK first. CHKDSK repairs file-system structures; it is not a deleted-file recovery tool and may change metadata that recovery software needs.
These precautions often matter more than the choice of software. They protect the remaining data while you prepare to recover files from emptied recycle bin.
Best Ways to Recover Files from Emptied Recycle Bin
The best method to recover files from emptied recycle bin depends on whether another copy of the file exists. Start with backup and cloud options because they do not require scanning deleted disk space. Move to recovery software when those methods fail.
Method | Requires prior setup | Difficulty | Best use case |
OneDrive or cloud Recycle Bin | Yes | Easy | Synced Desktop, Documents, or Pictures |
File History | Yes | Easy | Windows folders backed up before deletion |
Previous Versions | Usually | Easy | Earlier folder snapshot exists |
Windows File Recovery | No | Advanced | Users comfortable with commands |
Magic Data Recovery | No | Easy | No backup, permanent deletion, or mixed data-loss cases |
Method 1: Check OneDrive or Another Cloud Recycle Bin
If Windows backed up or synchronized your Desktop, Documents, or Pictures folder to OneDrive, the cloud service may still hold a deleted copy even after the local Windows Recycle Bin was emptied.
To check OneDrive:
- Sign in to the OneDrive website.
- Open Recycle bin in the navigation pane.
- Select the required files or folders.
- Choose Restore.
- Confirm that the files return to the expected synced folder.
Microsoft states that personal OneDrive accounts normally retain deleted items in the online Recycle Bin for 30 days, while work or school retention can differ.
This is often the fastest empty Recycle Bin recovery method and the fastest way to recover files from emptied recycle bin when folder backup or sync was enabled. Because no disk scan is required, cloud recovery should be your first choice whenever you need to recover files from emptied recycle bin from a synchronized folder.
Also check Google Drive, Dropbox, SharePoint, or any backup service used on the computer.
Method 2: Restore Files with File History
File History can restore earlier copies of personal folders, but it only works if you enabled it before the deletion.
Follow these steps:
- Connect the external drive or network location used for File History.
- Open File Explorer.
- Browse to the folder that originally contained the deleted file.
- Right-click the folder and select Restore previous versions.
- Choose a version created before the Recycle Bin was emptied.
- Open the version first to verify its contents.
- Select Restore or restore the file to another location.
Microsoft explains that File History regularly saves copies of protected folders and lets users browse earlier versions when files are deleted or changed.
File History is a low-risk way to recover files from emptied recycle bin because it restores a backup rather than reading unallocated disk space. Use it before disk scanning whenever you need to recover files from emptied recycle bin and a valid backup exists.
Method 3: Use Previous Versions
The Previous Versions tab may show snapshots created through File History or other Windows backup mechanisms.
- Open the folder that previously stored the deleted file.
- Right-click the folder and select Properties.
- Open Previous Versions.
- Select a snapshot dated before deletion.
- Click Open to inspect it.
- Copy the required file to a safe location.
Do not click Restore immediately if the current folder contains newer files you want to keep. Opening the snapshot and copying only the missing items gives you more control.
If no versions appear, Windows did not retain a usable snapshot. In that case, the next practical way to recover files from emptied recycle bin is Windows File Recovery or a dedicated recovery application.
Method 4: Use Windows File Recovery
Windows File Recovery is Microsoft’s command-line utility for files that are no longer available in the Recycle Bin. It supports local storage devices, including internal drives, external drives, and USB devices, but it does not recover directly from cloud storage or network shares.
The basic command format is:
- winfr source-drive: destination-drive: [/mode] [/switches]
For example, to search the C: drive for Word and PDF files and save results to E:, use:
- winfr C: E: /extensive /n *.docx /n *.pdf
Important rules:
- The source and destination drives must be different.
- Use Regular mode for a recently deleted file on a healthy NTFS drive.
- Use Extensive mode when deletion occurred longer ago or Regular mode finds nothing.
- Narrow the search by folder, filename, or extension whenever possible.
- Do not save recovered files back to the source drive.
Windows File Recovery can recover files from emptied recycle bin, but its command-line workflow may be difficult for users who do not know the original path or file extension. For a small number of known file types, however, it remains a useful free option to recover files from emptied recycle bin.
Method 5: Recover Files with Magic Data Recovery
When no backup exists and the command-line method is impractical, permanently deleted file recovery software becomes the practical next step. In that situation, Magic Data Recovery provides a visual way to recover files from emptied recycle bin.
The software scans the original drive for deleted file records and recognizable file signatures. It supports accidental deletion, formatting, file-system errors, inaccessible partitions, and other common data-loss scenarios. Its current product page lists support for more than 5,000 file formats, including documents, photos, videos, audio, archives, databases, and disk-image files.
Why Magic Data Recovery Fits This Scenario
Magic Data Recovery addresses the main problems users face after emptying the Recycle Bin:
- No backup is available: It scans the affected storage device directly.
- The original folder structure is unclear: Scan results can reveal deleted folders and file categories.
- Many file types were lost: It supports documents, media, archives, and other formats.
- Users need to verify files first: Preview and filtering help identify useful results before recovery.
- The source should remain unchanged: Read-only scanning helps avoid modifying the original data during analysis.
- The loss is more complex than deletion: The same tool can also handle formatted drives and file-system errors.
Compared with backup tools, Magic Data Recovery does not depend on File History or cloud sync being enabled beforehand. Compared with Windows File Recovery, it offers a graphical workflow, searchable results, file filters, and preview options.
These advantages make it more practical for ordinary users who need to recover files from emptied recycle bin without constructing commands. If you are looking for a more efficient solution after backup methods fail, Magic Data Recovery is worth testing on the affected drive.
Step 1: Install the Software on Another Drive
Download Magic Data Recovery, but do not install it on the drive that contained the deleted files.
Supports Windows 7/8/10/11 and Windows Server
For example:
- If the files were deleted from C:, install the software on D: or an external drive.
- If they were deleted from an external disk, install the software on the computer’s internal drive.
- If the computer has only one partition, use another Windows computer or connect an external storage device where possible.
Installing to the affected partition can overwrite recoverable data.
Step 2: Select the Original Drive
Launch the program and select the partition where the files existed before deletion.
Desktop, Downloads, Documents, and Pictures usually reside on the Windows system partition unless you moved them elsewhere. Files deleted from another internal partition or external drive must be recovered by scanning that original device, not by scanning C: automatically.
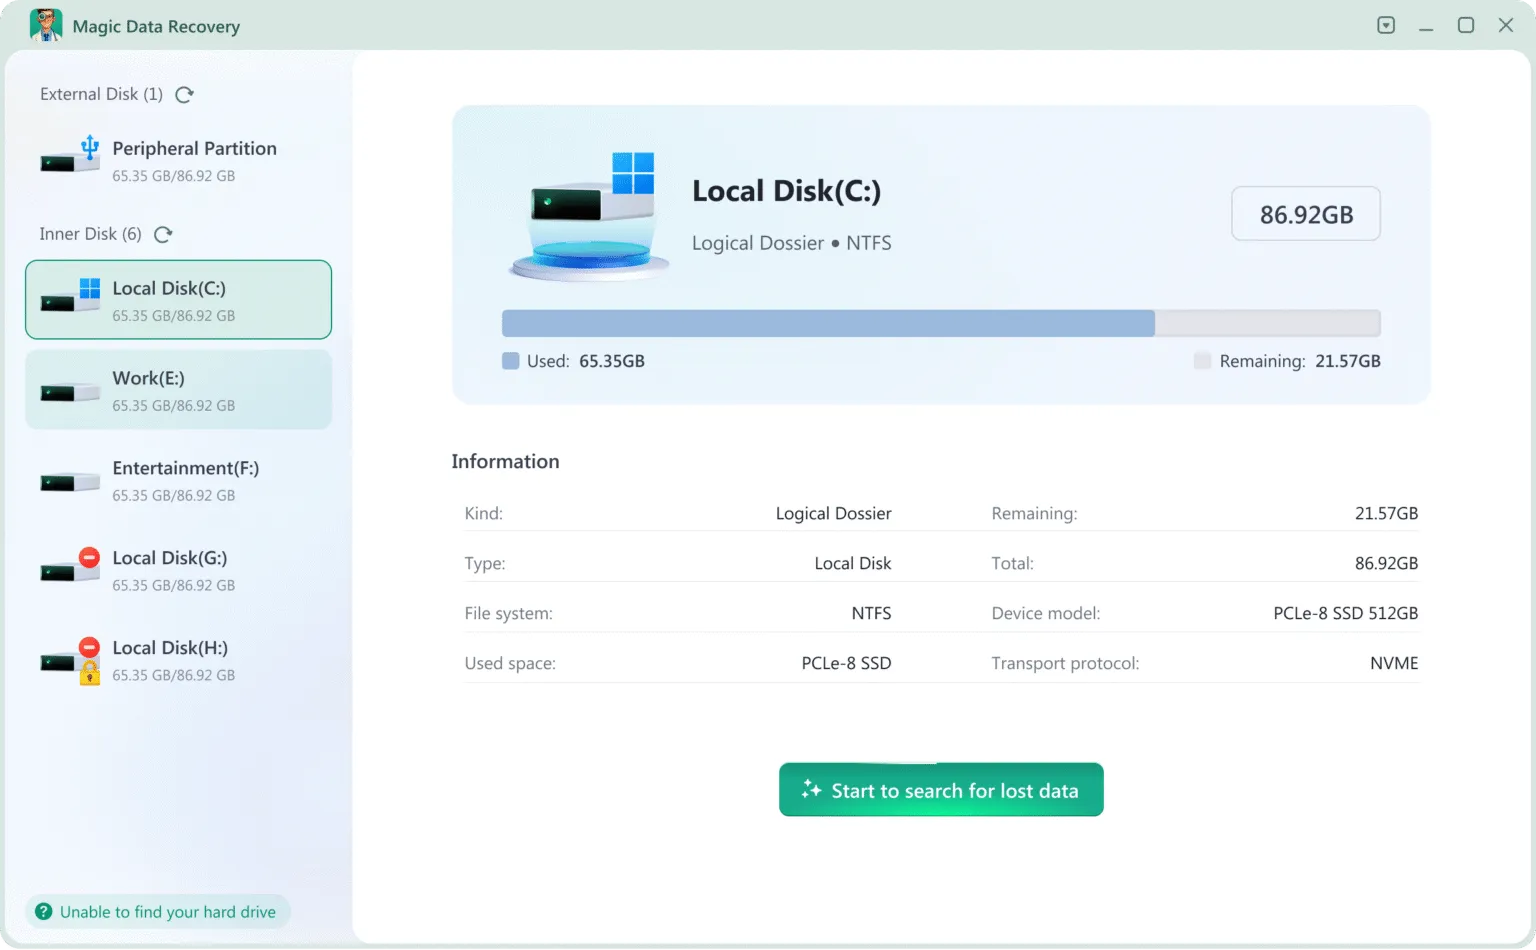
Step 3: Scan for Deleted Files
Start the scan and allow it to complete when possible. Early results may appear quickly, but a completed scan can locate additional deleted folders and signature-based files.
During the scan:
- Search by part of the filename
- Filter by file type, size, or modification date
- Check deleted-file and lost-file categories
- Review the original folder path when available
The official Magic Data Recovery user guide also recommends using filename fragments, extensions, date filters, and sorting to narrow large result sets.
Step 4: Preview Important Files
Preview documents, pictures, and other supported files before selecting them. A valid preview is a useful sign that the file content remains readable, although it does not guarantee that every part of a large or complex file is intact.

Prioritize irreplaceable data first, such as:
- Business documents
- Original photos and videos
- Project source files
- Financial or legal records
- Databases and email archives
Step 5: Recover to a Different Drive
Select the required files and save them to another physical drive or partition. Never recover them to the same source location during the initial process.
After recovery:
- Open several restored files.
- Check large files from beginning to end.
- Compare file sizes where possible.
- Keep the source drive unchanged until you verify all critical data.
Following this workflow gives you the best practical chance to recover files from emptied recycle bin without causing avoidable overwriting. It also keeps the source drive unchanged while you verify whether the recovered copies are complete.
Why Recovery Sometimes Fails
Even strong recovery software cannot restore data that no longer exists in readable form. Understanding these limits helps you decide whether to keep trying to recover files from emptied recycle bin or escalate the case to a specialist.
Deleted Data Was Overwritten
New downloads, Windows updates, browser caches, application files, and copied folders may reuse the same sectors. Once the original sectors are overwritten, the replaced content cannot be reconstructed from that location.
SSD TRIM Removed the Blocks
An SSD may process TRIM and garbage-collection operations after deletion. As a result, the file can disappear from software scan results even when deletion was recent.
The File Was Fragmented
A large file may occupy many non-contiguous areas. If some fragments remain and others were overwritten, the recovered file may be incomplete or corrupted.
Encryption Prevents Recovery
BitLocker, device encryption, encrypted containers, or application-level encryption can limit recovery when the required key or metadata is unavailable.
The Drive Has Physical Damage
Software cannot safely solve mechanical failure, damaged heads, unstable flash memory, burned components, or severe controller problems. Contact a professional recovery laboratory when the drive clicks, repeatedly disconnects, fails to initialize, or contains uniquely valuable data.
Common Mistakes to Avoid
Users often reduce their recovery chances while trying to recover files from emptied recycle bin. Avoid these mistakes:
- Installing several recovery programs on the source drive
- Running cleanup, optimization, defragmentation, or secure-erasure tools
- Saving scan results or recovered files to the original partition
- Repeatedly restarting a failing computer
- Running CHKDSK before preserving important data
- Assuming System Restore restores deleted personal files
- Continuing to use an SSD while deciding what to do
- Opening a physically damaged drive outside a controlled laboratory
A careful first attempt is usually better than several uncontrolled attempts.
How to Improve Future Protection
After you recover files from emptied recycle bin, reduce the risk of repeating the incident:
- Enable File History or another automatic local backup.
- Use OneDrive folder backup for Desktop, Documents, and Pictures.
- Keep at least one offline or external backup.
- Follow the 3-2-1 approach: three copies, two storage types, and one off-site copy.
- Review Recycle Bin contents before emptying it.
- Avoid using Shift + Delete for important folders.
- Test backup restoration occasionally.
- Separate active work, backup storage, and recovery destinations.
Backups remain more reliable than any undelete process because they preserve an independent copy before data loss occurs. They also eliminate the urgency and uncertainty involved when you must recover files from emptied recycle bin.
Conclusion
You can often recover files from emptied recycle bin when you act quickly and avoid writing new data to the source drive. Start by checking OneDrive, File History, and Previous Versions. Windows File Recovery is a useful free option for users comfortable with commands.
When no backup exists, Magic Data Recovery offers a clearer workflow to recover files from emptied recycle bin, with disk scanning, filtering, preview, and support for deletion, formatting, and file-system-error scenarios. It is recommended because it solves the core problem without requiring a pre-existing backup or complex command syntax. For more guidance on permanently deleted data, return to the deleted file recovery.
Supports Windows 7/8/10/11 and Windows Server
FAQs About Recovering Files from an Emptied Recycle Bin
Can I recover files after emptying the Recycle Bin?
Yes, you may still recover files from emptied recycle bin if the original disk sectors have not been overwritten. Stop using the affected drive immediately, check File History and cloud backups, then scan the original partition with recovery software. HDD recovery is often more favorable than SSD recovery because SSD TRIM can remove deleted blocks quickly.
How can I recover deleted files without software?
Check OneDrive or another cloud Recycle Bin, File History, and the Previous Versions tab for the original folder. These methods only work when synchronization, backup, or snapshot creation was active before deletion. Without an existing copy, Windows cannot simply undo an emptied Recycle Bin, so disk-scanning software or Windows File Recovery becomes necessary.
Where do files go after the Recycle Bin is emptied?
Windows removes the normal Recycle Bin reference and marks the file’s disk space as available for reuse. On an HDD, the underlying data may remain until another file overwrites those sectors, which can allow you to recover files from emptied recycle bin. On an SSD, TRIM and garbage collection may clear the deleted blocks, making later recovery less likely.
How long do emptied Recycle Bin files remain recoverable?
There is no fixed recovery period. A deleted file may survive for minutes, days, or longer, depending on free space, computer activity, storage type, and whether its sectors are reused. The safest assumption is that every new write reduces the chance to recover files from emptied recycle bin, so begin recovery immediately.
Can System Restore recover personal files deleted from the Recycle Bin?
Generally, no. System Restore focuses on Windows system files, drivers, registry settings, and installed programs rather than restoring ordinary personal documents, photos, or videos. File History, Previous Versions, OneDrive, Windows File Recovery, or dedicated data recovery software are more appropriate options for personal files removed from an emptied Recycle Bin.
Can I recover emptied Recycle Bin files from an SSD?
Sometimes, but SSD recovery is less predictable. If TRIM has not processed the deleted blocks, a backup or recovery scan may still recover files from emptied recycle bin. However, once the SSD controller clears those blocks, software cannot read the original content. Stop using the SSD immediately and check cloud or backup copies before attempting a scan.
Is Windows File Recovery free and safe to use?
Windows File Recovery is a free Microsoft command-line application for local drives. It can search for files no longer available in the Recycle Bin, but you must use a different destination drive and enter the correct filters. It is safe when used carefully, although its command syntax can be difficult for inexperienced users.
What is the best tool to recover files from an emptied Recycle Bin?
The best choice depends on your backup status and technical skills. Use File History or cloud recovery first when a backup exists. Without a backup, Magic Data Recovery is a practical option because it scans deleted data, supports many file formats, provides filters and previews, and avoids the command-line complexity of Windows File Recovery.

Jason has over 15 years of hands-on experience in the computer data security industry. He specializes in data recovery, backup and restoration, and file repair technologies, and has helped millions of users worldwide resolve complex data loss and security issues.