How to Format NVMe in Windows 11 Safely

How to Format NVMe in Windows 11 Safely
Formatting an NVMe SSD in Windows 11 is a common task, often triggered when users encounter slow performance, system errors, or need to prepare a drive for a fresh OS installation. If your NVMe drive appears as RAW, shows errors, or refuses to initialize, you may worry about data safety. The good news is—you can resolve these issues reliably. This guide explains how to format NVMe Windows 11 in a clear, step-by-step way, including standard Windows methods and a professional data-recovery-safe solution. You can download the Data Recovery Tool first.

Supports Windows 7/8/10/11 and Windows Server

Table of Contents

Why You May Need to Format an NVMe SSD on Windows 11

Before formatting, it helps to understand the situation. Users commonly experience:

① The NVMe drive showing as RAW in Disk Management

② Windows 11 asking to format before use

③ Slow read/write speeds due to corrupted file system

④ Switching between file systems (e.g., NTFS, exFAT) for compatibility

⑤ Preparing the NVMe as a bootable or storage drive

These scenarios typically point to a file system or partition structure issue. Formatting resolves it, but it can also erase data. If your files are important, do not panic—your data is not truly lost.

How to Format NVMe in Windows 11 Using Standard Windows Tools

Windows 11 includes built-in tools that let you format an NVMe drive quickly. Follow the method that best fits your situation.

Format NVMe via File Explorer

This method works when the drive is recognized normally.

Steps:

① Open File Explorer.

② Right-click your NVMe drive.

③ Select Format.

④ Choose NTFS, exFAT, or FAT32 (default NTFS for Windows).

⑤ Click Start to begin formatting.

Best for: simple reformatting, storage drives.

Format NVMe Using Disk Management

Use this if Windows detects the disk but not the partition.

Steps:

① Press Win + X, choose Disk Management.

② Locate your NVMe SSD.

③ Right-click the volume → Format.

④ Set file system to NTFS and click OK.

If the disk is unallocated:

① Right-click the Unallocated space.

② Choose New Simple Volume.

③ Follow the wizard to format.

Format NVMe via Diskpart (Advanced)

This is useful when the drive is corrupted or cannot be formatted through the GUI.

Steps:

① Press Win + S, type cmd, choose Run as administrator.

② Enter:

				
					diskpart
list disk
select disk X
clean
create partition primary
format fs=ntfs quick


③ Type exit.

Warning:clean removes all partitions.

What If Your Data Is Important?

Formatting always erases data, even when using quick format. If your NVMe contains important files but is inaccessible, RAW, or Windows keeps asking to format it, you should recover data before you perform any formatting.

Magic Data Recovery offers a professional, read-only solution that protects your drive while retrieving files.

How to Recover Your NVMe Data Before Formatting (Step-by-Step)

Magic Data Recovery performs a non-destructive scan, allowing you to extract data safely before formatting your NVMe drive.

Step-by-Step Recovery Process

①. Download and Install: Get Magic Data Recovery from the official website and install it on your computer.

Supports Windows 7/8/10/11 and Windows Server
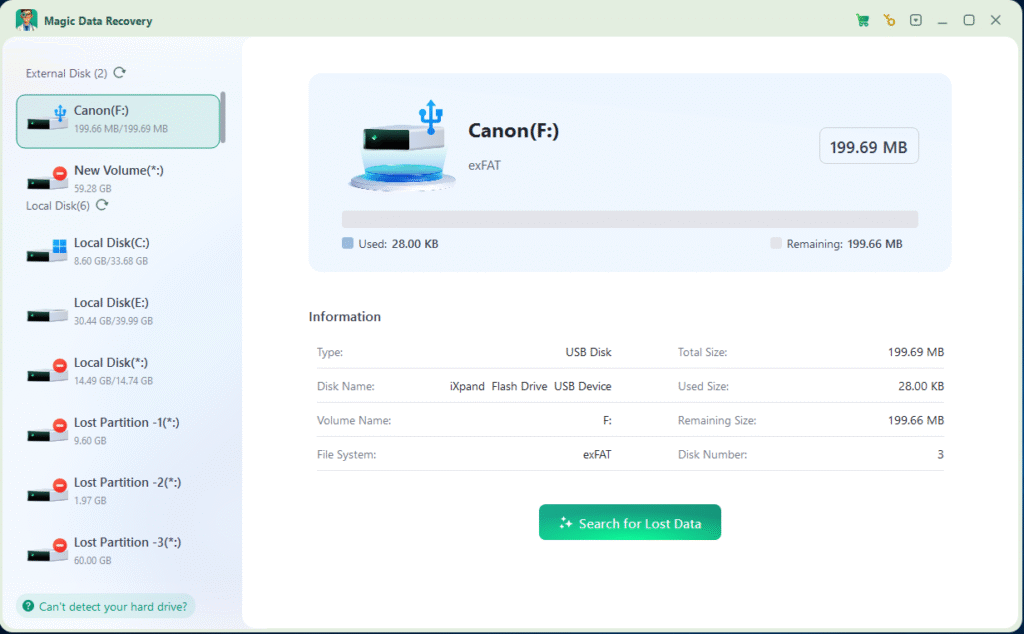
②. Select the Drive: Launch the software and choose your drive from where you lost files.
Recover Your NVMe Data Before Formatting
③. Start the Scan: Click “Search for Lost Data” to begin. It will start Quick Scan first then Deep scan to find more lost files.
Scan your lost files befor formatting NVME drive
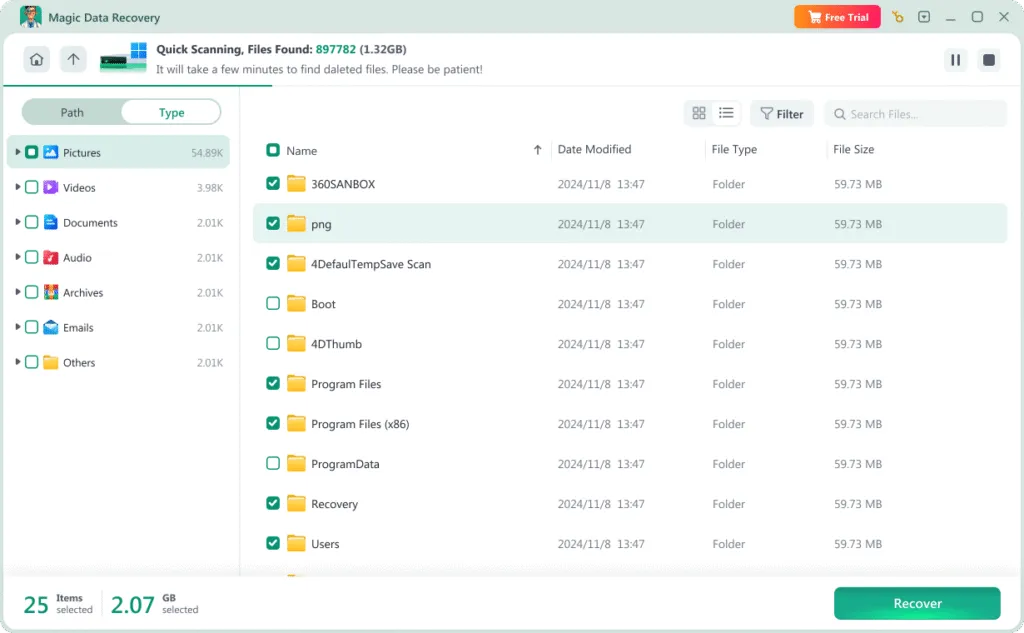
④. Preview and Select: Browse and preview the found files after the scan.
Preview your file before Magic Data Recovery Recovering
⑤. Recover: Select the files you need and save them to a different drive (not the one your lost files from).
Save all recovered files before Formatting  NVMe SSD Windows 11
You can also watch the video to learn about the usage steps of Magic Data Recovery.

Conclusion

Learning how to format NVMe Windows 11 helps you fix corrupted file systems, improve drive performance, and prepare the SSD for new installations. If your NVMe contains important data, always recover it first using a safe, professional tool.

To recover data from a formatted drive, you can download Magic Data Recovery and restore your files safely before formatting.

Supports Windows 7/8/10/11 and Windows Server
How to Format NVMe Windows 11 FAQs

How do I format NVMe in Windows 11?

You can format an NVMe SSD in Windows 11 through File Explorer, Disk Management, or Diskpart. The simplest method is via File Explorer: right-click the NVMe drive, choose Format, select a file system such as NTFS, and confirm. If the drive is RAW or unallocated, you can use Disk Management to create a new volume before formatting.

How to fully format an NVMe?

To fully format an NVMe SSD, you can use Diskpart with the clean command. After opening Command Prompt as administrator, run Diskpart, select the NVMe disk, apply the clean operation, and create a new partition. This process removes all partitions and performs a complete reset of the drive structure.

How to initialize NVMe in Windows 11?

To initialize an NVMe SSD, open Disk Management, find the uninitialized NVMe drive, and select Initialize Disk when prompted. Choose GPT for modern systems. After initialization, create a new simple volume and format it with NTFS or another preferred file system.

How to wipe an M.2 SSD in Windows 11?

You can wipe an M.2 SSD using Diskpart. Open Command Prompt as administrator, launch Diskpart, select the disk, and run the clean command to remove all partitions. If you want a full wipe before reinstalling Windows, you may also delete partitions during Windows Setup.

Do NVMe drives need to be formatted?

Yes, a new NVMe SSD must be formatted before Windows 11 can store files on it. If it shows as RAW, unallocated, or uninitialized, you must initialize and format it in Disk Management. However, if the drive contains important data, recover the files first before formatting.

How to format SSD drive on Windows 11?

To format any SSD—including NVMe or SATA—open File Explorer, right-click the drive, choose Format, select NTFS or exFAT, and confirm. Alternatively, you can format the drive through Disk Management or Diskpart if it does not appear correctly in File Explorer.

How to fully wipe NVMe?

A complete wipe requires using Diskpart. Run Command Prompt as administrator, open Diskpart, select the NVMe disk, and use the clean command. This removes all partitions and resets the disk structure. For deeper erasure, some manufacturers provide NVMe Secure Erase tools.

Is F11 or F12 factory reset?

This depends on the computer manufacturer. Many systems use F11 to open the recovery environment for a factory reset, while others may use F12 for the boot menu. Check your device’s documentation to determine the correct key.

How to format NVMe SSD in BIOS?

Most BIOS interfaces cannot fully format a drive. However, you can format an NVMe SSD during the Windows installation setup accessed through BIOS boot options. After booting from a USB installer, delete existing partitions on the NVMe drive and create a new one, which formats it automatically.

Erin Smith is recognized as one of the most professional writers at Amagicsoft. She has continually honed her writing skills over the past 10 years and helped millions of readers solve their tech problems.