
ESD USB Recover Files: Safe Guide
If you searched ESD USB recover files, your USB flash drive or external disk probably became a small ESD-USB volume after you created Windows installation media. Important folders may have disappeared, and a 500GB, 1TB, or larger drive may now show only about 32GB.
Do not format the drive, delete its partitions, run CHKDSK, or copy new files to it. Instead, begin with the recovery-first approach explained in our deleted file recovery guide. Then follow the steps below to scan the entire affected device before rebuilding its partitions.
Microsoft recommends using a blank USB drive with at least 8GB of storage because creating Windows installation media deletes its existing content. Therefore, choosing the wrong USB drive, portable HDD, or external SSD may replace its original partition layout and write Windows setup files over part of the old data.
This guide explains what happened, how to assess your recovery chances, how to use Magic Data Recovery, and how to return the ESD-USB device to normal only after your files are safely stored elsewhere.
Supports Windows 7/8/10/11 and Windows Server
Table of Contents
Quick Answer: Can ESD USB Recover Files?
Yes, an ESD USB recover files attempt can succeed when the missing data has not been overwritten and the storage device has no serious physical damage.
The Windows Media Creation Tool normally changes the partition structure, formats a bootable volume, and copies Windows installation files to the selected device. As a result, the old files become inaccessible. However, the process does not necessarily overwrite every sector of a large external drive.
A disciplined ESD USB recover files plan evaluates four factors before scanning:
- Overwritten area: Files stored in sectors occupied by Windows setup data may be partly or completely damaged.
- Device type: External HDD recovery is often more predictable than recovery from flash-based storage.
- Subsequent activity: Formatting, partitioning, copying files, or running installation media again can overwrite additional data.
- Physical condition: Clicking, overheating, disconnection, or detection problems may indicate hardware failure.
Many current recovery guides correctly recommend recovering data before converting ESD-USB back to normal. However, a safer ESD USB recover files workflow should also distinguish logical damage from physical failure, scan the whole physical device instead of only the visible volume, save files elsewhere, and postpone every partition repair.
What Is an ESD-USB Drive?
For the ESD USB recover files query, ESD-USB commonly refers to the volume label assigned to Windows installation media.
It is not a special type of USB hardware. Furthermore, it does not mean that a 1TB external drive has physically become a 32GB drive. Windows has instead replaced or modified the disk’s former partition structure and created a bootable volume containing setup files.
Why Did the Original Files Disappear?
A storage device uses a partition table and file system metadata to tell Windows where volumes, folders, and files begin and end.
When Media Creation Tool prepares the selected device, it writes a new bootable structure and Windows installation data. Consequently:
- The previous partition entries may disappear.
- The mounted volume receives the ESD-USB label.
- The remaining storage may appear as unallocated space.
- File Explorer can no longer display the old folders.
- Some original sectors may remain recoverable.
- Sectors reused by Windows installation files may be overwritten.
This distinction matters. The missing files are not simply hidden, so enabling Show hidden files usually will not solve the problem.
The ESD USB recover files process requires software that can search beyond the current installer volume and inspect lost partitions, remaining file-system records, and recognizable file signatures.
Why Does a 1TB Drive Show Only 32GB?
Many users report that a large external drive appears as an approximately 32GB ESD-USB volume after they accidentally select it in Media Creation Tool.
The remaining capacity usually exists outside the mounted volume as unallocated or inaccessible space. Microsoft community reports describe this pattern after a 1TB portable drive was unintentionally repartitioned.
Disk Management may still display the full physical capacity even when File Explorer shows only the smaller ESD-USB volume.
Nevertheless, do not create a new volume in the unallocated area yet. Doing so writes new file-system metadata and may reduce the effectiveness of an ESD USB recover files scan.
What to Do Immediately After the Drive Becomes ESD-USB
The first few decisions strongly influence the recovery result. A safe ESD USB recover files plan follows these precautions before attempting any repair.
1. Stop All Writes to the Device
Cancel any remaining download or installation process. Next, safely disconnect the affected drive and do not reuse it.
This pause protects the remaining ESD USB recover files opportunity. Avoid opening, renaming, moving, or deleting files on the ESD-USB volume. Every new write may replace sectors that still contain original data.
2. Do Not Format or Delete the ESD Partition
Formatting may make the drive look normal again, but it does not restore the missing files.
Formatting before the ESD USB recover files scan reverses the correct order. Similarly, deleting volumes, creating a new simple volume, or running DiskPart’s clean command changes the disk structure.
These steps belong after data recovery, not before it.
3. Do Not Run CHKDSK First
CHKDSK repairs a file system in place. For an ESD USB recover files case, repair-first is usually the wrong strategy.
An ESD-USB incident is generally not a standard file-system inconsistency. Instead, the partition layout and part of the stored data have been deliberately rewritten by the Windows media creation process.
An in-place repair may change metadata that recovery software could otherwise analyze.
4. Check for Physical Warning Signs
Connect the drive once to a stable Windows computer.
If Windows Disk Management displays the correct device model and total physical capacity, a DIY ESD USB recover files attempt may be reasonable.
Stop immediately if:
- An external HDD clicks or grinds.
- The drive repeatedly spins down.
- It disappears during access.
- Windows reports the wrong physical capacity.
- The USB connector is loose or damaged.
- The device becomes unusually hot.
Repeated scanning can worsen a mechanical or electronic failure.
5. Prepare a Separate Destination Drive
Every ESD USB recover files job needs a separate destination disk with enough free capacity for the recovered data.
Never save recovered files to the affected ESD-USB device. Microsoft’s Windows File Recovery instructions also require different source and destination drives because writing to the source may overwrite recoverable information.
Best ESD USB Recover Files Method: Magic Data Recovery
For most logical ESD-USB cases, Magic Data Recovery provides a practical recovery-first workflow.
The software supports USB flash drives, external hard drives, SSDs, accidental deletion, formatting, inaccessible file systems, and more than 5,000 file formats. Its scan, filter, preview, and recovery workflow also helps ordinary users verify files before saving them.
The visible ESD partition does not represent the full storage history of the disk. That distinction is central to an ESD USB recover files scan.
A suitable recovery application must search the affected storage device for previous file-system records and recognizable file signatures instead of relying exclusively on the current Windows installer volume.
Why Magic Data Recovery Is Suitable
- Whole-device scanning: It can scan connected storage devices instead of relying only on folders visible in File Explorer.
- Multiple recovery scenarios: It handles deleted files, formatted volumes, RAW file systems, corruption, and inaccessible storage.
- Broad format recognition: It supports more than 5,000 formats, including documents, photos, videos, archives, databases, and project files.
- Preview before recovery: Users can check whether important files remain readable before restoring them.
- Beginner-friendly workflow: The process follows a clear select, scan, preview, and recover sequence.
- Search and filtering: File types and search terms help users navigate large scan results.
- Free recovery allowance: The current version allows up to 500MB of recovery, which can help users test several important files before purchasing a license.
No recovery application can restore sectors that Windows installation files have completely overwritten.
Therefore, this recommendation is based on device coverage, scanning capability, preview functions, and workflow reliability rather than an unrealistic recovery guarantee.
How to Use Magic Data Recovery on an ESD-USB Drive
Step 1: Connect the Device for ESD USB Recover Files
Attach the affected device directly to a reliable USB port. A stable connection matters throughout the ESD USB recover files scan.
Avoid unstable hubs, extension cables, and questionable adapters. For an external HDD, place it on a stable surface and listen for unusual mechanical noises.
When Windows asks you to format the drive before use, select Cancel.
Step 2: Install the Software on Another Drive
Download and install Magic Data Recovery on the computer’s internal system drive or another healthy storage device.
Supports Windows 7/8/10/11 and Windows Server
This keeps the ESD USB recover files source unchanged. Never install recovery software on the affected USB drive, external HDD, or external SSD because the installation files may overwrite missing data.
For additional background, review the USB drive data recovery guide, which explains why recovery software and recovered files should remain separate from the source device.
Step 3: Select the Correct Physical Device
Launch Magic Data Recovery and identify the affected device by checking its model, connection type, and original total capacity.
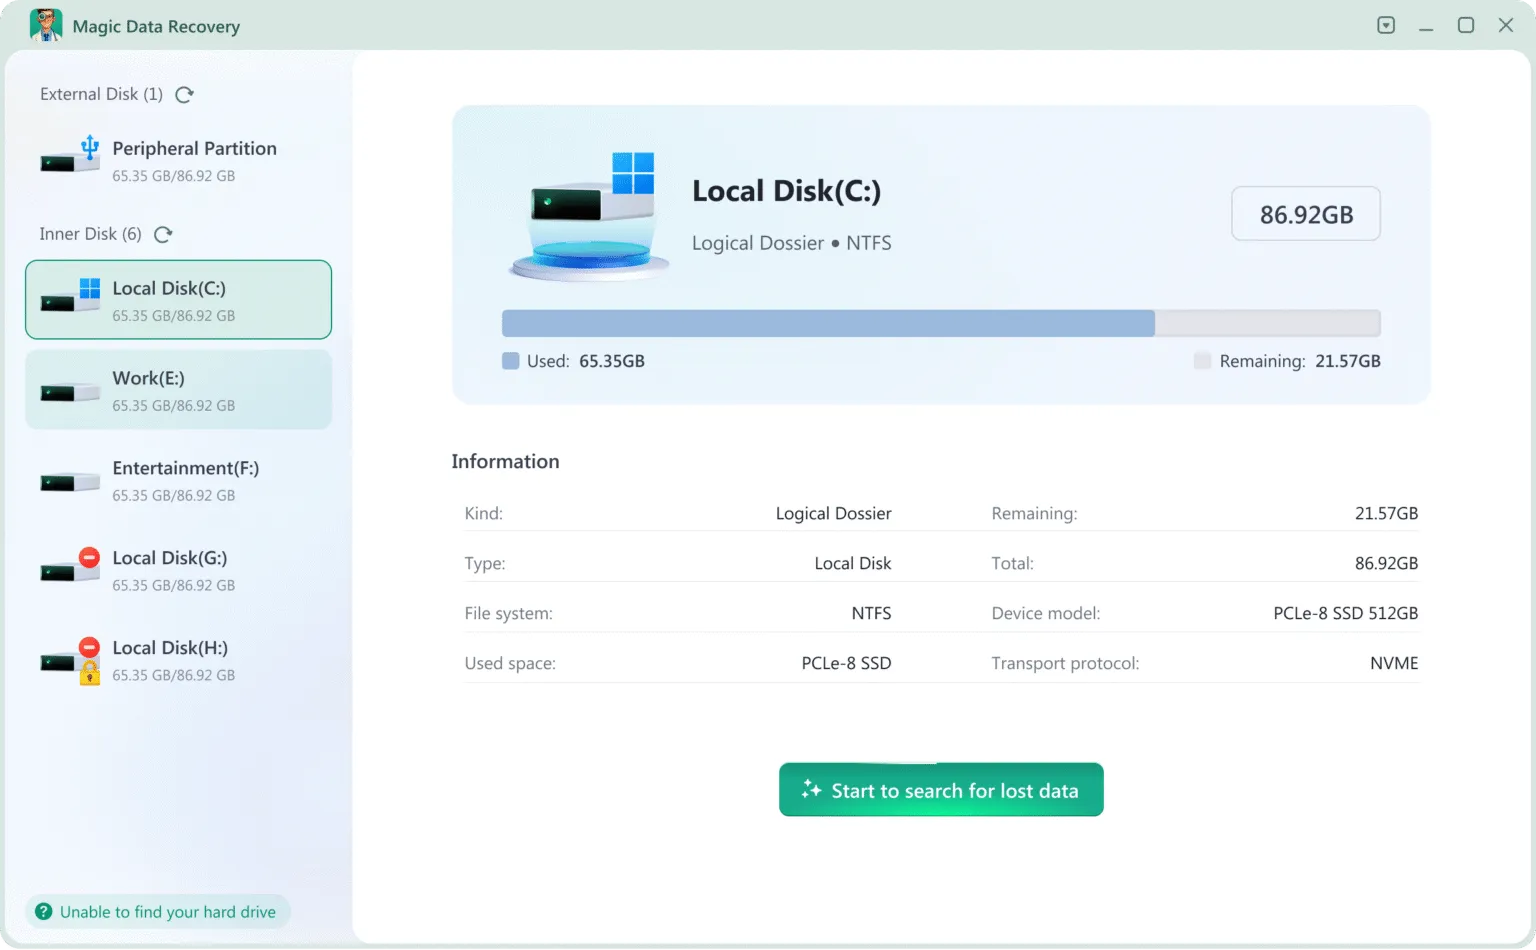
Do not select a disk only because it has the ESD-USB drive letter. When the interface displays the physical device, a lost partition, or unallocated storage, choose the option covering the affected storage space.
This is one of the most important ESD USB recover files decisions. Scanning only the visible bootable partition may find Windows installation files but miss older data stored beyond it.
Step 4: Run a Complete Scan
Start the ESD USB recover files scan and allow it to finish.
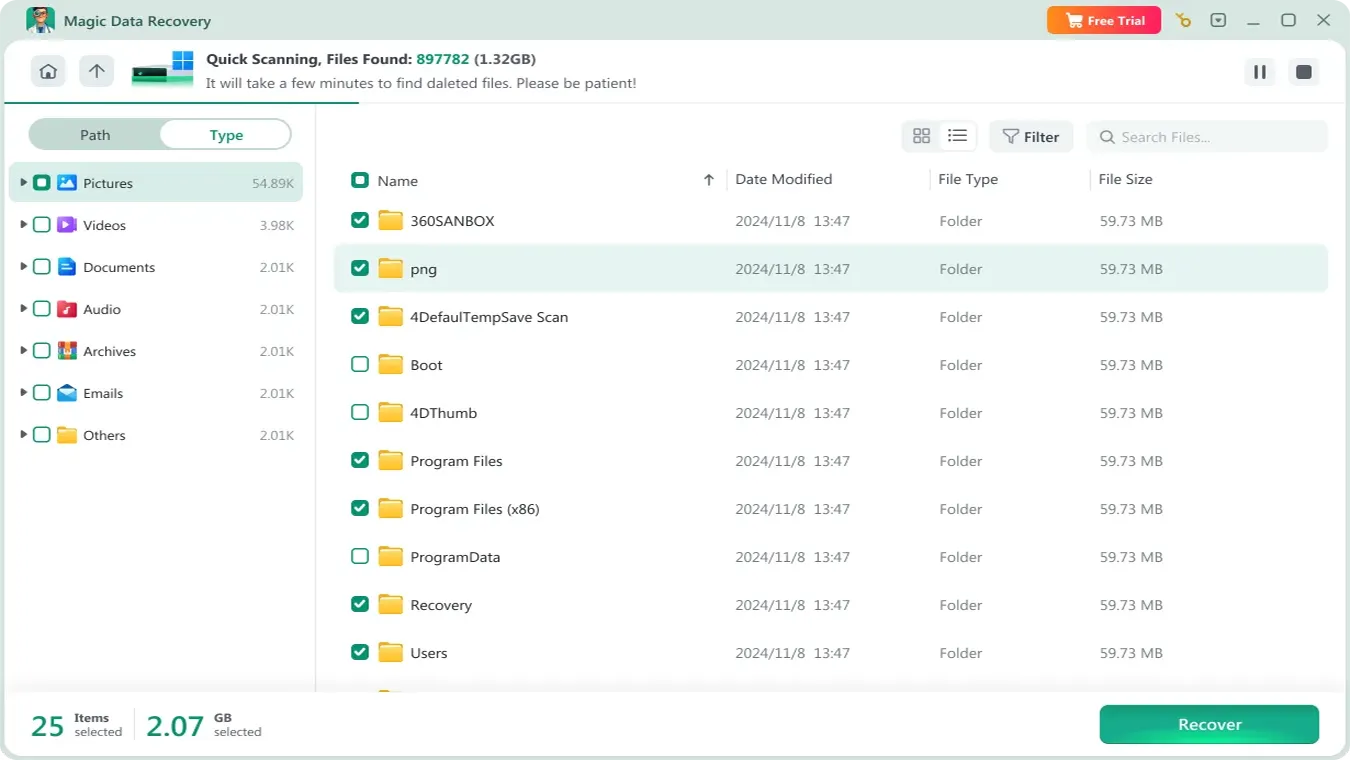
A 1TB or 2TB drive may contain many historical file-system records and signature-based results. Interrupting the scan too early may exclude data stored in later sectors.
During the scan, use filters and search terms to locate:
- DOCX, XLSX, PPTX, PDF, and text documents
- JPG, PNG, HEIC, PSD, and RAW camera images
- MP4, MOV, AVI, MKV, and other videos
- MP3, WAV, FLAC, and other audio files
- ZIP, RAR, 7Z, and backup archives
- PST, database, CAD, and project files
- Previous folder paths and lost partitions
Step 5: Preview Important Files
Open previews of representative files before recovery. Previewing turns an ESD USB recover files result into evidence you can verify.

Check several documents, photos, videos, and other files from different folders. A correct filename does not always prove that the content remains intact. A successful preview provides a stronger indication that the required sectors are readable.
Do not dismiss files simply because they have generic names. Signature-based recovery may restore usable content even when the original filename or folder record has been overwritten.
Step 6: Recover Files to a Different Disk
Select the required files and save them to a healthy internal drive or a different external device.
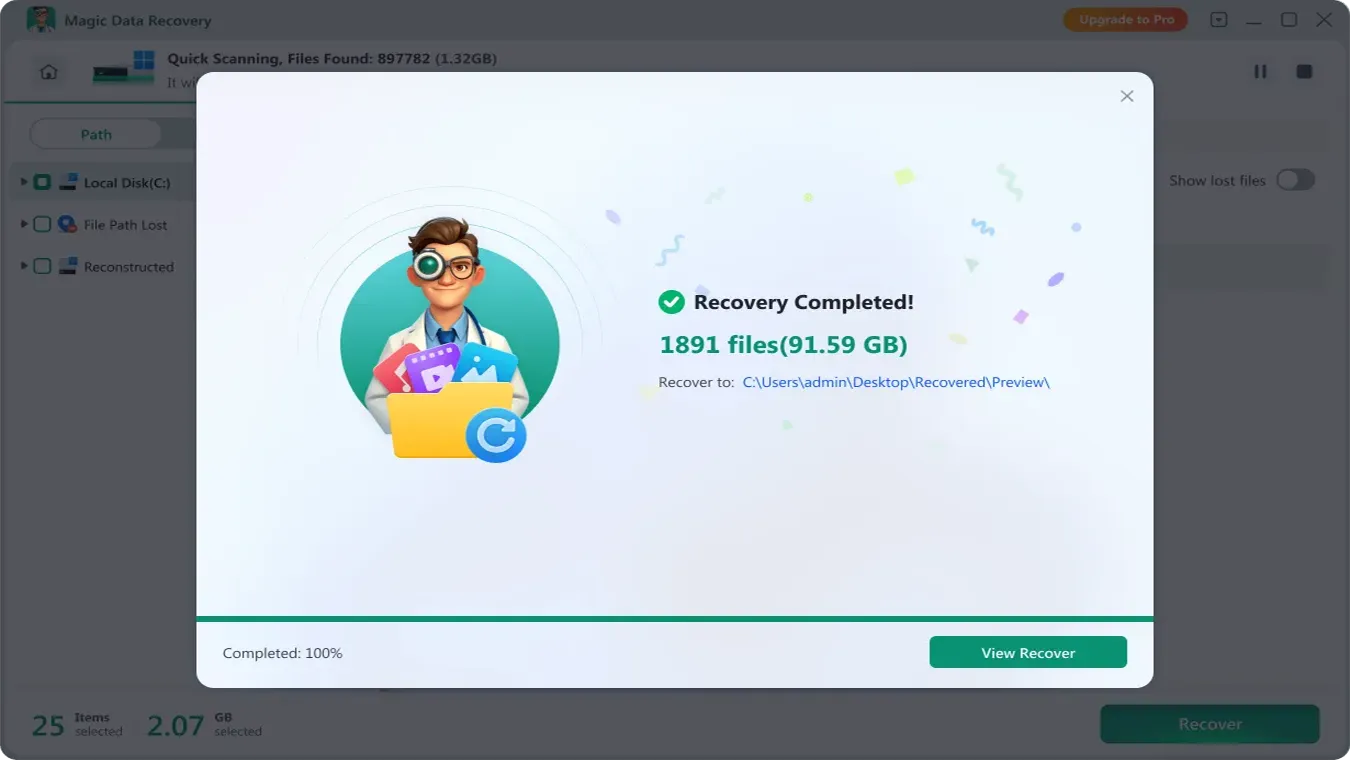
Preserve the affected ESD-USB drive unchanged until you confirm that the recovered copies open correctly.
The safest ESD USB recover files sequence is:
Scan → Preview → Recover elsewhere → Verify → Rebuild the source device
Step 7: Validate the Recovered Data
Open the recovered documents and check their contents. Play videos from beginning to end, extract archives, and inspect large project files instead of checking only thumbnails.
For important business, financial, or legal files, compare file sizes, modification dates, and checksums with other copies when possible.
Only erase the ESD partitions after the ESD USB recover files results have been fully reviewed.
Other Ways to Recover Files from ESD-USB
Method 1: Restore Files from a Backup
Before starting a long ESD USB recover files scan, check whether another copy exists in:
- OneDrive
- Google Drive
- Dropbox
- Windows File History
- Another external disk
- A NAS device
- Email attachments
- The original camera or memory card
A verified backup is faster and avoids placing further stress on a questionable drive.
However, check version history and deleted-file retention. A synchronization service may have mirrored a deletion or replacement to the cloud.
Method 2: Use Windows File Recovery
Microsoft provides Windows File Recovery, a command-line application for recovering data from local storage devices.
It includes Regular and Extensive modes. Microsoft recommends Extensive mode for formatted disks, corrupted disks, FAT volumes, and exFAT volumes. The source and destination must use different drives.
A command may look like this:
- winfr E: D: /extensive /n *.docx /n *.xlsx /n *.jpg /n *.png /n *.mp4
Replace E: with the visible ESD-USB source letter and D: with a separate destination drive.
Windows File Recovery may help with a standard deleted-file case. However, it is less convenient for a complex ESD USB recover files incident.
The visible drive letter may cover only the newly created installer partition, while the old partition layout has disappeared. The application also lacks the visual physical-device selection, folder browsing, filtering, and preview workflow provided by graphical recovery tools.
Method 3: Use Partition Recovery Software
A partition recovery utility may detect a previous NTFS, exFAT, or FAT32 volume.
Nevertheless, restoring a partition in place writes changes to the source disk. A false partition match, incorrect boundary, or overlapping structure may make the situation harder to reverse.
For valuable data, treat detected partitions as possible read-only recovery sources. Extract files to another drive before committing partition-table changes.
This order makes the ESD USB recover files operation safer than immediately attempting to undo ESD-USB in place.
Method 4: Contact a Professional Recovery Service
Choose a professional recovery service when the ESD USB recover files task involves unstable hardware, especially when:
- The HDD clicks, beeps, or grinds.
- The device disconnects repeatedly.
- Windows Disk Management cannot detect it.
- The reported physical capacity is incorrect.
- The USB connector or controller is damaged.
- The files are irreplaceable.
- Previous scans made the drive slower or less stable.
A professional laboratory cannot promise recovery either. However, specialists can image unstable storage with hardware designed to manage bad sectors, failing heads, and controller problems.
ESD USB Recover Files Chances by Device Type
Device | Typical situation | Recovery outlook | Recommended first action |
External HDD | A new ESD partition overwrote the beginning of a larger magnetic disk | Often reasonable if the drive remains healthy and has not been reused | Scan or image the entire physical disk |
USB flash drive | Windows setup files occupy part of a limited-capacity flash device | Variable, especially on smaller drives | Stop using it and run a complete device scan |
External SSD | Repartitioning and flash-controller cleanup may affect deleted blocks | Less predictable than HDD recovery | Disconnect it quickly and avoid additional writes |
Large portable HDD used once | The ESD volume occupies only part of the original capacity | Potentially favorable outside overwritten regions | Recover files before changing partitions |
Physically failing drive | The disk clicks, disconnects, slows down, or shows the wrong capacity | DIY scans may increase the risk | Use a professional imaging or recovery service |
Flash-based recovery may be less predictable because wear leveling, garbage collection, and TRIM behavior can affect whether deleted blocks remain available.
The result depends on the storage controller, connection type, operating system, device firmware, and subsequent usage.
How to Convert ESD-USB Back to Normal After Recovery
Do not follow this section until the ESD USB recover files process has finished and you have verified the restored data.
The following actions erase or replace the current partition structure. Therefore, they may destroy data that remains recoverable.
Option 1: Use Windows Disk Management
- Press Win + X.
- Select Disk Management.
- Identify the affected physical disk by its model and capacity.
- Confirm that the required files have been recovered elsewhere.
- Right-click the ESD-USB volume and select Delete Volume.
- Delete any remaining installer partitions on that same target disk.
- Wait until the storage appears as one unallocated area.
- Right-click the unallocated space.
- Select New Simple Volume.
- Use the full available capacity.
- Assign a drive letter.
- Choose a suitable file system.
- Complete a quick format.
- Verify the full capacity in File Explorer.
Choose NTFS for Windows-focused storage and files larger than 4GB.
Choose exFAT when you need compatibility between Windows and macOS.
FAT32 works with many devices but limits each individual file to 4GB. The Amagicsoft guide to formatting a USB drive to FAT32 explains when FAT32 is appropriate.
Option 2: Reset the Drive with DiskPart
DiskPart may help when Disk Management cannot remove the Windows installer partitions.
However, DiskPart is destructive. Verify the selected disk number, model, and capacity twice.
- diskpart
- list disk
- select disk X
- detail disk
- clean
- create partition primary
- format fs=exfat quick
- assign
- exit
Replace X with the correct disk number.
The clean command removes partition information from the selected disk. Never run it while an ESD USB recover files scan is pending or while unverified files remain on the source.
What If the Drive Becomes RAW?
If the device displays RAW after the ESD incident or an interrupted repair, do not format it while files remain missing.
Use a recovery-first procedure such as the flash drive RAW format recovery guide.
RAW means Windows cannot interpret the current file system. It does not automatically prove that every stored file has disappeared.
Common ESD-USB Recovery Mistakes
Formatting Before Scanning
Users often focus on restoring full capacity first during an ESD USB recover files emergency.
That approach reverses the correct priority. A normal-looking but empty disk is less valuable than an unchanged source that may still contain recoverable sectors.
Scanning Only the 32GB Volume
In an ESD USB recover files case, the original files may remain in lost or unallocated regions beyond the visible ESD partition.
A complete physical-device scan is more appropriate than scanning only the mounted drive letter.
Saving Recovered Files to the Same Device
During ESD USB recover files recovery, saving output to the source may overwrite files that have not yet been restored.
Always use a different disk as the recovery destination.
Assuming Every Found File Is Healthy
Recovery software may reconstruct filenames or recognize file signatures even when parts of a file were overwritten.
Preview the files first. After recovery, open and test the copies before deleting or rebuilding the source disk.
Running Multiple Repair Commands
DiskPart, formatting utilities, CHKDSK, and partition editors all write metadata that can complicate an ESD USB recover files scan.
Trying several repair methods in sequence may make the original disk structure less consistent and reduce later recovery options.
Reusing the Drive as Installation Media
A second Media Creation Tool operation writes additional Windows setup files to the device.
Preserve the affected disk until the ESD USB recover files results have been validated.
How to Prevent Another ESD USB Recover Files Incident
- Use a dedicated and empty USB flash drive for Windows installation media.
- Disconnect backup drives before running Media Creation Tool.
- Verify the target using its model, capacity, and drive letter.
- Never select a large backup disk simply because it is removable.
- Maintain at least two copies of important data.
- Store backup copies on separate devices or services.
- Create an ISO file first when you do not want Media Creation Tool to write directly to removable storage.
- Label Windows installation drives clearly.
- Avoid using a high-capacity backup drive as temporary boot media.
- Read the Amagicsoft guide on how to create a Windows recovery USB before preparing installation or recovery media.
Microsoft explicitly recommends a blank USB drive because the media creation process deletes existing content. Treat that warning as a requirement rather than a minor suggestion.
Conclusion
An ESD-USB incident changes the disk structure and overwrites part of the selected device. However, it does not always erase every original file.
The correct ESD USB recover files order is:
- Stop using the affected drive.
- Check whether the hardware is physically stable.
- Scan the entire physical device.
- Preview important files.
- Recover them to another disk.
- Verify the recovered copies.
- Rebuild the ESD-USB partitions only afterward.
Magic Data Recovery is recommended because it addresses the data-loss problem instead of merely making the drive usable again.
It supports deleted, formatted, corrupted, and inaccessible storage scenarios. In addition, it scans USB drives, HDDs, and SSDs, recognizes more than 5,000 file formats, and lets users preview files before recovery.
These features make the ESD USB recover files workflow clearer and less risky for ordinary Windows users without suggesting that overwritten data can always be restored.
For more recovery-first principles and related deletion scenarios, return to the deleted file recovery guide before making destructive changes to the affected disk.
Supports Windows 7/8/10/11 and Windows Server
FAQs About ESD USB Recover Files
Can ESD USB recover files work after Media Creation Tool formatted the drive?
Yes, recovery may be possible when Windows setup files have not overwritten the sectors containing the original data. Stop using the device immediately, scan the whole physical disk, and save recovered files to another drive. Results depend on the device type, original file location, overwritten area, and actions taken after the ESD-USB volume was created.
Why does my 1TB external drive show only 32GB as ESD-USB?
Media Creation Tool may replace the previous partition layout with a smaller bootable Windows installation volume. File Explorer displays that mounted ESD-USB partition, while much of the original capacity may appear as unallocated space in Disk Management. Do not create a new volume there until you have completed an ESD USB recover files scan.
Should I format ESD-USB before trying to recover files?
No. Formatting, deleting the ESD partition, creating a new volume, or running DiskPart clean writes new structural information to the device. These operations may overwrite useful file-system records or file contents. Recover and verify important files on another disk first. Format the ESD-USB device only after the recovery result is acceptable.
Can Windows File Recovery restore data from an ESD-USB drive?
Windows File Recovery can scan USB and external drives, while its Extensive mode supports formatted, corrupted, FAT, and exFAT volumes. However, an ESD-USB incident may replace the original partition map, and the visible drive letter may represent only the installer partition. A graphical whole-device recovery tool is often easier for locating and previewing files.
Can I recover the original folders and filenames?
Sometimes. If enough NTFS, exFAT, or FAT32 metadata remains intact, recovery software may reconstruct the original directory structure, filenames, and dates. When those records have been overwritten, signature-based scanning may still recover file contents under generic names. Previewing results and sorting by type, size, and date can help identify these files.
Is ESD-USB recovery different for HDDs, SSDs, and flash drives?
Yes. A large healthy HDD may retain substantial data outside the region overwritten by Windows setup files. USB flash drives have less capacity and use controller-managed storage, so results vary. SSD recovery may be less predictable because TRIM and garbage collection can clear deleted blocks. In every case, immediate disconnection helps prevent further overwriting.
How do I restore the ESD-USB drive to its full capacity?
After recovering and verifying the files, open Disk Management, identify the correct physical disk, delete the ESD-USB and other installer volumes, and create a new simple volume using the unallocated space. Alternatively, use DiskPart clean and recreate the partition. Both methods are destructive and must follow the ESD USB recover files process.
When should I stop DIY recovery and contact a professional?
Stop DIY attempts when an HDD clicks, beeps, disconnects repeatedly, displays the wrong physical capacity, or disappears from Disk Management. Professional assistance is also appropriate when the missing files are legally, financially, or personally irreplaceable. Repeated scans can stress failing hardware, while a recovery laboratory can image the device under controlled conditions.

Jason has over 15 years of hands-on experience in the computer data security industry. He specializes in data recovery, backup and restoration, and file repair technologies, and has helped millions of users worldwide resolve complex data loss and security issues.