
How to Create a Recovery USB for Windows 10
When Windows 10 fails to boot, crashes repeatedly, or becomes unstable after a system update, knowing how to create a recovery USB for Windows 10 can save both time and data. In these situations, a recovery USB allows you to start your computer and access built-in repair tools even when Windows no longer loads normally.
However, while creating a recovery USB for Windows 10 is an officially supported and effective crashed OS recovery solution, many users overlook a critical issue. System recovery does not always protect personal files. Depending on the option you choose, Windows may remove applications or make user data inaccessible.
For this reason, this guide explains how to create a recovery USB for Windows 10 step by step. At the same time, it shows how you can reduce data loss risks by recovering important files in advance with a reliable tool such as Magic Data Recovery.
Supports Windows 7/8/10/11 and Windows Server
Wondering if your files can be recovered? Find out in seconds with our quick check below.
Data Recovery Assessment
Answer 3 quick questions to estimate your recovery chances
Table of Contents
What Is a Windows 10 Recovery USB?
A Windows 10 recovery USB is a bootable drive that gives you access to recovery and troubleshooting tools when the operating system cannot start properly.
With a recovery USB for Windows 10, you can:
- Repair startup and boot errors
- Restore Windows from a system image
- Reset Windows to factory settings
- Access advanced recovery options
Unlike a standard installation USB, a recovery USB focuses on repairing an existing system. As a result, many experienced users recommend preparing one before problems occur.
Why You Should Create a Recovery USB for Windows 10 in Advance
System failures rarely happen at a convenient time. Hardware issues, corrupted updates, malware infections, and disk errors can all prevent Windows from starting.
By choosing to create a recovery USB for Windows 10 in advance, you gain several practical benefits:
- You can boot a non-working system more reliably
- You can troubleshoot faster without reinstalling Windows from scratch
- You can access official recovery tools when standard startup fails
In real-world scenarios, many users only search for create recovery usb for windows 10 after their system stops working. At that point, recovery options often become more limited and risky.
Important Things to Know Before Creating a Recovery USB
Before you begin, it helps to understand a few practical details.
The USB Drive Will Be Erased
Windows completely formats the USB drive during the creation process. Therefore, you should back up any existing files on the drive first.
System Recovery May Affect Personal Files
Although recovery tools aim to fix Windows, some recovery options—such as resetting the system—may remove installed programs or user data. As a result, files can be lost if you proceed without preparation.
Recovery Is Not a Backup Solution
A recovery USB restores system functionality. However, it does not automatically protect documents, photos, or other personal files. Because of this limitation, professionals often recover important data before starting system recovery.
How to Create a Recovery USB for Windows 10 Using Built-in Tools
Below is the official and most reliable way to create a recovery USB for Windows 10 using Windows built-in features.
Step 1: Open the Recovery Drive Tool
First, type Recovery Drive in the Windows search bar. Then, select Create a recovery drive from the results.
Step 2: Insert a USB Flash Drive
Next, insert a USB flash drive with at least 16 GB of available space. Make sure it does not contain important files.
Step 3: Back Up System Files
After that, enable the option to back up system files to the recovery drive. This step allows Windows to reinstall itself if necessary.
Step 4: Create the Recovery USB
Once you confirm your selection, Windows prepares the recovery USB. During this process, you only need to wait until completion.
Step 5: Store the USB Safely
Finally, label the USB clearly and store it in a secure place. By following these steps, you can successfully create a recovery USB for Windows 10 and use it when serious system issues arise.
What Happens to Your Data During Windows Recovery?
Many guides explain how recovery works. However, fewer explain how recovery affects stored data. Depending on the option you choose:
- Startup Repair usually keeps personal files intact
- Resetting Windows may remove apps and user data
- Reinstalling Windows can erase the system drive
In practice, users often notice missing files only after recovery begins. At that stage, reversing data loss becomes much more difficult.
Recover Important Files Before Performing System Recovery
Before you use a recovery USB to reset or repair Windows, securing important files can significantly reduce the risk of permanent data loss.
If the system drive remains accessible—either through another computer or a recovery environment—recovering files first is usually the safest approach. For this reason, many users turn to Magic Data Recovery before proceeding with system recovery.
How to Use Magic Data Recovery to Recover Files Before System Recovery
The steps below outline a practical way to recover files when Windows becomes unstable or unbootable.
Step 1: Download and Install Magic Data Recovery
First, download Magic Data Recovery on a working computer and install it on a drive different from the affected system drive. This approach helps prevent accidental overwriting of lost data.
If Windows cannot boot, you can connect the system drive to another computer before starting recovery.
Supports Windows 7/8/10/11 and Windows Server
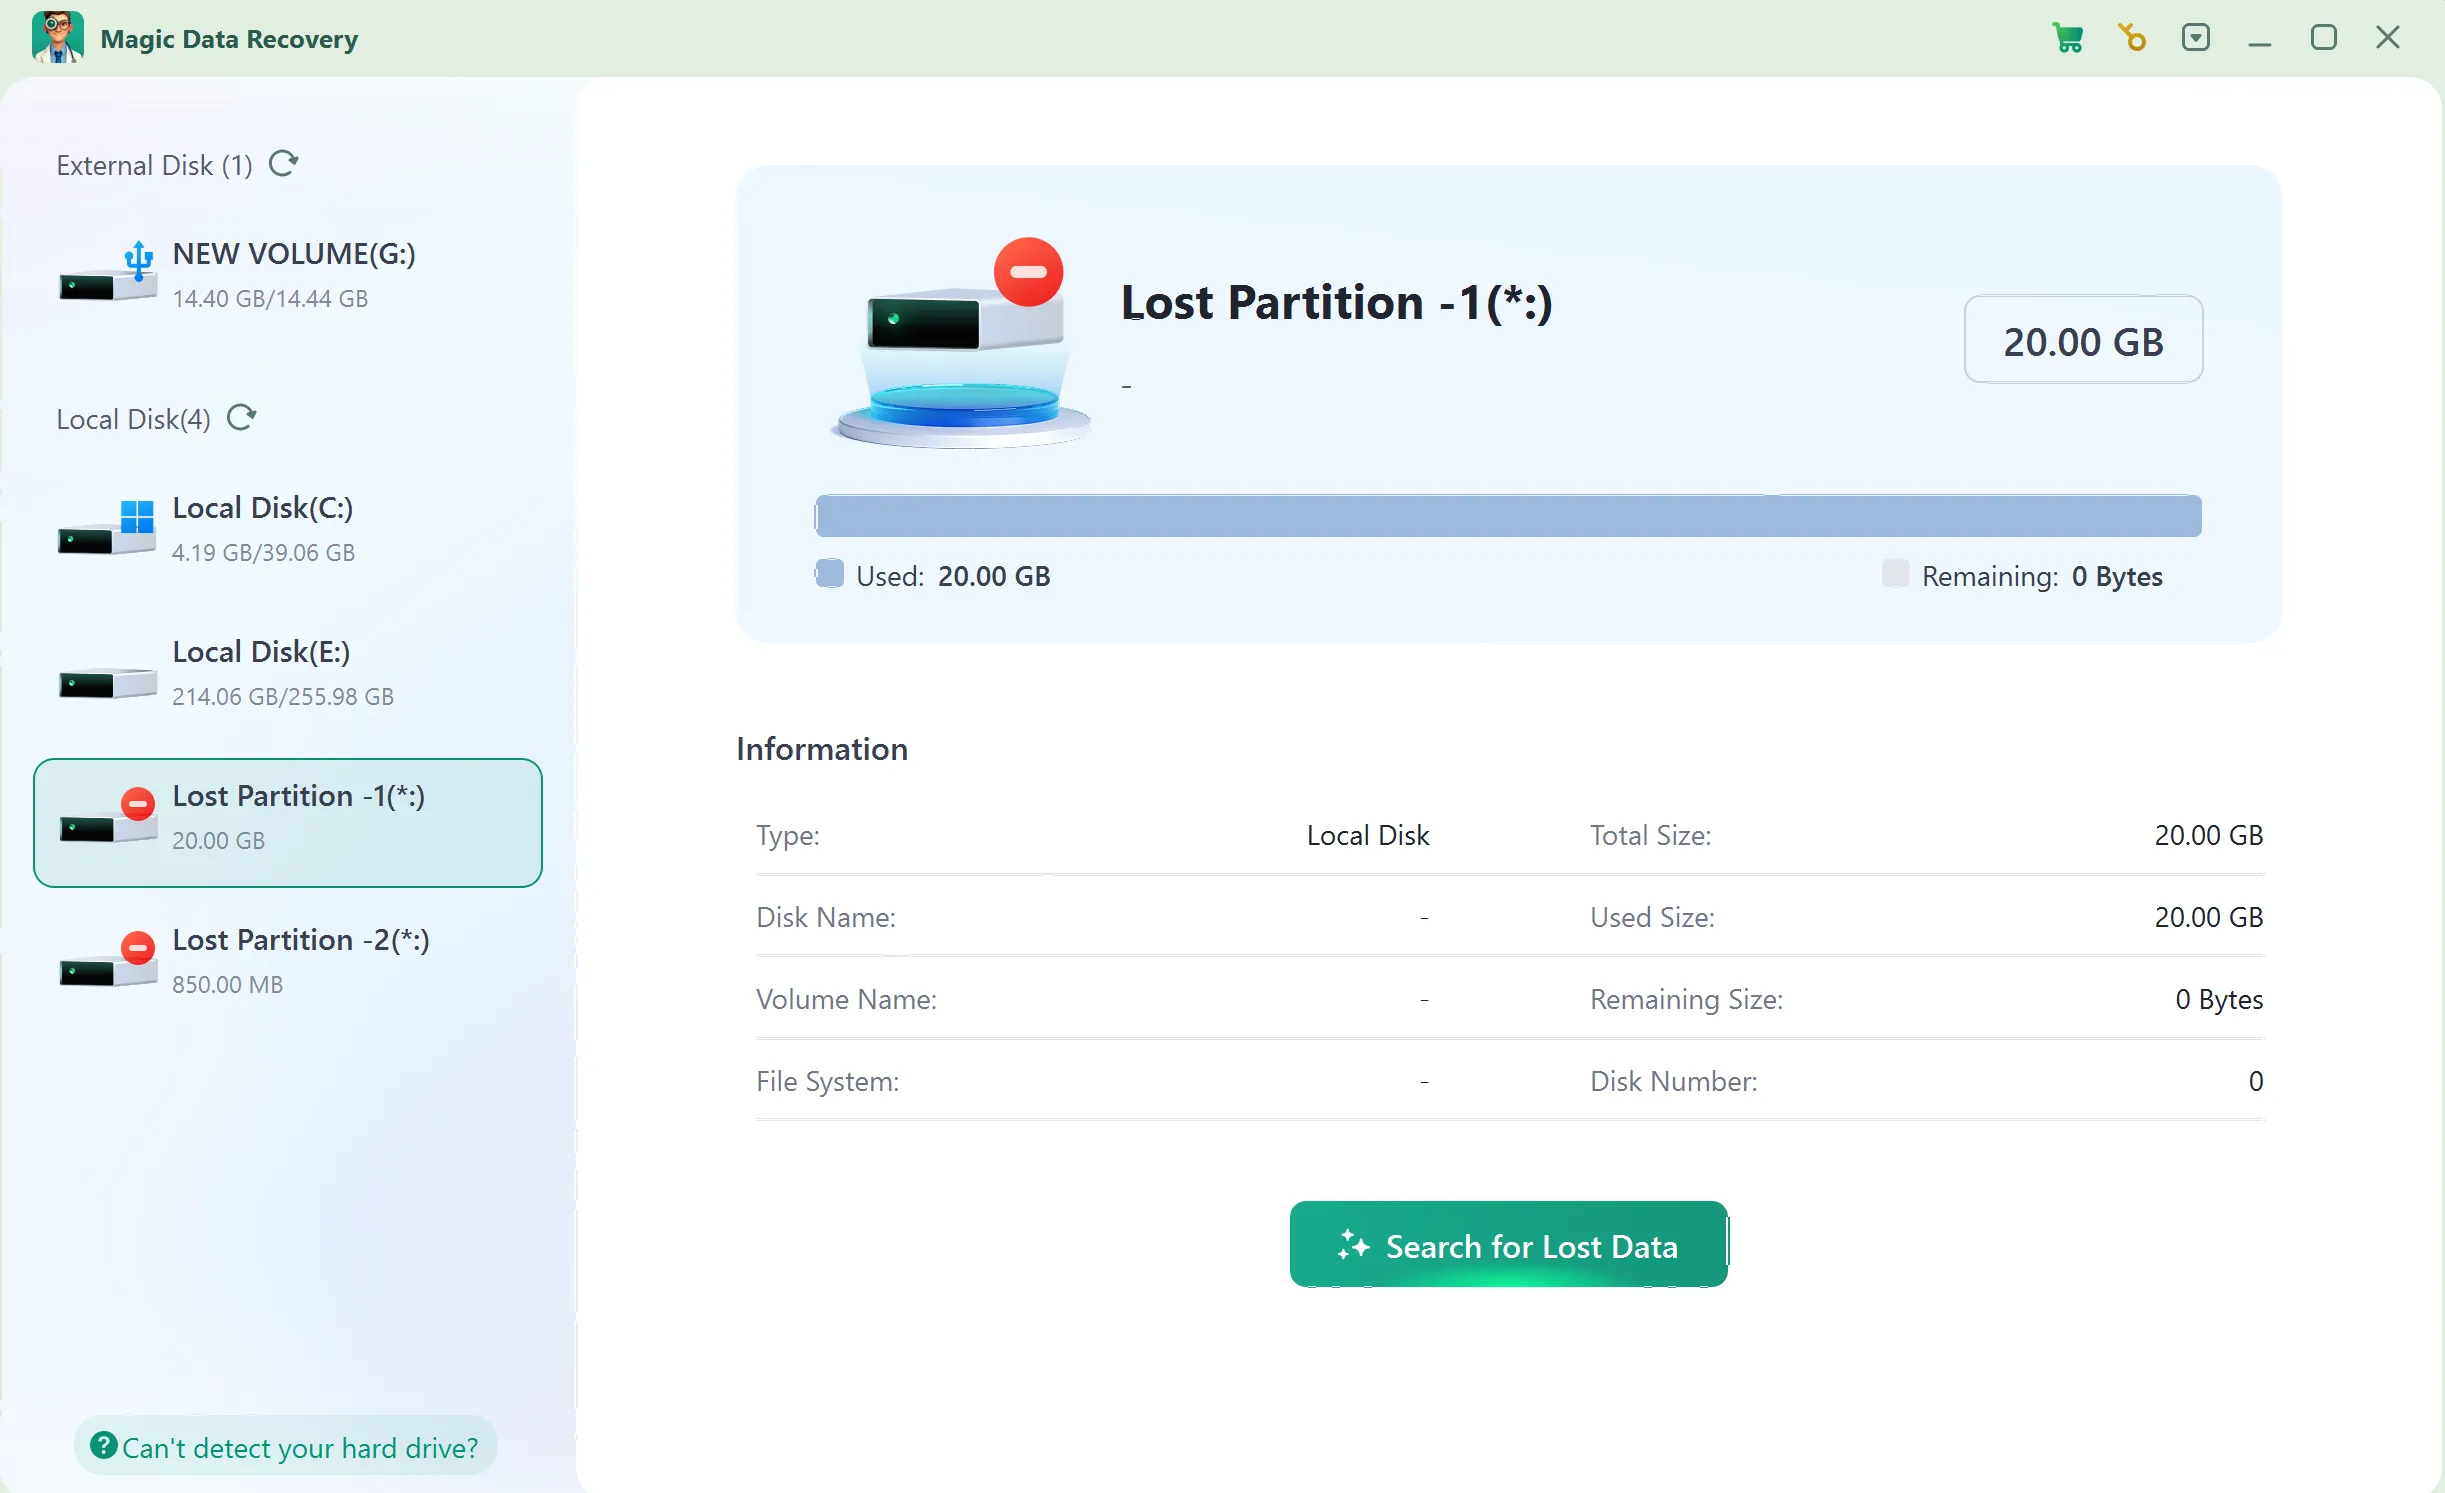
Step 2: Select the Affected Drive to Scan
Next, launch the software and select the system drive or connected disk that contains lost files. Then, start the scan from the main interface.
Step 3: Scan the Drive for Lost Files
Magic Data Recovery performs an advanced scan to locate files affected by system crashes, disk errors, or accidental deletion. Meanwhile, recoverable files appear as the scan progresses.
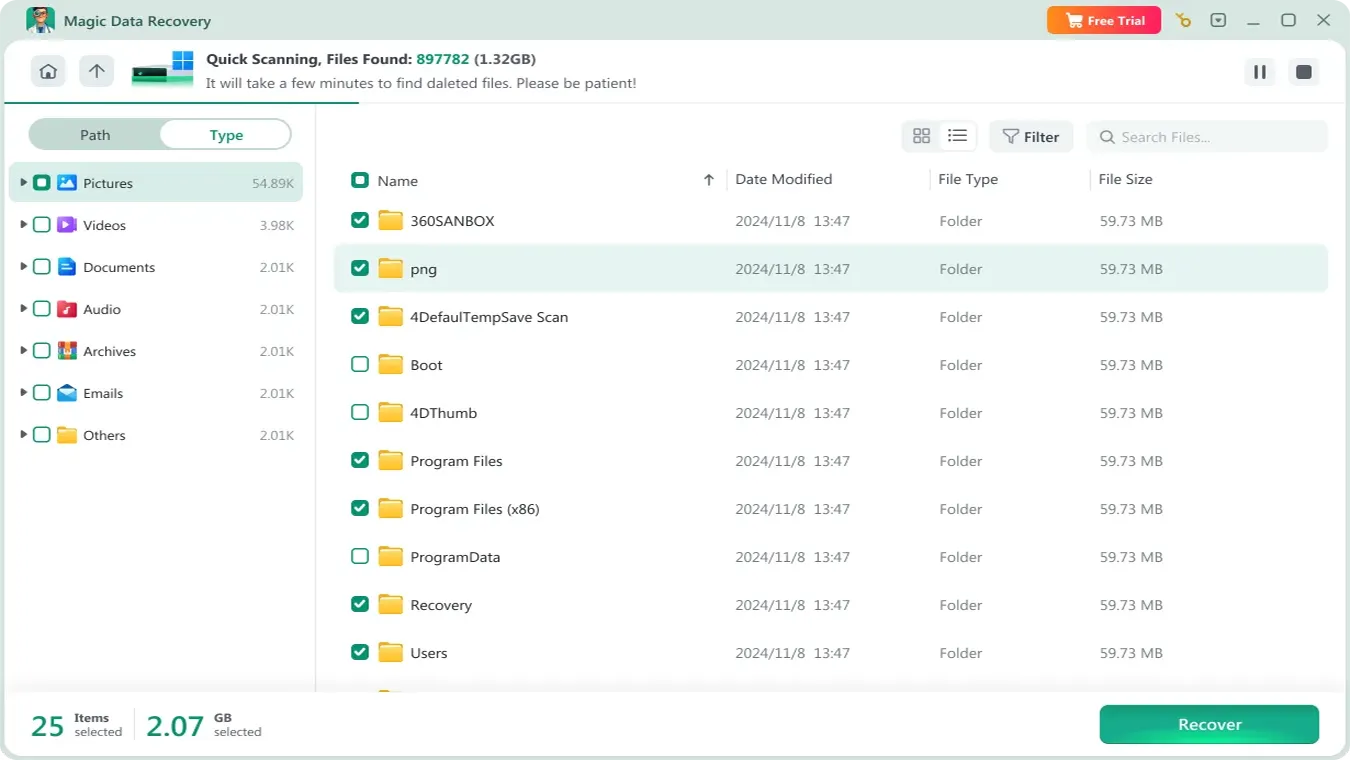
Step 4: Preview Files Before Recovery
Before restoring files, use the preview feature to confirm file content and integrity. This step ensures that you recover only the files you actually need.

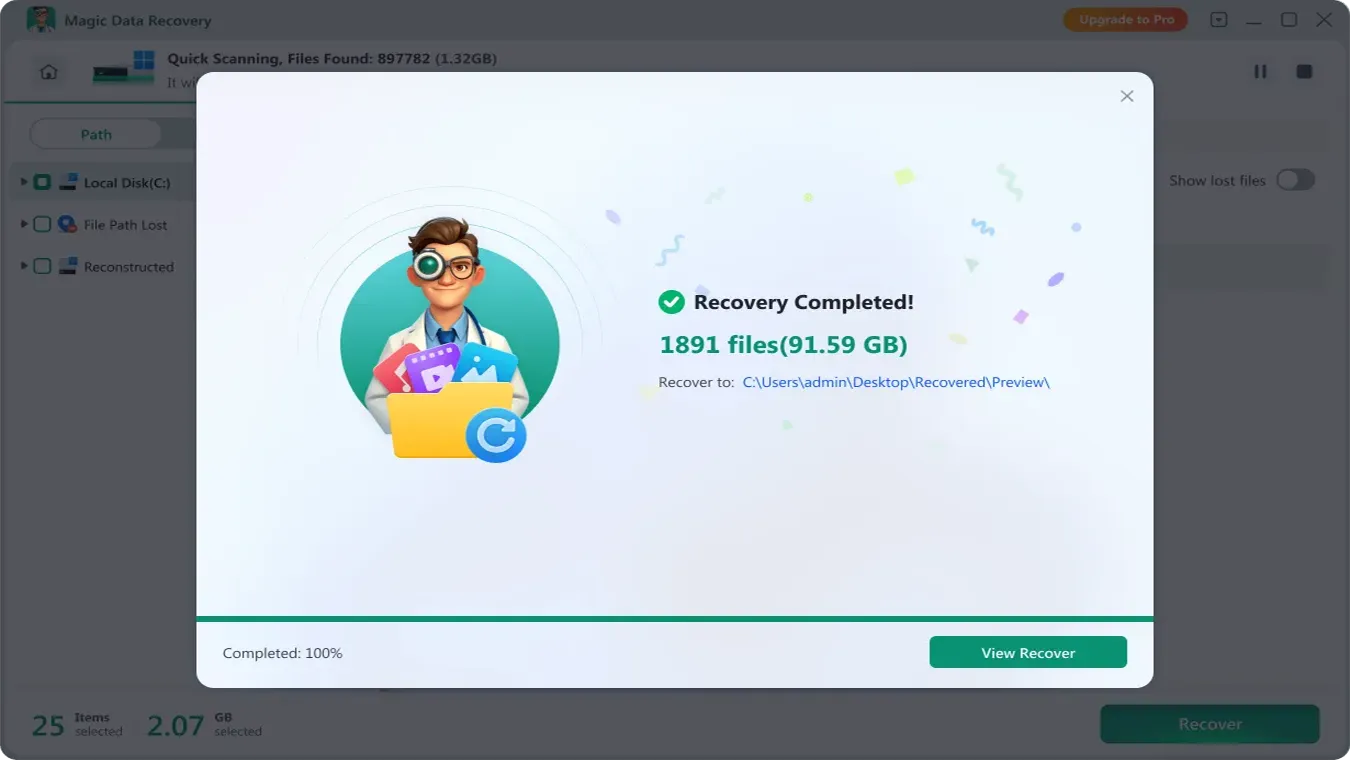
Step 5: Recover Files to a Safe Location
After selecting the files, save them to an external drive or another storage device. Never restore data to the original system drive, because doing so may overwrite remaining recoverable files.
Why Magic Data Recovery Is a Practical Choice
Compared with manual recovery attempts or proceeding directly with system reset, Magic Data Recovery offers clear advantages.
First, it focuses on data recovery without modifying system settings. In addition, it supports recovery after crashes, disk errors, or accidental deletion. More importantly, the preview feature allows you to verify files before recovery.
For users preparing to create a recovery USB for Windows 10, recovering files in advance adds an important layer of protection. If you want a safer and more controlled recovery process, Magic Data Recovery provides a reliable solution for crashed OS recovery.
Conclusion
Understanding how to create a recovery USB for Windows 10 is essential when dealing with startup failures or serious system issues. A properly prepared recovery USB gives you access to official repair and restoration tools when Windows cannot load.
However, creating a recovery USB for Windows 10 does not automatically safeguard personal data. System recovery actions may still lead to file loss if precautions are not taken.
Therefore, by recovering files from a crashed OS first and then proceeding to create a recovery USB for Windows 10, users can handle system problems with greater confidence. Tools like Magic Data Recovery help secure valuable data before recovery, making the entire process safer and more predictable.
Supports Windows 7/8/10/11 and Windows Server
FAQ – Create Recovery USB for Windows 10
What is a recovery USB for Windows 10?
How do you create a recovery USB for Windows 10?
Can you create a Windows 10 recovery USB from another computer?
What is the difference between a bootable USB and a recovery USB?
Can a bootable USB recover a computer that will not start?
Should you recover files before using a recovery USB?
How can you recover files from a Windows 10 system that will not boot?
How do you manually make a USB bootable for Windows 10?
Is NTFS or FAT32 better for a bootable USB?

Vasilii is a data recovery specialist with around 10 years of hands-on experience in the field. Throughout his career, he has successfully solved thousands of complex cases involving deleted files, formatted drives, lost partitions, and RAW file systems. His expertise covers both manual recovery methods using professional tools like hex editors and advanced automated solutions with recovery software. Vasilii's mission is to make reliable data recovery knowledge accessible to both IT professionals and everyday users, helping them safeguard their valuable digital assets.