
Can Lightroom Recover Deleted Photos? 6 Safe Methods

You open Adobe Lightroom and discover that an entire photo shoot has disappeared. Perhaps Lightroom Classic displays “The file could not be found,” your Library looks empty, or you accidentally selected Delete From Disk. Can Lightroom recover deleted photos and preserve your previous edits? In many cases, yes, but the correct method depends on what actually disappeared.
A photo missing from Lightroom does not necessarily mean its original file was deleted. The problem may involve a disconnected storage drive, a different Lightroom catalog, broken file references, or cloud synchronization. Therefore, this guide first explains Lightroom’s built-in recovery options and how to locate the originals. Only when the actual image files are gone should you consider storage recovery. For general Windows deletion scenarios, see our deleted file recovery guide.
Table of Contents
Quick Answer: Can Lightroom Recover Deleted Photos?
Yes. Lightroom can restore cloud-deleted photos through its Deleted album, generally within 30 days. Meanwhile, Lightroom Classic can reconnect missing originals, reopen previous catalogs, and restore editing information from catalog backups.
However, these options solve different problems.
What you see | Likely cause | Best first action |
Photos disappeared from Lightroom All Photos | Cloud deletion, account, or sync issue | Check Deleted album and Adobe account |
Photos vanished after opening Lightroom Classic | Wrong or empty catalog | Open the previous catalog |
“The file could not be found” | Broken reference to an original | Locate and relink the photo |
Photos removed using Remove | Catalog entry removed | Find originals and check older catalogs |
Photos deleted using Delete From Disk | Original files deleted | Check Recycle Bin or Trash |
Edits disappeared after a crash | Catalog or metadata state changed | Check current and backed-up catalogs |
Photos missing from an SD card | Deleted or inaccessible source files | Check backups, then storage recovery |
The key distinction: Lightroom stores or references photographs differently depending on whether you use cloud-based Lightroom, Lightroom Classic, or Lightroom’s Local tab.
Before Recovery: Protect Your Lightroom Photos and Edits
Before attempting to recover deleted Lightroom photos, preserve the remaining files and editing information.
- Do not reset or delete the Lightroom catalog. It may contain your previous edits, collections, and photo references.
- Avoid clearing previews and caches. They may provide useful clues, even though they cannot replace full-resolution originals.
- Do not immediately reimport hundreds of photos. Duplicate catalog entries can complicate restoring previous edits.
- Keep disconnected drives disconnected until you identify the problem. If a drive shows physical symptoms, avoid repeated access.
- Stop writing to storage containing genuinely deleted photos. New data may overwrite recoverable images.
If Lightroom remains open immediately after an accidental action, try Edit > Undo where available. However, do not assume Undo will reverse deletion after the session ends.
Understand What Lightroom Actually Saves
Lightroom workflows involve several different kinds of data.
File or data type | What it contains |
Original images (JPG, DNG, NEF, CR3, ARW) | The actual photographs |
Lightroom Classic catalog ( | Photo references, organization, editing information |
XMP or ACR sidecar metadata | Supported editing and metadata information |
Smart Previews ( | Reduced-size image data for working without originals |
Cloud-based Lightroom library | Cloud-managed photos, edits, and albums |
This matters because recovering an original photo does not automatically restore its previous Lightroom editing history.
Similarly, a recovered catalog entry may still point to an original file that no longer exists.
Method 1: Lightroom Recover Deleted Photos from the Deleted Album
Best for: Photos deleted from cloud-based Lightroom desktop, mobile, or web.
Adobe provides a built-in Deleted album that normally retains deleted photographs for 30 days.
This is the quickest option when you recently deleted an image from a synchronized Lightroom library.
How to Restore Deleted Photos in Lightroom
- Open Lightroom desktop or visit Lightroom on the web.
- Sign in with the Adobe account that contains your photographs.
- Select Photos > Deleted.
- Find the missing images and select the ones you want.
- Click Restore.

Lightroom returns the selected images to All Photos and their previous albums.
According to Adobe’s official deleted photo recovery guide, associated metadata is restored, except for stack information.
What If the Deleted Album Is Empty?
First, verify that you are using the correct Adobe account. Next, check whether the deletion occurred in a synchronized Lightroom library or only on local storage.
Also, note these limitations:
- Photos permanently deleted from the cloud cannot be restored through the Deleted album.
- The standard 30-day recovery window does not extend indefinitely.
- Lightroom’s Local tab can access photos without uploading them to the cloud.
- Lightroom Classic does not automatically upload full-size originals when syncing photos from Classic to the Lightroom cloud; it uses Smart Previews.
Therefore, a synchronized preview is not necessarily a backup of your original RAW file.
Method 2: Recover Photos Removed from Lightroom Classic
Best for: Photos that disappeared from the Lightroom Classic Library without confirmed deletion from storage.
Lightroom Classic distinguishes between Remove and Delete From Disk.
- Remove removes catalog references while normally leaving original files on storage.
- Delete From Disk removes the catalog entries and sends originals to the operating system’s deletion location when supported.
This distinction determines how you should proceed.
Step 1: Check Whether Lightroom Opened the Wrong Catalog
A nearly empty Library after an upgrade, reset, or catalog change does not necessarily indicate deletion.
To check:
- Open Lightroom Classic.
- Choose File > Open Recent.
- Look for the catalog you previously used.
- Alternatively, select File > Open Catalog and locate its
.lrcatfile. - Open it and verify that the missing images, collections, and edits appear.
Adobe identifies these common default catalog locations:
Windows: C:\Users\[username]\Pictures\Lightroom\
macOS: /Users/[username]/Pictures/Lightroom/
However, your catalog may be elsewhere if you selected a custom location.
You can also search your computer for *.lrcat and compare modification dates.
Step 2: Find Photos Removed from the Catalog
If you selected Remove but the originals remain on your computer:
- Open Windows File Explorer or macOS Finder.
- Navigate to the folder where you stored the images.
- Search for their filenames or extensions.
- Confirm that the original files open normally.
- Check whether an earlier catalog still contains the missing entries and edits.
If an older catalog has your edits, consider File > Import From Another Catalog instead of immediately reimporting all the originals.
Otherwise, use File > Import Photos and Video to add the files again.
Expected result: The photographs return to your Lightroom library. However, ordinary reimporting may not restore previous edits, collection membership, or history.
Method 3: Relink Missing Lightroom Photos Without Recovering Files
Best for: Photos still visible in Lightroom Classic but displaying “The file could not be found” or a missing-photo icon.
This is a reference problem, not necessarily a deletion problem.
For example, suppose you imported wedding photographs from drive E:. Later, Windows assigns that external drive the letter F:. Lightroom Classic continues looking for the original files under E:.
Although the photographs still exist, Lightroom cannot find them.
Locate and Reconnect Missing Photos
- Open Lightroom Classic and switch to the Library module.
- Select Library > Find All Missing Photos.
- Click the missing-photo icon on an affected thumbnail.
- Check the original file location shown in the dialog.
- Click Locate and navigate to the image’s current location.
- Enable Find nearby missing photos when appropriate.
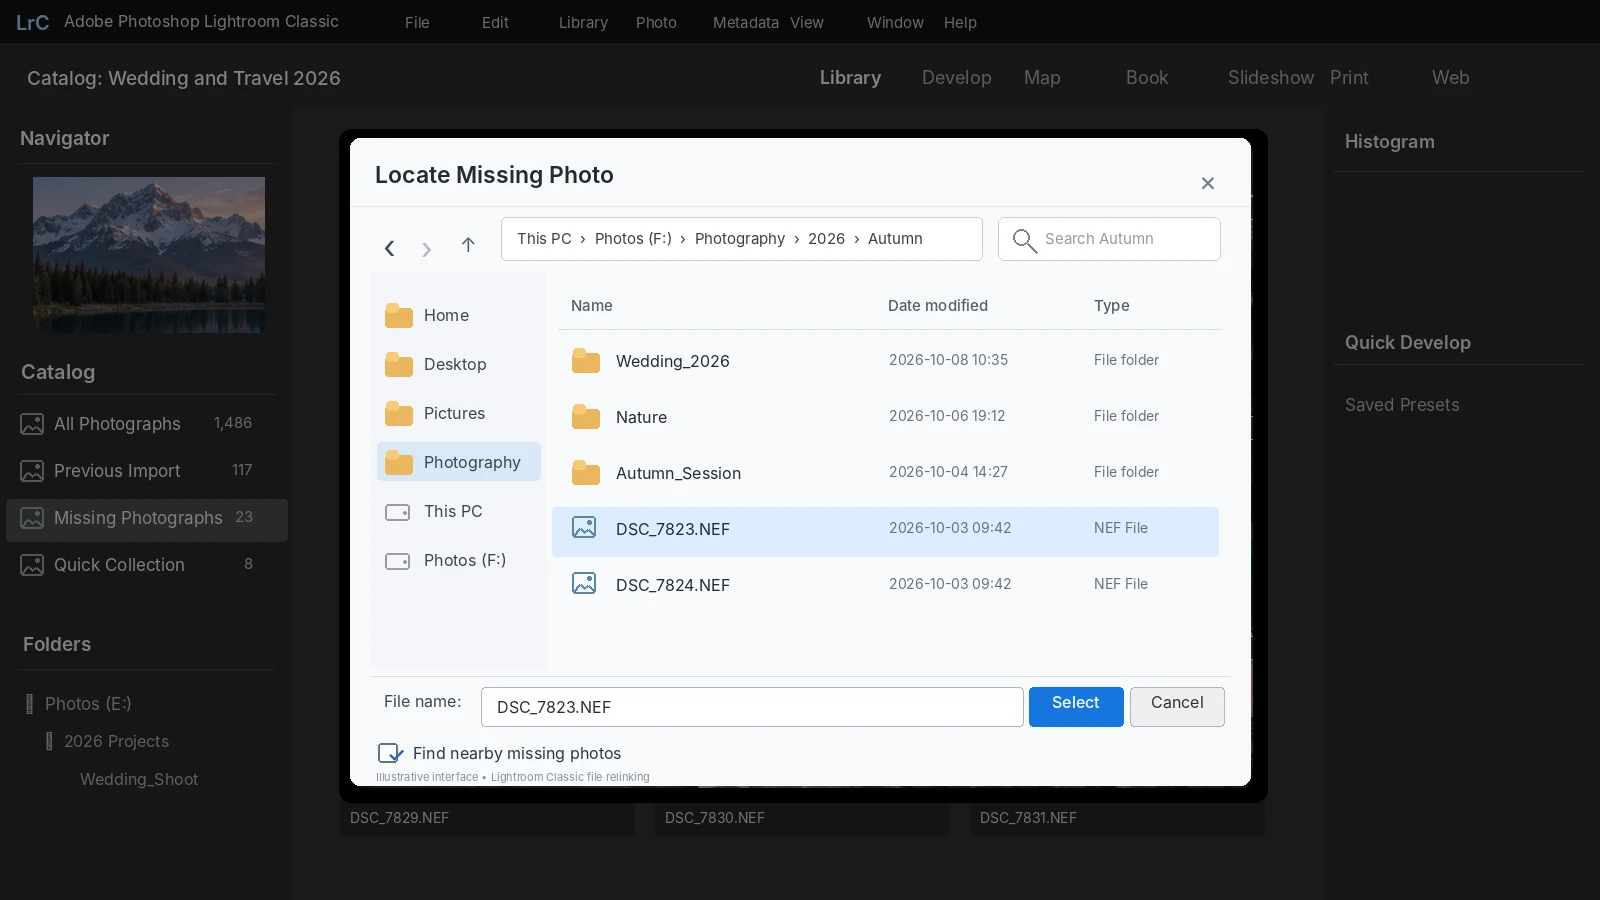
Lightroom Classic can then reconnect other files in the same folder.
If an entire folder is missing, right-click it in the Folders panel and choose Find Missing Folder.
For the official workflow, see Adobe’s Locate Missing Photos documentation.
What If You Do Not Know Where the Photos Moved?
Use clues from Lightroom’s previous file location:
- Search for the exact filename, such as
DSC_4521.NEF. - Filter by relevant extensions:
.jpg,.dng,.cr3,.nef,.arw, or.raf. - Check folders created around the photograph’s capture or import date.
- Reconnect your usual photography drives and memory cards.
- Check whether the storage drive letter or mount location changed.
If you find the file, use Locate rather than importing it as a new photo whenever the original catalog entry still exists. This helps preserve the association with previous edits.
Method 4: Recover Lightroom Photos from Recycle Bin or Trash
Best for: Photos deleted using Delete From Disk, rather than simply removed from a catalog.
When Lightroom Classic deletes original files from local storage, they normally go to Windows Recycle Bin or macOS Trash when the operating system supports that action.
Restore Deleted Photos in Windows
- Open Recycle Bin.
- Search for the original image filenames or sort by deletion date.
- Select the photographs you need.
- Right-click and choose Restore.
- Verify that the files appear in their original locations.
On macOS, open Trash and select Put Back when available.
If the files return but Lightroom no longer recognizes them, use the appropriate catalog or relinking method from earlier sections.
You can also follow our guide to recovering files deleted from Recycle Bin.
When This Method Will Not Work
Recycle Bin may not contain files deleted from certain removable storage devices. Files may also be unavailable after permanent deletion or after the bin has been emptied.
Furthermore, restoring original photographs does not necessarily restore their old Lightroom Classic catalog entries.
In those cases, continue by checking independent backups.
Method 5: Restore Lightroom Catalog Backups and Original Photos
Best for: Missing edits, deleted catalog entries, or original photographs with available backup copies.
Lightroom Classic provides catalog backups, but these are not the same as photo backups.
Restore an Earlier Lightroom Classic Catalog
Lightroom Classic normally saves editing information automatically in the active catalog. It does not rely on a separate, universally available autosave recovery folder like some document-editing applications.
Its scheduled catalog backups are typically created when Lightroom Classic exits.
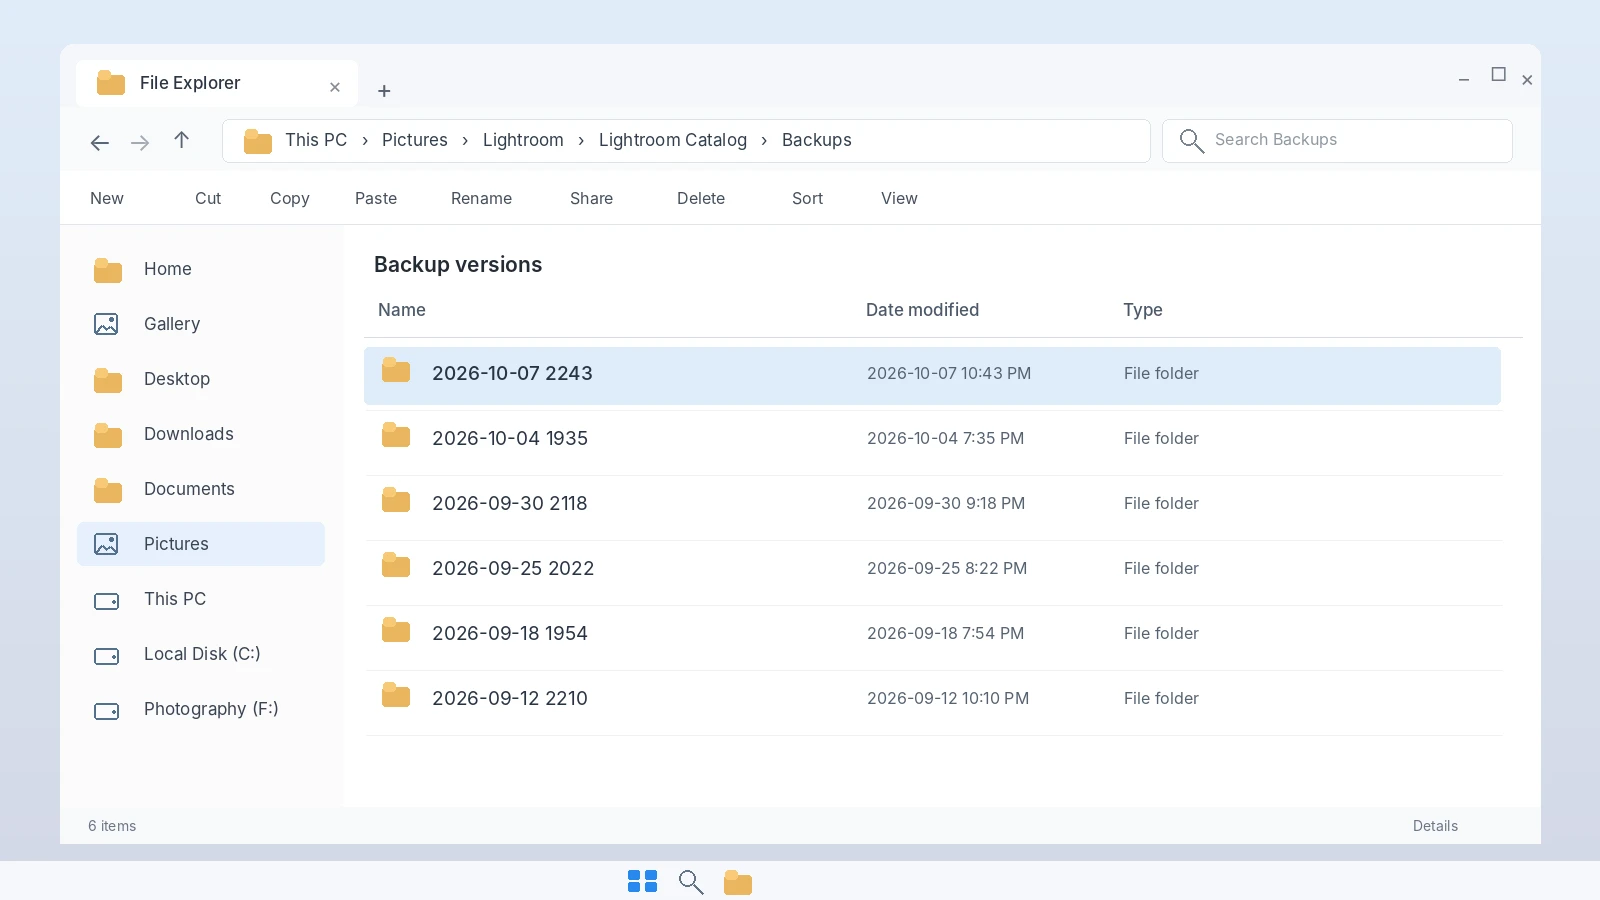
Adobe documents these default backup locations:
Windows: \Users\[username]\Pictures\Lightroom\[catalog name]\Backups\
macOS: /Users/[username]/Pictures/Lightroom/[catalog name]/Backups/
To inspect a backup:
- Locate the catalog backup folder.
- Find a version created before the deletion or catalog problem.
- Extract the backup archive if necessary.
- Open the backed-up
.lrcatfile using File > Open Catalog. - Check whether the missing photographs, editing adjustments, and collections are present.
Before replacing anything, back up your current catalog.
When choosing between multiple versions, compare the timestamps and file sizes. Then open a likely candidate and verify that it contains the correct recent photo shoot and edits.
Once confirmed, preserve that version and consider importing the relevant entries into your working catalog.
Adobe explains this process in its Lightroom Classic catalog backup guide.
Can Lightroom Catalog Backups Restore Original RAW Photos?
No. Lightroom Classic’s standard catalog backup does not include the original image files.
A catalog backup may restore editing instructions and photo references. However, if the actual NEF, CR3, DNG, or JPEG files are deleted, you still need another copy of those files.
Check these locations:
- Windows File History or Previous Versions
- macOS Time Machine
- OneDrive, Dropbox, or Google Drive backups
- Copies created during Lightroom import
- Dedicated photography backup drives
For cloud storage, inspect the provider’s Trash and Version History. Also, distinguish complete local files from online-only placeholders.
Restore any usable backup to a stable directory before reconnecting it to Lightroom.
Can Smart Previews Replace Deleted Lightroom Originals?
Not completely.
Smart Previews allow Lightroom Classic to display and edit photographs without their original files connected. However, they are reduced-size, lossy DNG representations.
Consequently, a Smart Preview is not an identical replacement for a deleted full-resolution RAW image.
If a Smart Preview remains available, preserve it and the associated catalog while searching for the original.
When Should You Use Data Recovery Software for Lightroom Photos?
Before scanning a drive, complete this final check:
Question | If yes |
Can you find the original image in File Explorer or Finder? | Open or relink it |
Does another Lightroom catalog contain the photo? | Restore the catalog entry |
Is the photo available in Lightroom’s Deleted album? | Use Restore |
Does a cloud service or backup contain the original? | Restore the backup |
Is the storage device physically unstable or undetectable? | Stop DIY recovery and seek specialist assistance |
Only consider storage recovery when the original files are genuinely missing, no usable copy exists, and the affected storage remains accessible.
This distinction is important because data recovery software cannot fix a broken Lightroom catalog reference or restore an expired Adobe cloud deletion.
Method 6: Recover Permanently Deleted Lightroom Photos with Magic Data Recovery
Best for: Original photos deleted from Windows-accessible storage when Lightroom, Recycle Bin, and backups cannot restore them.
If the files are genuinely missing, Magic Data Recovery can scan the original storage device for potentially recoverable image data.
Unlike Lightroom’s Deleted album, catalog recovery, and file relinking, Magic Data Recovery searches the storage device rather than Lightroom’s library records.
According to its official product information, it supports photography formats such as JPG, PNG, TIFF, DNG, CR2, CR3, NEF, ARW, and RAF.
This makes it relevant when original images disappear from a Windows drive or a compatible memory card. However, its scanning capabilities do not rebuild Lightroom editing history, collections, or cloud records.
For permanently deleted local files, see also our permanently deleted file recovery guide.
How to Use Magic Data Recovery for Deleted Lightroom Photos
Step 1: Download and Install Magic Data Recovery
Download Magic Data Recovery on Windows. Install it on a different drive or partition from the location where your Lightroom originals were deleted.
Supports Windows 7/8/10/11 and Windows Server
Step 2: Select the Drive Where Lightroom Photos Were Stored
Launch the software and select the original storage location, such as the Windows photo library drive or the memory card that contained your photographs. Start the scan.
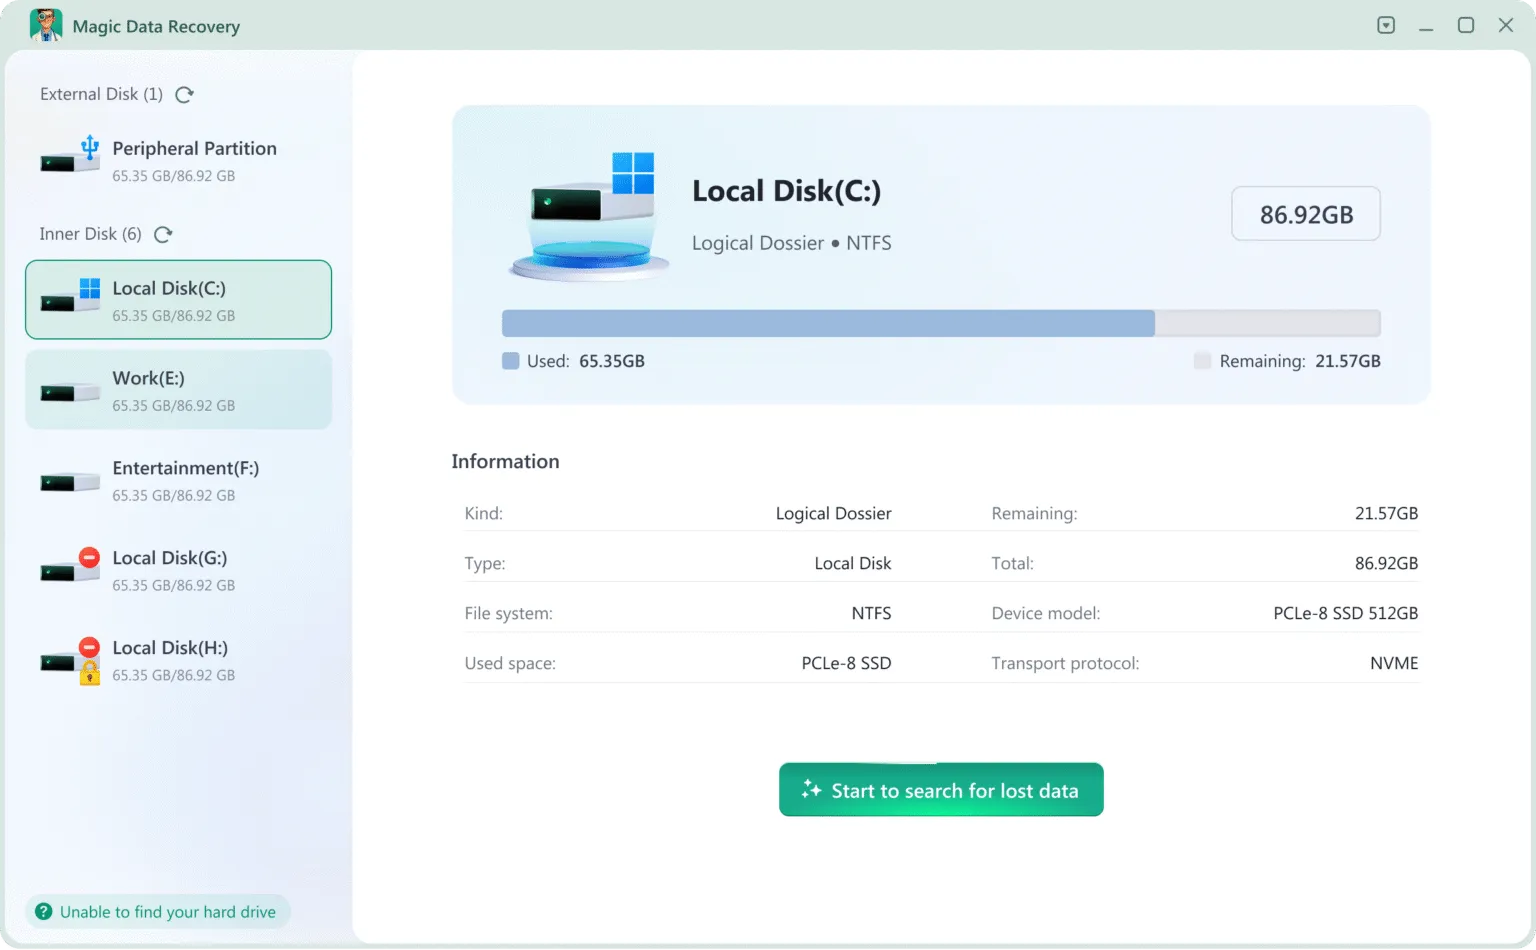
Step 3: Scan for Deleted Lightroom Photo Files
Allow the software to scan for recoverable data. Check the results for relevant image extensions, including JPG, DNG, NEF, CR3, and ARW.
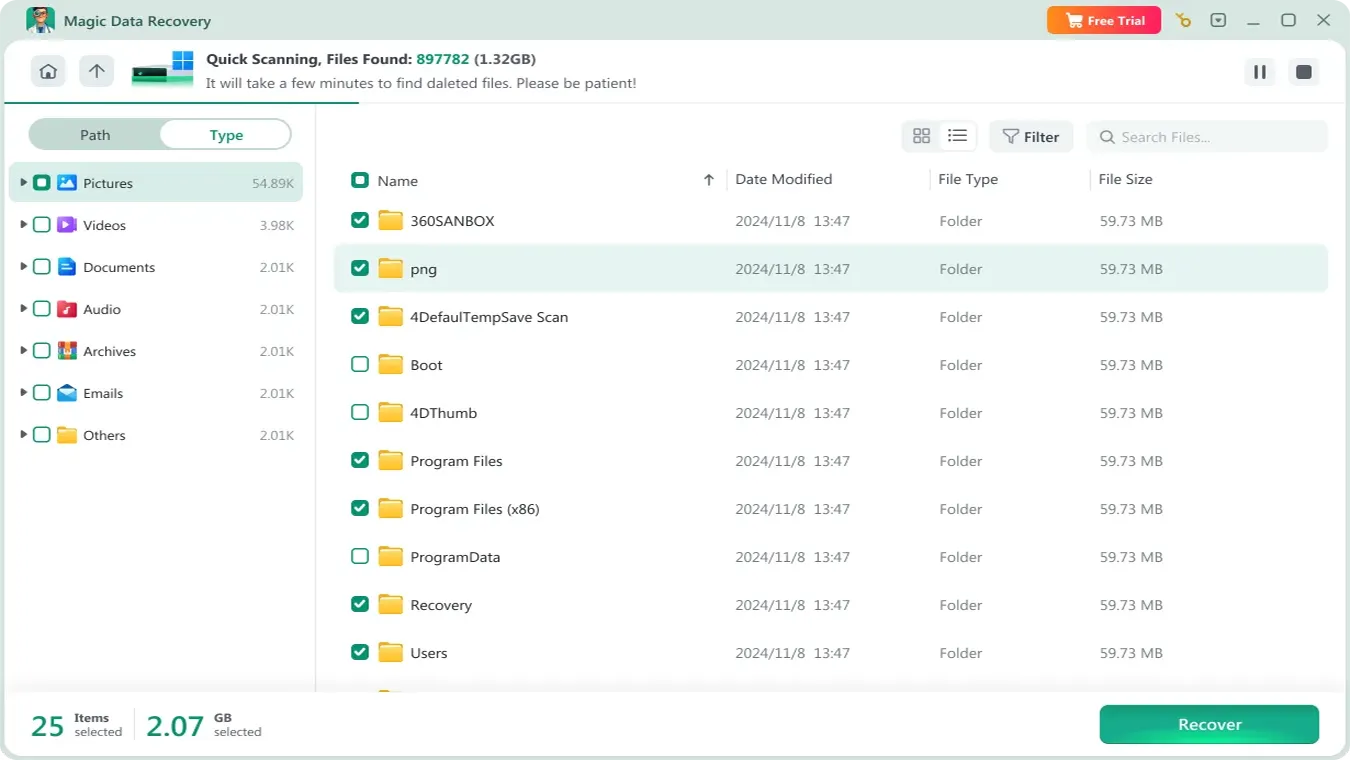
Step 4: Preview Lightroom Images Before Recovery
Review the detected photographs using Preview where supported. Check filenames, image content, and file sizes. A successful preview does not guarantee that every recovered file will be complete.

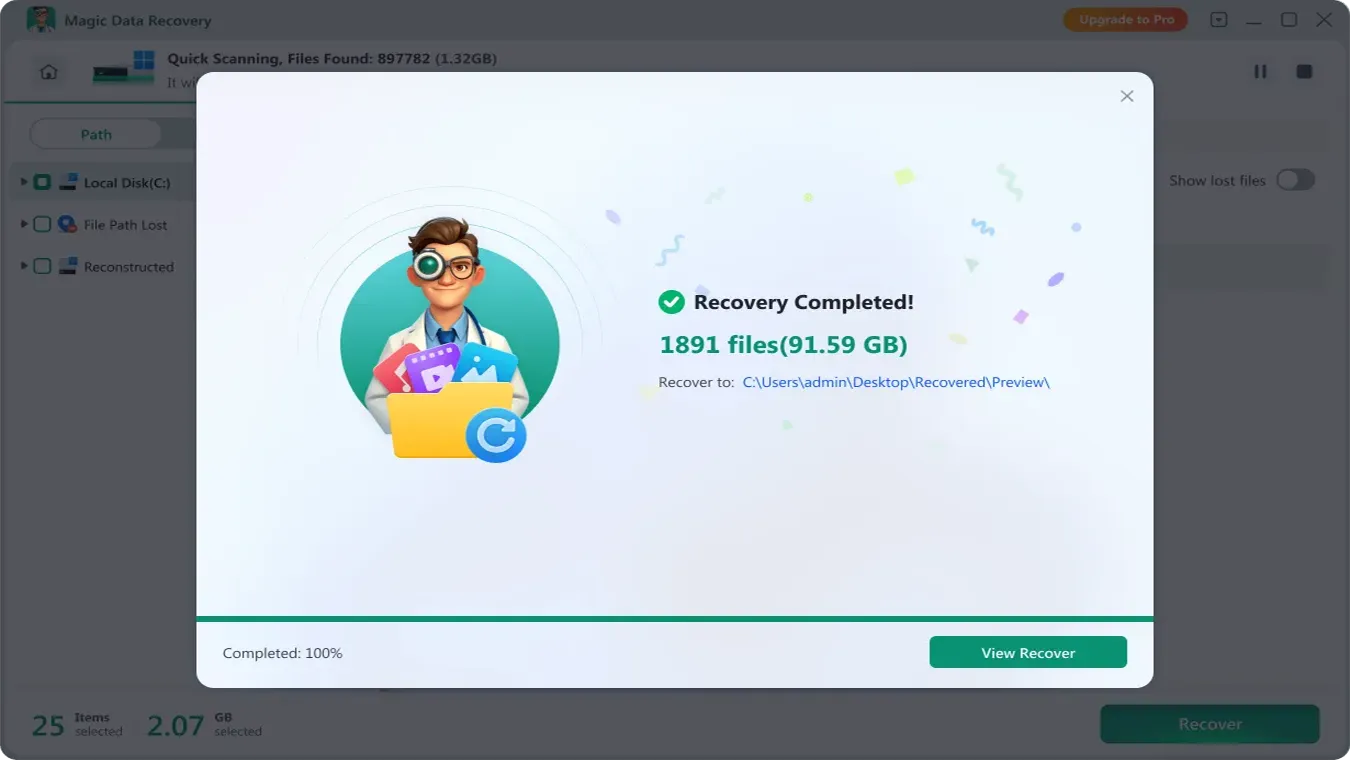
Step 5: Recover Photos to a Safe Location
Select the photographs you need and recover them to a different healthy drive. Then verify that the files open correctly before returning them to Lightroom.
After Recovery: Restore Photos to Your Lightroom Workflow
Finding an original image file is not the final step. You also need to reconnect it to the correct Lightroom environment.
If the Original Catalog Entry Still Exists
- Place the recovered images in a stable folder.
- Open the original Lightroom Classic catalog.
- Select an image that displays the missing-file icon.
- Choose Locate and select its recovered original.
- Verify that the previous edits and adjustments still appear.
Relinking preserves the existing catalog relationship when Lightroom successfully matches the recovered photo.
If the Catalog Entry Was Removed
Look for an earlier catalog containing the original editing instructions. If available, use File > Import From Another Catalog to restore the relevant entries.
If no usable catalog or metadata exists, import the recovered originals as new photographs.
However, you may need to recreate edits that were stored only in the missing catalog.
Verify the Recovered Files
Before considering the job complete:
- Open each important image at full resolution.
- Check for visible corruption or incomplete content.
- Confirm that RAW files can be processed correctly.
- Verify that Lightroom uses the recovered original rather than only a Smart Preview.
- Export a test photograph to confirm that the editing workflow works.
The real success criterion is not simply finding a file during a scan. It is having an image that opens correctly and can be used in Lightroom again.
What If Lightroom Photo Recovery Fails?
Not every deleted photograph can be recovered.
Several limitations can affect the result.
Overwritten image data: Once new files overwrite the necessary storage blocks, software cannot reconstruct the missing original data.
SSD TRIM: Modern SSDs may clear deleted blocks through TRIM and garbage collection. As a result, recovery can become impossible even shortly after deletion. Our SSD deleted file recovery guide explains the distinction.
Damaged storage: A drive that disconnects repeatedly, makes unusual noises, or fails to identify reliably may require professional attention rather than more software scans.
Cloud-only deletion: A local recovery scan cannot retrieve data that existed only on Adobe’s servers and has been permanently removed.
Incomplete recovery: A restored RAW file may still be corrupted, while a valid JPEG preview cannot necessarily recreate a missing RAW original.
If software recovery fails, recheck where the original images were stored and whether any independent copies exist. Avoid repeated intensive scans on unstable hardware.
How to Prevent Lightroom Photos and Edits from Disappearing
A reliable Lightroom workflow protects both original images and their editing information.
- Back up original photographs separately. Do not depend on catalog backups to protect your RAW files.
- Schedule Lightroom Classic catalog backups. Store them on another drive and confirm that older copies open correctly.
- Keep stable folder structures. Move and rename photo folders through Lightroom Classic when possible to avoid broken references.
- Preserve metadata when appropriate. Lightroom Classic can write supported editing metadata to XMP. However, XMP does not replace a full catalog backup.
- Verify cloud synchronization. Confirm that images are actually uploaded before deleting local originals.
- Maintain independent photo copies. Consider copying images to a second destination during import and keeping an offsite backup.
- Check storage before deletion. Distinguish Remove from Delete From Disk, especially when handling multiple photographs.
For camera-based workflows, see our SD card photo recovery guide for additional storage precautions.
Conclusion
Can Lightroom recover deleted photos? Often, yes, but the first step is identifying whether the original files are actually gone.
If the photos still exist, use Lightroom Classic’s Locate or Import functions. If a catalog or synchronized image was deleted, check the Deleted album, earlier catalogs, and backups. Only when the original photographs are missing from local storage should you move to storage recovery.
In that situation, Magic Data Recovery offers an additional option for Windows-accessible drives. It may help recover original image files, although it cannot recreate overwritten data or rebuild missing Lightroom edits automatically.
For a broader set of recovery methods, visit Amagicsoft’s deleted file recovery guide.
Supports Windows 7/8/10/11 and Windows Server
FAQ
Can Lightroom recover deleted photos after 30 days?
Why did my photos disappear after updating Lightroom Classic?
.lrcat files in File Explorer or Finder. Avoid reimporting everything until you confirm whether your original catalog still contains the missing photos and edits.What does “The file could not be found” mean in Lightroom Classic?
Does Lightroom Classic automatically back up original RAW photos?
Can I recover deleted Lightroom photos without losing my edits?
Can Lightroom recover photos deleted from an SD card before import?
Can Smart Previews restore deleted full-resolution Lightroom photos?

Vasilii is a data recovery specialist with around 10 years of hands-on experience in the field. Throughout his career, he has successfully solved thousands of complex cases involving deleted files, formatted drives, lost partitions, and RAW file systems. His expertise covers both manual recovery methods using professional tools like hex editors and advanced automated solutions with recovery software. Vasilii's mission is to make reliable data recovery knowledge accessible to both IT professionals and everyday users, helping them safeguard their valuable digital assets.