
How to Recover Files After Emptying Recycle Bin on Windows 11/10
You clear the Recycle Bin, then realize a project folder or document was still inside. The Restore option has gone, but you may still recover files after emptying Recycle Bin. The practical routes are an existing backup, a cloud copy, or a scan of the original drive when recoverable content remains.
The difference matters: a backup restores another copy, while recovery software depends on what survived deletion. When no usable backup exists and the original drive remains stable, Magic Data Recovery offers a graphical workflow to scan for deleted files, filter the results, and preview supported content before saving it to another device. New writes can overwrite the original content. On an SSD, TRIM and the drive’s internal cleanup can make deleted blocks unavailable even without a new file being saved there deliberately.
Stop using the affected drive before you start. This guide helps you choose a recovery route and verify the files afterward. For other deletion scenarios, use our deleted file recovery guide.
Supports Windows 7/8/10/11 and Windows Server
Table of Contents
Protect the Original Drive First
Do not download, install, or save recovery output to the affected drive. If the deleted files were on C:, Windows activity itself can create new writes.
- Check online backups from another device where possible.
- Prepare a different physical storage device for recovered files.
- Avoid cleanup, defragmentation, CHKDSK, formatting, and bin-reset commands.
- Do not keep running a drive that clicks, disconnects, or becomes progressively harder to read.
For an important sole copy on the Windows system drive, consider stopping use and arranging recovery from another computer or through a specialist. Installing a new recovery application on that same running system is not a write-free procedure.
Quick Decision: Can You Recover Files from an Emptied Recycle Bin?
Your situation | Best first route | Main limitation |
The file is actually still visible in the local bin | Direct Restore | This is not permanent deletion |
The folder was synced to OneDrive | Check its web recycle bin | The item must still be recoverable in the correct account |
File History or another backup contains the file | Restore a copy from before deletion | The backup must already exist and include the file |
No backup, stable drive, comfortable with commands | Windows File Recovery | Results depend on surviving data and correct options |
No backup, stable drive, prefer a graphical workflow | Magic Data Recovery | A listed filename or preview does not guarantee a complete file |
Clicking, disconnects, or repeated read errors | Professional assessment | Further DIY activity can add risk |
Data was overwritten, securely erased, or made inaccessible by SSD cleanup | Look for another copy | Scanning cannot recreate content that is no longer readable |
If the first row applies, use our guide to restoring files still in Recycle Bin. The rest of this article focuses on items that have already been removed.
Confirm the Loss Before Scanning
Was the File Local, Synced, or Online-Only?
Check the original path. A Desktop or Documents folder may be redirected into OneDrive, while a project may live on a different drive. A Recent shortcut can help identify its target, but it is not another copy.
Online-only content may not have been downloaded to the PC. In that case, a local scan is not a substitute for cloud restoration. Check the account, web recycle bin, and organizational retention options first.
For a network share, ask the server owner or IT team about snapshots and backups. Scanning your own C: drive does not recover a file that existed only on a server.
Which Drive Originally Held the Files?
The desktop Recycle Bin is a combined view, not a reason to scan C: automatically. A file deleted from D: needs attention on its original volume. For an external disk, identify it by capacity and model as well as its current letter.
Write down the old path, likely file types, approximate sizes, and deletion time. These details help you choose the source and filter results without restoring thousands of unrelated files.
Is the Device Healthy Enough for DIY Recovery?
Check whether the correct drive is detected and reads consistently. If Windows offers to format or initialize it, decline; those actions do not restore deleted files.
An encrypted volume also needs the appropriate key or authorized unlock access. A locked BitLocker volume and an emptied bin are separate problems. Do not format a locked volume to make it appear readable.
What Changes When You Empty Recycle Bin?
Normal recycling preserves a route back to the original folder. Emptying the bin removes that route and frees the associated storage for reuse. The content may remain readable for a while, but its survival is not assured.
This explains why continuing to use a drive matters more than simply counting the days since deletion. A heavily used system disk can change quickly; an idle device may retain useful traces for longer. Neither situation supplies a guaranteed recovery window.
On SSDs, deletion notifications add another constraint. Microsoft’s documentation on delete notifications and TRIM describes how the file system informs supported storage that blocks are no longer needed. The practical consequence is to reduce activity, not spend recovery time changing TRIM settings. Disabling a setting afterward cannot bring back content already discarded by the device.
Start with another copy, then consider a scan. That order gives you the most dependable result before asking software to reconstruct anything.
Method 1: Check OneDrive and Other Existing Copies
Best for: Files from synced folders, shared work, attachments, or an independent backup.
Why first: An intact copy avoids the uncertainty of recovering deleted storage blocks.
Limitation: The right version must still exist. A local deletion can propagate through sync, so another synced folder is not automatically an independent backup.
For OneDrive:
- Sign in to the account that owned the original file.
- Open Recycle bin on the website.
- Find the item and check that it is the correct version.
- Select Restore.
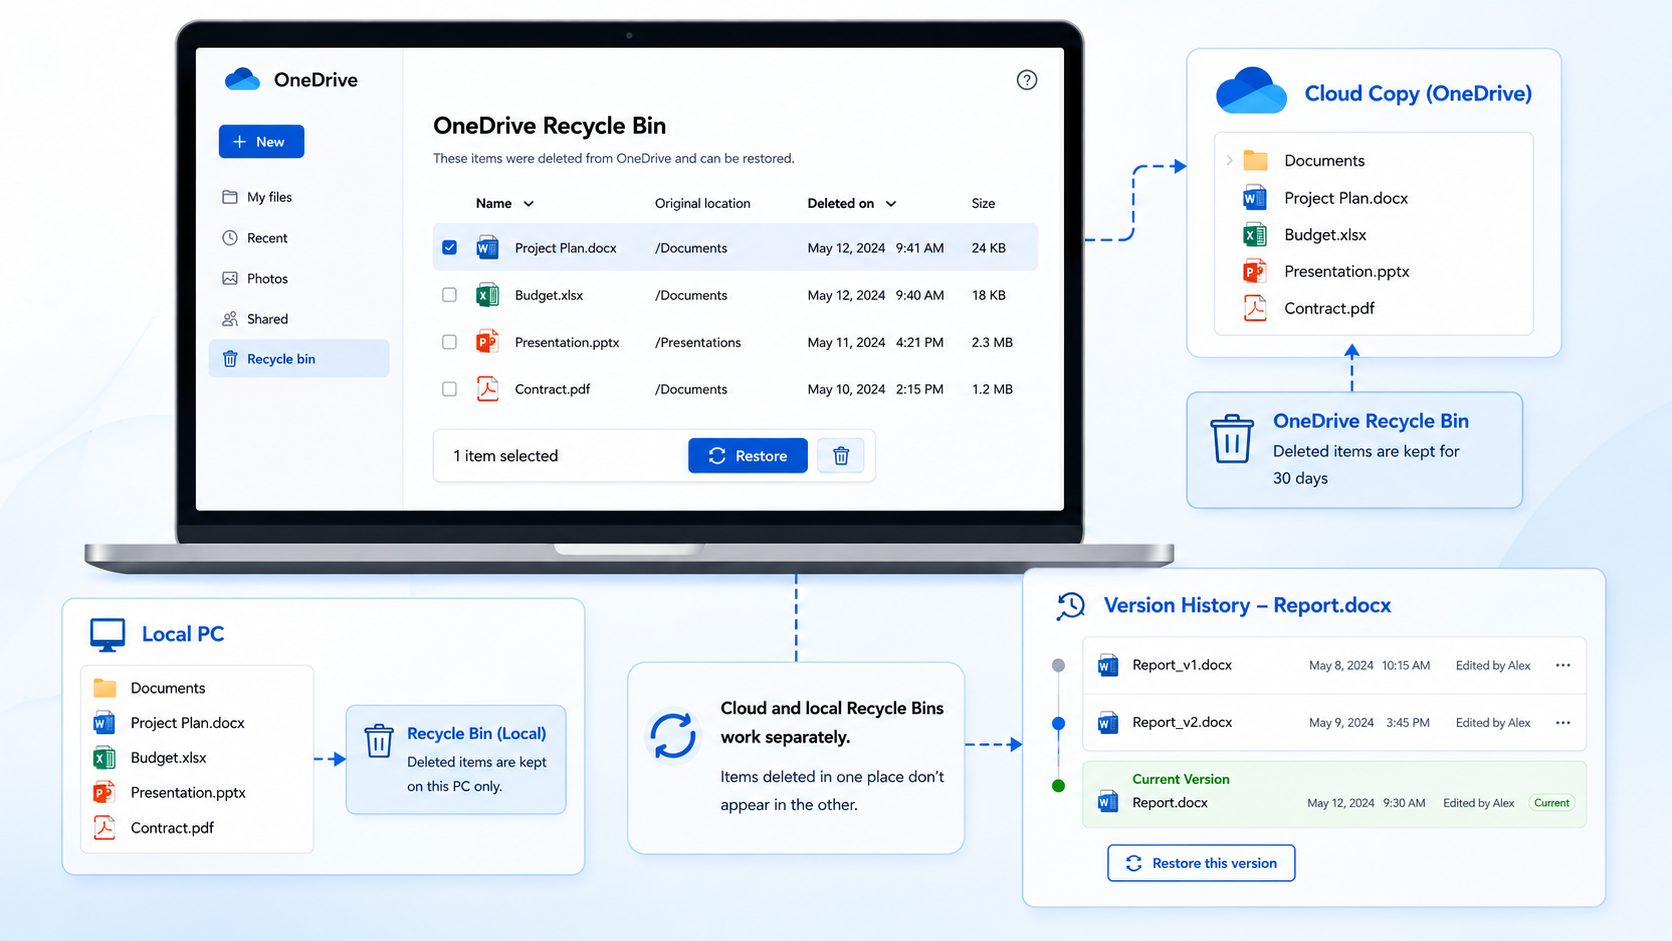
Microsoft specifies a normal deleted-item window of 30 days for personal accounts and 93 days for work or school accounts unless an administrator changes the setting. This is a cloud policy, not a retention rule for the Windows bin.
Also check attachments, an external backup, or a collaborator’s separate copy. For company data, ask IT about retained versions before changing shared content.
Expected result: A copy opens with the required content. If local disk recovery may still be needed, avoid downloading it onto the affected drive.
If it fails: Check File History or another backup. Permanent removal from a cloud bin does not prove that a local copy is recoverable.
Method 2: Restore a File History Backup
Best for: A folder protected by File History before the deletion.
Why use it: A dated backup can contain the original content, even though the local bin is empty.
Limitation: The required folder and version must have been backed up already. Turning File History on now does not retrieve yesterday’s deletion.
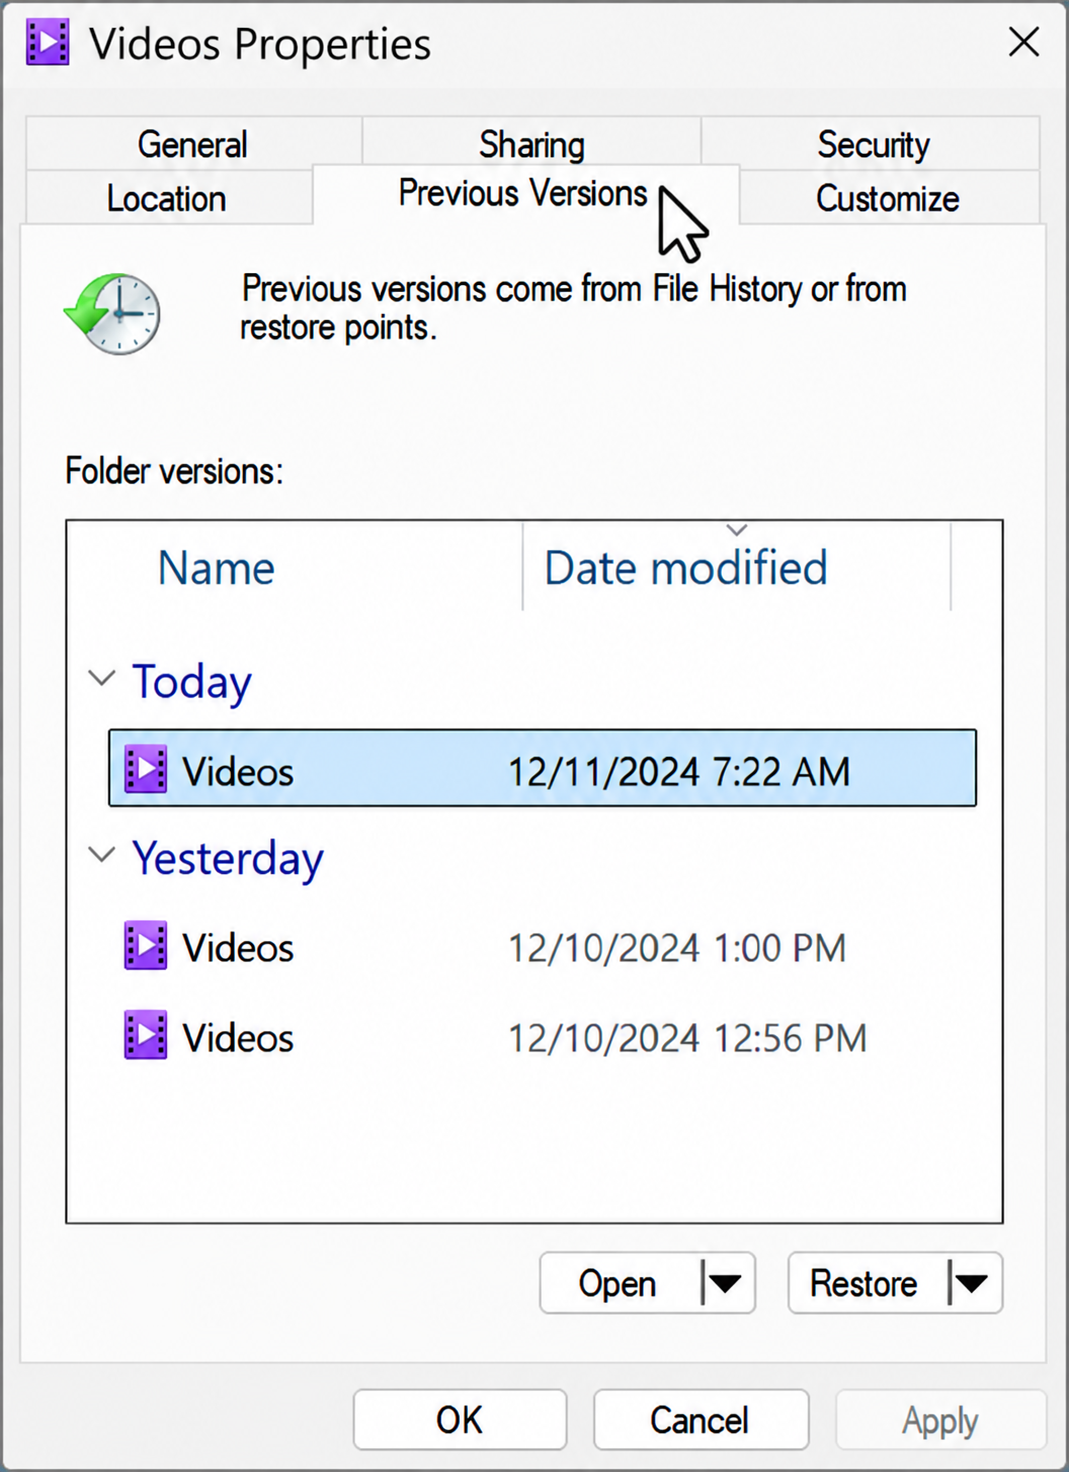
- Connect the storage containing the existing backup.
- Browse to the original parent folder.
- Open Restore previous versions from its context menu.
- Choose a version dated before deletion and inspect it.
- Use Restore to where available to save a separate copy.
Microsoft’s File History instructions explain previewing previous versions and restoring elsewhere to avoid replacing current content.
Expected result: The needed version opens correctly. Avoid restoring an entire older folder over newer work when one missing file is sufficient.
If it fails: Check other backups, then move to disk recovery if the source is stable. An empty Previous Versions list provides no copy to restore. System Restore is not a personal-document recovery method.
Method 3: Try Windows File Recovery
Best for: Command-line users with a stable local drive.
Why consider it: Microsoft’s free recovery utility provides an official scan option. It cannot recover directly from cloud storage or network shares.
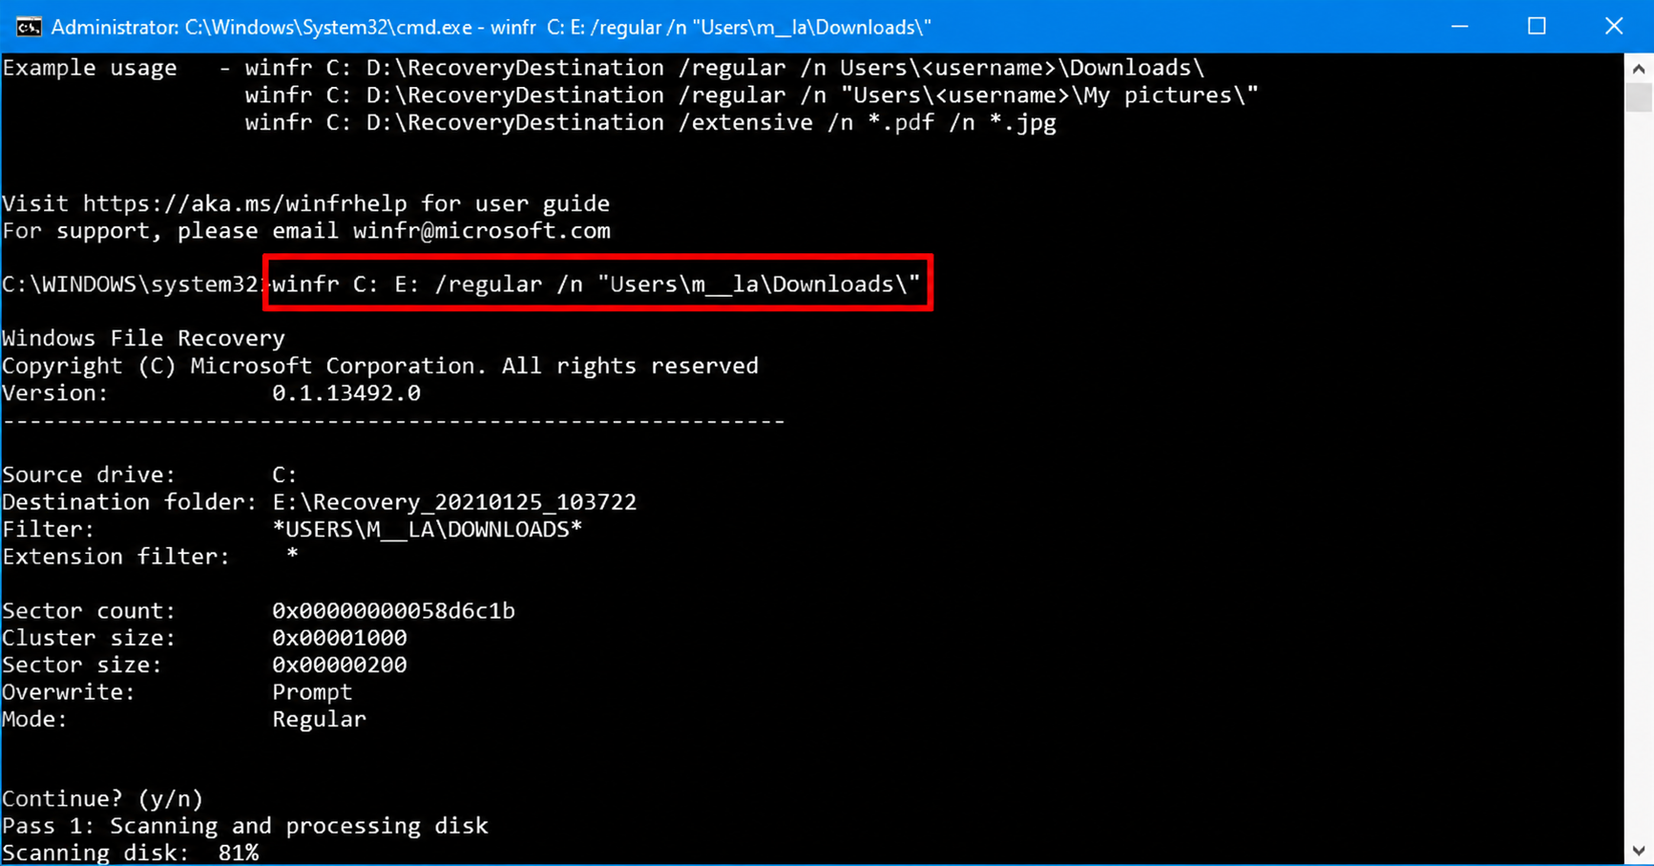
Follow the official instructions. Obtain the tool through Microsoft Store, considering installation writes if C: is affected.
- Open Windows File Recovery and approve the permission prompt.
- Substitute your source and destination letters in the appropriate command below.
- Confirm the operation.
- Inspect the output on the destination device.
For recently deleted documents on a healthy NTFS source:
- winfr C: E: /regular /n *.docx /n *.pdf
For older deletions or a broader search:
- winfr C: E: /extensive /n *.docx /n *.pdf
Here C: is the affected volume; E: must be a different destination, preferably a separate physical device. Use Extensive mode for FAT/exFAT. Check the actual file system rather than guessing from device capacity.
Expected result: Candidate files appear in the destination recovery folder.
If it fails: Recheck letters, filters, and mode. Stop if the device becomes unstable. A graphical alternative cannot guarantee recovery.
Method 4: Use Magic Data Recovery for a Graphical Workflow
Best for: An emptied bin, no usable backup, and an original drive that remains readable and stable.
At this stage, Magic Data Recovery addresses a specific problem: the files are no longer available through Restore, and you need to inspect what the original storage still contains. Its drive-selection, search, filtering, and preview tools can help identify candidates without writing command-line filters.
These capabilities are relevant to the task; they do not establish a success rate. Recovery depends on the source data, and this guide does not claim a new product test or a measured recovery percentage.
Check the current Magic Data Recovery options before starting. Review any recovery limits before buying a license, and use a supported preview or permitted sample recovery to assess the actual files when available.
Supports Windows 7/8/10/11 and Windows Server
Step 1: Prepare a Safe Working Arrangement
Keep the installer, application, and recovered output off the affected storage where possible. A different partition on the same physical disk is not the same precaution as a different device.
If Windows runs from the source disk, ordinary system activity can still write there even when the application is installed elsewhere. For a valuable sole copy, another computer or professional assistance may be preferable. Avoid opening a laptop or removing a drive unless you can do so safely and understand the hardware and encryption requirements.
Step 2: Select the Original Volume
Launch the application and choose the drive that held the files before deletion. Compare its letter, size, and identity with your notes. Do not select C: merely because the Recycle Bin shortcut was on the desktop.
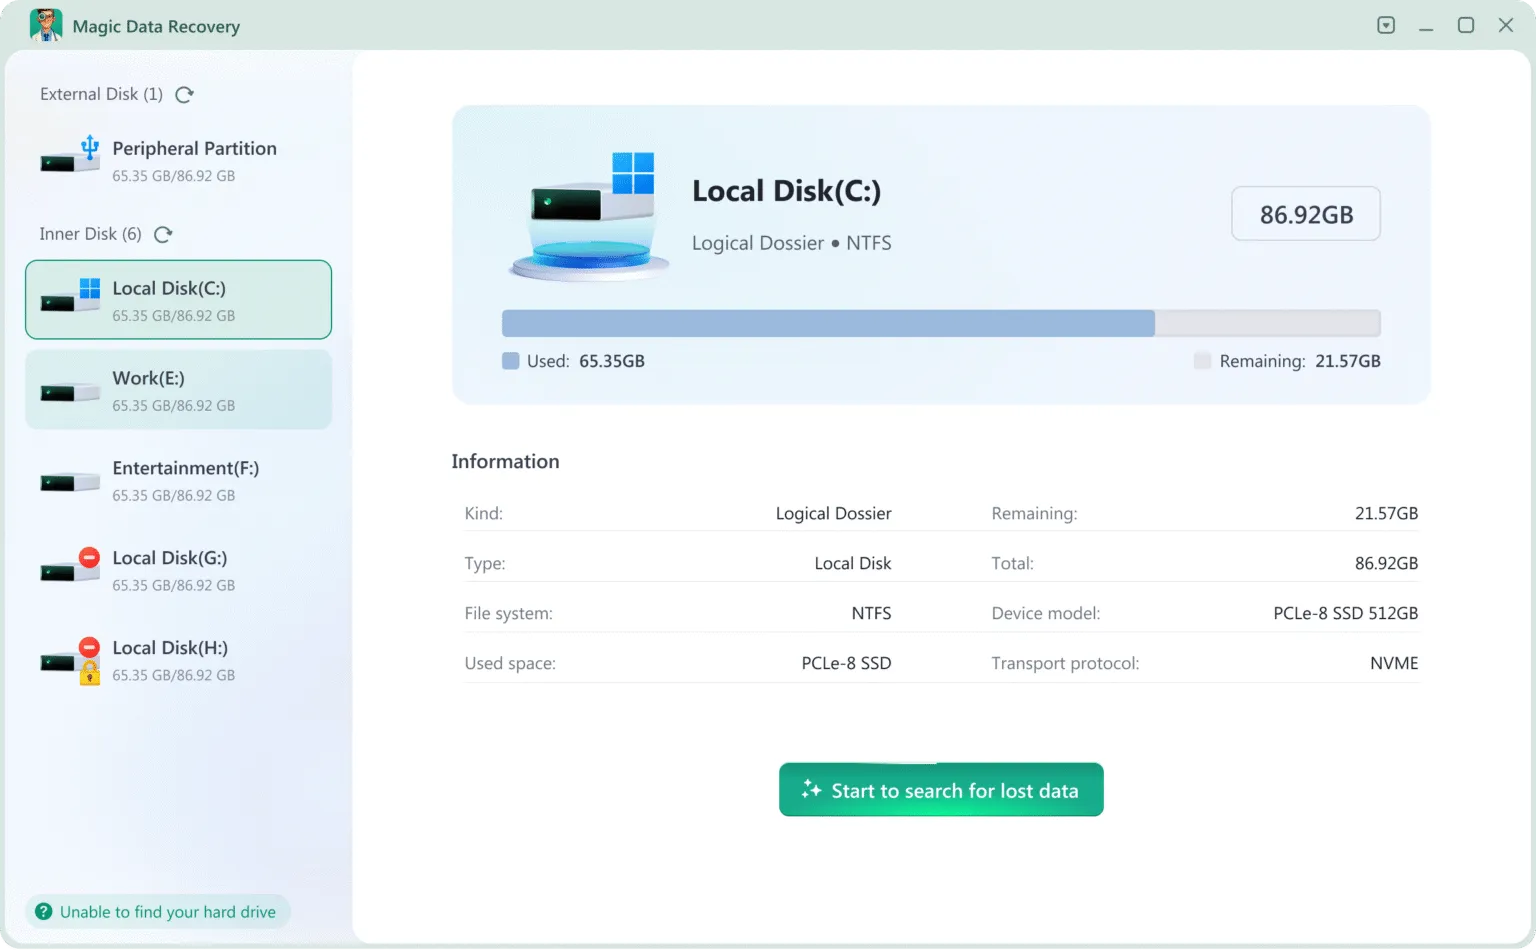
If you cannot identify the source confidently, stop before starting a recovery operation. Scanning the wrong healthy device wastes time; choosing the wrong destination later can overwrite useful data.
Step 3: Scan and Narrow the Results
Start the lost-file scan for the selected source. Review the results by filename, extension, size, and folder where that information survives. Use file-type categories when the original name is unavailable.
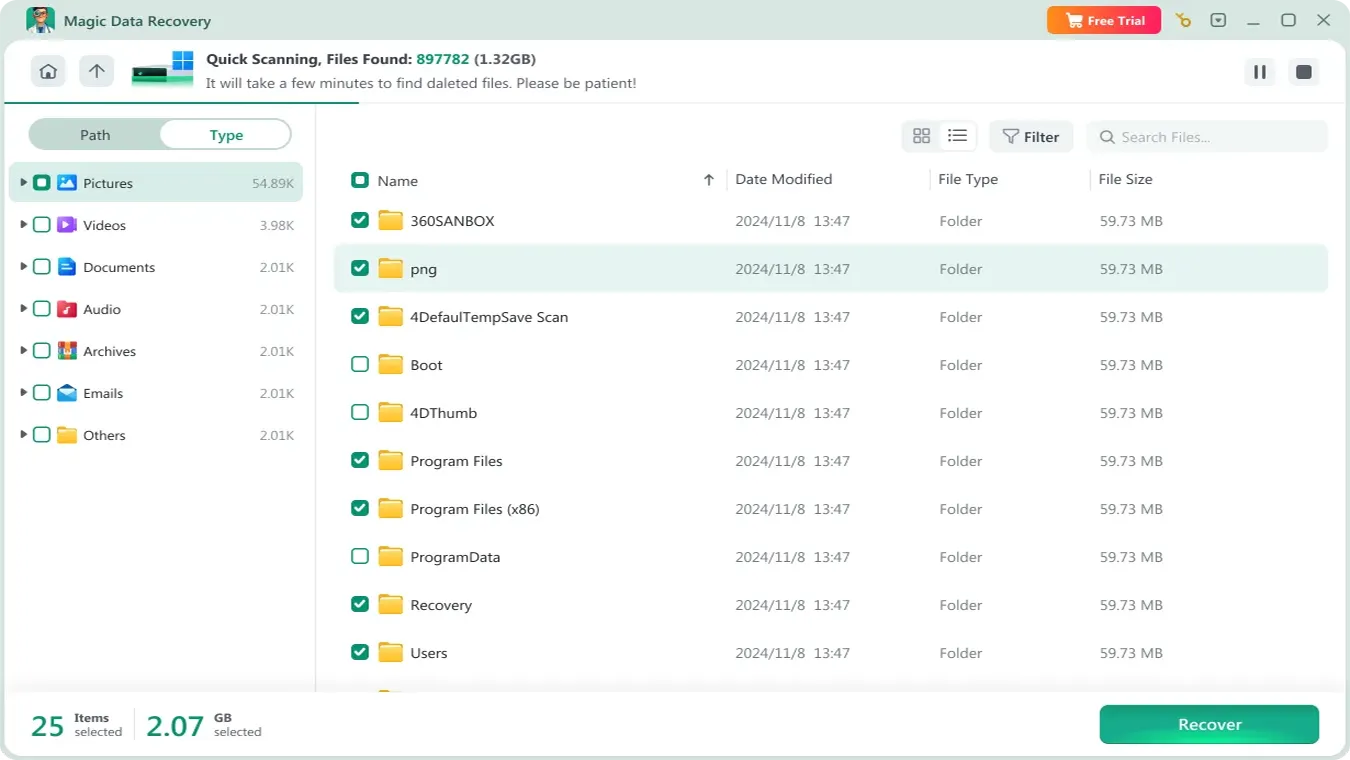
Allow an appropriate scan to finish if the device remains stable. Stop when repeated errors, disconnects, or abnormal noises appear; a longer scan is not an answer to a hardware fault.
Step 4: Preview the Files That Matter
Inspect several important candidates, not just the first thumbnail. Compare their content with what you remember. A result with a familiar filename can have missing or overwritten data; another candidate may contain useful content despite losing its original name.

Preview availability varies by format. An unsupported preview alone does not prove corruption, while a successful preview does not prove that every part of a large file is intact. Recover a permitted sample to a separate destination and test it in its usual application when possible.
Step 5: Recover to a Different Device
Select the required files and save them to the prepared destination. Do not choose the original Desktop, Downloads, or project folder if it is on the source drive.
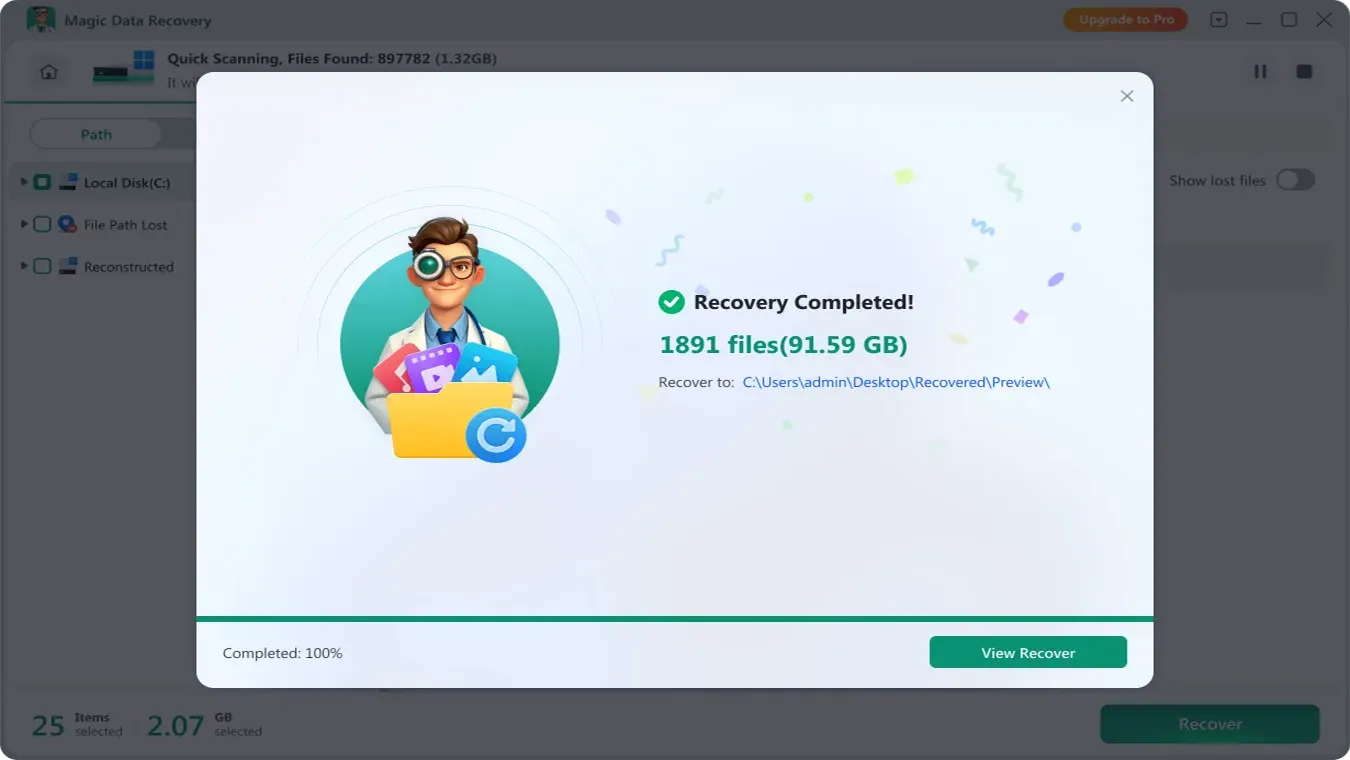
Open the recovered files from the destination and keep the originals of the recovery output while assessing them. Perform any repair attempts on copies.
Expected result: The selected files are usable on the destination device, with their important content checked.
If it fails: Distinguish a wrong source, unsuitable filter, incomplete content, and physical instability. Changing software does not reverse overwriting or SSD cleanup. If another scan has no clear reason to succeed, reconsider backups or seek an assessment instead of cycling through tools.
Verify Recovered Files Beyond the Filename
To recover files after emptying Recycle Bin successfully, you need usable content, not simply a list of recovered names.
File type | What to verify | What can be misleading |
Word or PDF | Body text, tables, images, comments, and required pages | Opening without an error may still leave missing content |
Excel | Worksheets, formulas, charts, and linked resources | A readable first sheet does not prove the workbook is complete |
Photos | Full image at normal size, with important details visible | A thumbnail can survive when the full image is damaged |
Videos and audio | Playback across the recording, including its end | The first few seconds can work despite later corruption |
ZIP or other archives | Built-in integrity test and extraction of needed files | A plausible filename and size do not prove extraction will succeed |
Project folders | Required subfolders, media, sidecar files, and references | A project file can open while linked assets are missing |
For a unique recording, review it fully when practical. For large projects, prioritize the files that determine whether the work can continue. Record what is missing before deciding whether another recovery attempt is justified.
When DIY Recovery Should Stop
Stop when the device clicks, repeatedly drops offline, reports worsening read errors, or has suffered liquid, impact, or electrical damage. Recovery applications cannot repair those faults.
Professional help is also reasonable before a first scan when the only copy is unusually valuable. A lab may be able to manage unstable hardware or acquire readable data more carefully, but it cannot guarantee recovery of overwritten or securely erased content.
Avoid “fixes” that reset the bin, rebuild a file system, initialize the disk, or format it. They change storage structures instead of restoring the deleted files. If a repair is needed later, first recover or back up what remains and verify it elsewhere.
Prevent Another Empty-Bin Recovery Emergency
After recovery, spend a few minutes improving the safety net rather than leaving the recovered output as the only copy.
- Keep an independent backup with history. A synced folder can reflect accidental deletions on several devices. Use a separate backup target or retained versions that you can actually restore.
- Test the recovery path. Restore a small folder to a temporary location on a safe device. Confirm that the backup includes the file types and locations used for your work, not only default folders.
- Review automatic cleanup. Check Storage Sense, application cleanup, and third-party maintenance settings. Decide how long recycled items should remain before deletion, without treating the bin itself as a backup.
- Separate working data from recovery output. Keep verified recovered files on a healthy destination until you have a second copy. Do not immediately reuse or reformat the original source while recovery questions remain.
- Act on hardware symptoms early. A drive that disconnects repeatedly needs attention while a backup is still possible. Waiting for complete failure removes options.
The useful outcome is a tested route back to your files, even if someone empties the bin again.
Conclusion
You may recover files after emptying Recycle Bin, but the right method depends on what still exists. If a backup or cloud copy is available, restore it first and check the contents. That is more dependable than reconstructing a deleted file from storage traces.
Without a usable copy, identify the original drive and prepare a separate destination. Windows File Recovery offers a command-line route; Magic Data Recovery provides a graphical scan, filter, and preview workflow. Neither can restore content that has been overwritten or made inaccessible by the device.
Stop DIY work when hardware becomes unstable, and verify recovered files before repairing or reusing the source. For other deletion situations, consult our deleted file recovery guide. Your next step should match the actual source, available copies, and value of the missing data.
Supports Windows 7/8/10/11 and Windows Server
FAQs
Can files deleted months or years ago still be recovered?
Will restarting Windows make permanently deleted files recoverable?
Can changing TRIM settings bring back deleted SSD files?
Is there a free way to restore an emptied Recycle Bin?
Why did the software recover a file that will not open?
Can recovery software retrieve a file that was online-only?
Should I scan the Recycle Bin folder or the original drive?
Is a different partition safe for recovered files?

Erin Smith is recognized as one of the most professional writers at Amagicsoft. She has continually honed her writing skills over the past 10 years and helped millions of readers solve their tech problems.