
How to Recover Deleted Jupyter Notebook Files

Your Jupyter notebook was visible yesterday, but now its .ipynb file is missing from JupyterLab. Alternatively, you may have deleted a code cell, saved over important work, or restarted the kernel after a crash. To recover deleted Jupyter notebook files, you first need to identify what actually disappeared. A missing notebook in Jupyter’s file browser does not always mean Windows deleted the original file.
In fact, Jupyter may be showing a different directory, an earlier version may still exist in a checkpoint, or the notebook may be stored on a remote server. Each situation requires a different recovery method.
This guide starts with Jupyter’s built-in recovery features, then checks local storage, version history, and backups. Only when an .ipynb file has actually disappeared from an accessible Windows drive should you consider disk recovery. For related methods, see our deleted file recovery guide.
Table of Contents
What to Do Before Recovering a Jupyter Notebook
Before trying to recover deleted Jupyter notebook files, protect any notebook content and recovery information that may still exist.
The safest action depends on what happened:
- Deleted cell: Keep the notebook open. Avoid refreshing the browser or restarting Jupyter before attempting undo.
- Accidentally overwritten notebook: Save the current version under a different filename before restoring an older checkpoint.
- Jupyter crash: Avoid clearing temporary files, checkpoint folders, or session information.
- Missing notebook in the file browser: Check the current directory before creating another notebook with the same name.
- Permanently deleted local file: Stop writing new data to the affected drive. Do not install packages or recovery software on that drive.
- Cloud or JupyterHub problem: Preserve available versions and contact the administrator before resetting the workspace.
Important: Restoring an older version can replace newer work. Therefore, always preserve any surviving content before reverting a notebook.
Quick Diagnosis: What Exactly Is Missing in Jupyter?
Not every missing Jupyter notebook requires data recovery software.
Use this table to identify the correct solution before changing files.
What you see | Likely problem | Best next step |
A code or Markdown cell disappeared | Deleted cell | Undo Cell Operation |
Notebook opens, but recent changes are missing | Autosave, checkpoint, or version issue | Check earlier versions |
| Wrong directory or moved file | Locate and reopen |
Notebook opens, but CSV or other data files are missing | Broken relative file paths | Locate referenced data |
Notebook disappeared after a crash | Unsaved changes or incomplete save | Check checkpoint and history |
Entire | File deletion | Check Recycle Bin and backups |
Notebook disappeared from JupyterHub | Server-side storage issue | Check host backups |
File is permanently deleted from a Windows drive | Local data loss | Consider disk recovery |
Understand the Difference Between Notebook Files and Their Data
A Jupyter notebook uses the .ipynb format, which stores code cells, Markdown cells, metadata, and saved outputs in a JSON document.
However, a notebook does not necessarily contain the datasets or external resources used by its code.
For example:
import pandas as pd
df = pd.read_csv("data/sales.csv")
Here, sales.csv is a separate file. Restoring analysis.ipynb will not automatically recreate the missing dataset.
Similarly, an executed Python command may remain in IPython history even when its original notebook cell is gone.
This distinction determines whether you need to restore a cell, find a moved file, repair a path, or recover deleted data.
Method 1: Recover Deleted Jupyter Notebook Cells with Undo
Best for: Accidentally deleted cells in a notebook that remains open.
If the notebook still exists but an important cell has disappeared, start with Jupyter’s built-in undo feature.
Restore a Deleted Cell in JupyterLab
- Keep the affected notebook open.
- Press
Escto enter command mode. - Press
Zto undo the previous cell operation. - Repeat carefully if you deleted multiple cells.
- Once the missing content returns, save a separate notebook copy.
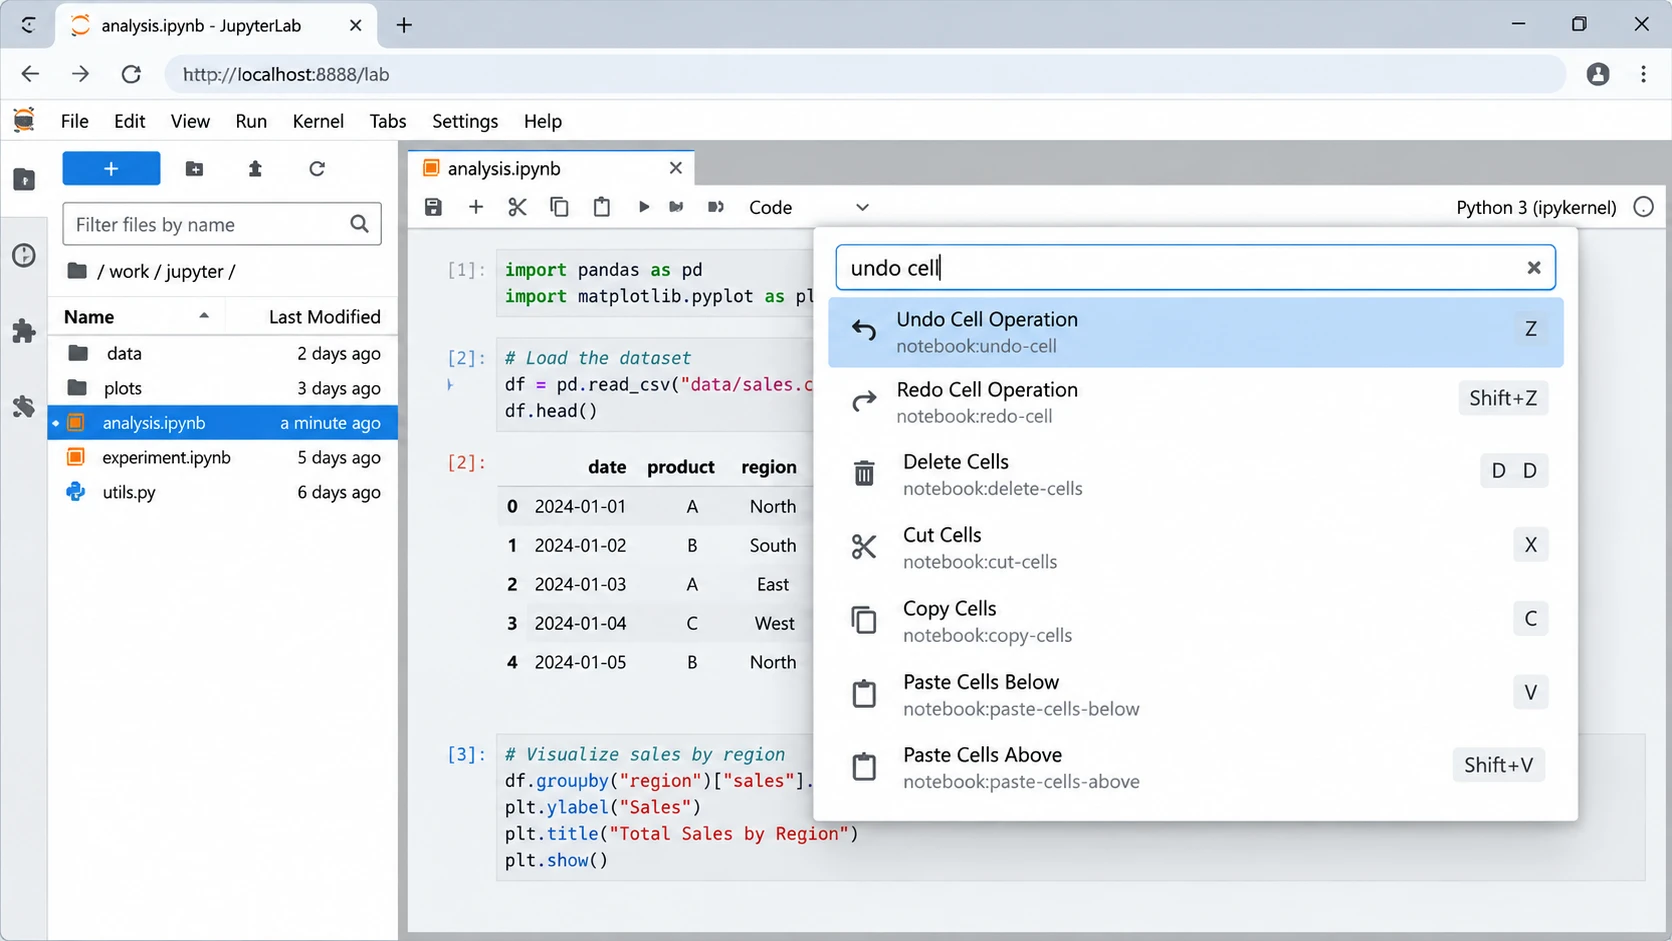
JupyterLab’s official command reference confirms that Z is the shortcut for Undo Cell Operation.
You can also find this command through JupyterLab’s Command Palette.
Important distinction:
Zin command mode undoes notebook-level cell operations.Ctrl + ZorCmd + Ztypically reverses text edits in the appropriate editing context.
This approach can restore recently deleted code or Markdown cells. However, closing or reloading the notebook may clear the relevant undo history.
Use IPython History When Cell Undo Fails
If you cannot undo the deletion, IPython may still contain previously executed Python code.
Open an available notebook or IPython console and run:
%history -n
This displays code inputs from the current session with line numbers.
Alternatively, search saved history for a recognizable command:
%history -g *model.fit*
After finding the missing code, copy it into a new cell and save the notebook.
According to the IPython documentation, the history command can retrieve previously executed inputs, including earlier sessions when persistent history is available.
Limitation: IPython history cannot fully reconstruct Markdown cells, images, notebook metadata, or original outputs. In addition, code that was never executed may be missing.
Method 2: Recover Deleted Jupyter Notebook Content from Checkpoints
Best for: Missing cells, unwanted edits, or older notebook versions after saving.
Jupyter checkpoints preserve an earlier saved notebook state when checkpoint support is available.
However, a checkpoint differs from autosave. Autosave updates the working notebook, while a checkpoint provides a separate recovery point.
Restore a Notebook Checkpoint
- Open the affected notebook in JupyterLab.
- Save a copy of the current version.
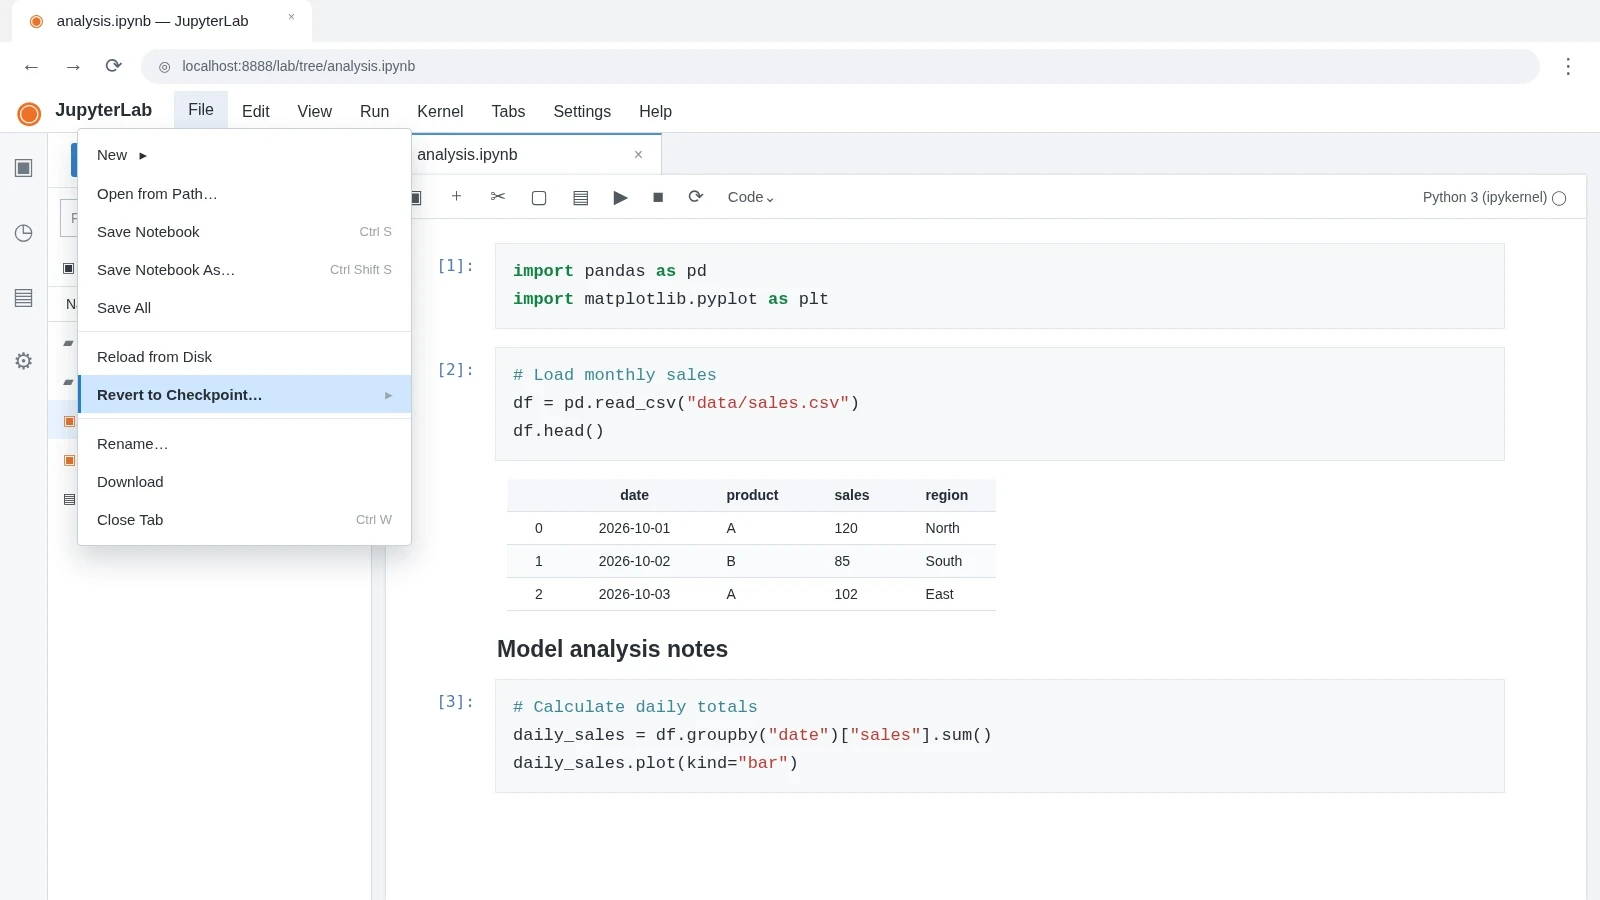
- Open the File menu.
- Look for Revert to Checkpoint, Revert Notebook to Checkpoint, or a similarly named command.
- Review the available checkpoint and its timestamp.
- Restore it only after protecting newer changes.
The available commands depend on your Jupyter version and server configuration.
Find the .ipynb_checkpoints Folder
In many standard local installations, Jupyter stores checkpoint files in a hidden folder beside the original notebook.
For example:
project/
├── analysis.ipynb
└── .ipynb_checkpoints/
└── analysis-checkpoint.ipynb
If you find a checkpoint, copy it to a new location and rename the copy:
analysis-recovered.ipynb
Then open the copied notebook in Jupyter.
How to Verify a Recovered Checkpoint
Do not assume that the newest checkpoint contains everything you need.
Instead, check:
- Modification time: Does it predate the deletion or unwanted edit?
- File size: Is it consistent with the expected notebook?
- Openability: Does Jupyter open the file without errors?
- Content: Are the important code cells, Markdown explanations, and saved outputs present?
- Dependencies: Are referenced datasets and scripts still accessible?
Once you find a usable version, save it under a different filename.
Limitation: Checkpoints are not permanent backups. They can be replaced, removed, or deleted alongside the original notebook. Therefore, they cannot always recover deleted Jupyter notebook files.
Method 3: Find a Jupyter Notebook That Still Exists
Best for: A notebook missing from JupyterLab’s file browser but still present on the computer.
Before assuming the file is gone, confirm whether Jupyter is displaying the correct directory.
Search the Original Notebook Location
In JupyterLab, check the file browser’s current directory and navigate to the expected project folder.
If the notebook is still listed elsewhere, open it directly.
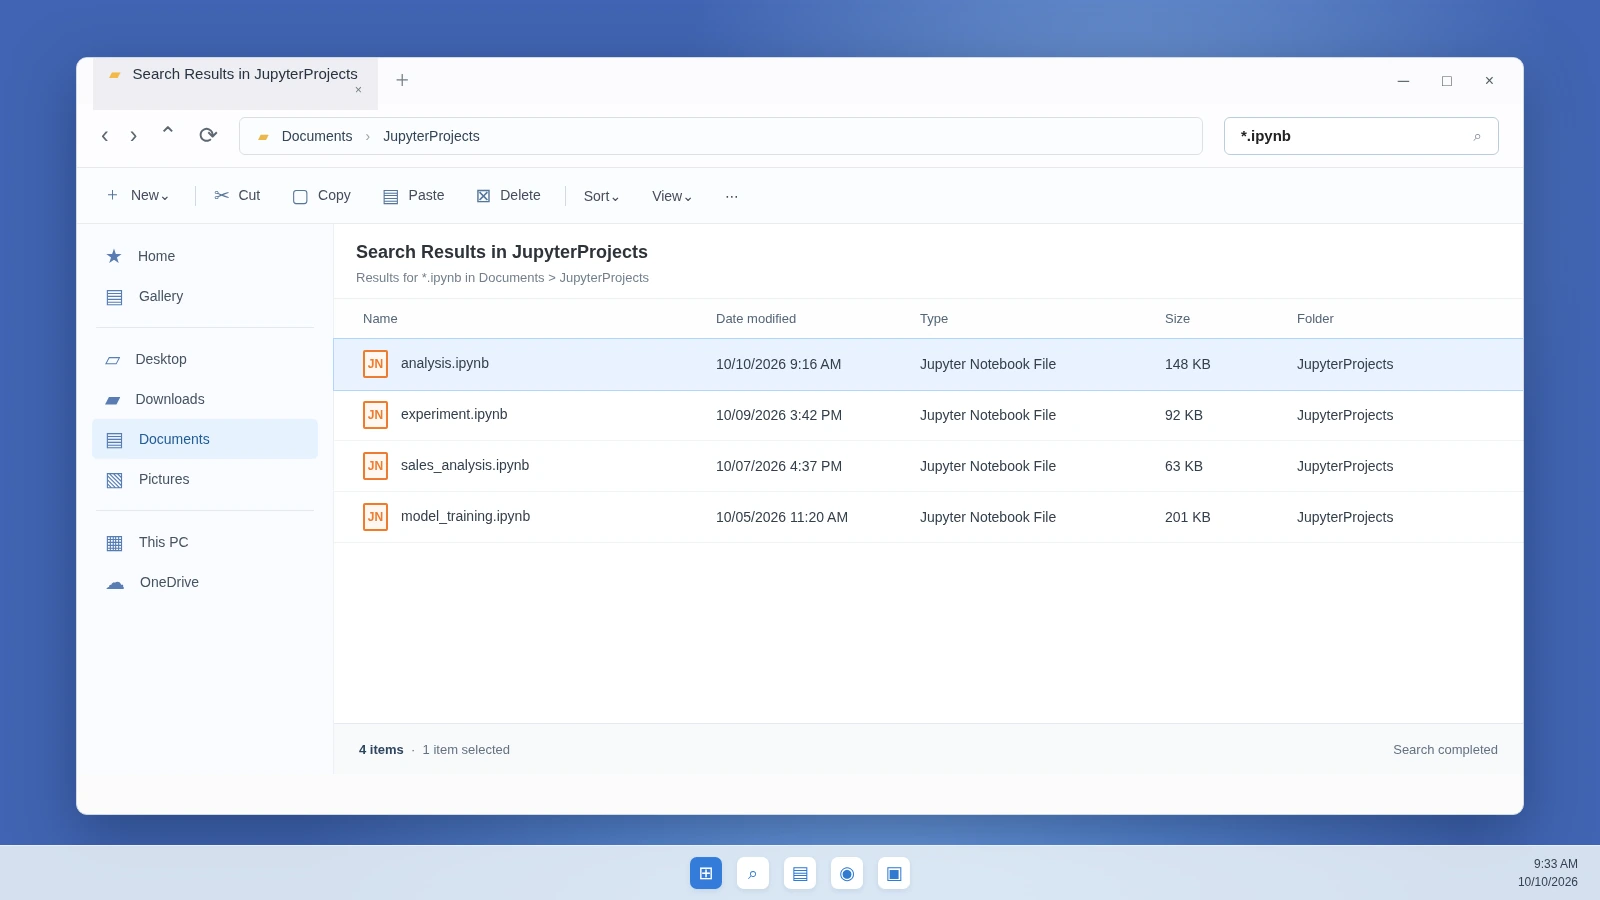
On Windows, use File Explorer to search the relevant project directory for:
*.ipynb
Also check:
- The original project folder
- Recently renamed directories
- Downloads and Documents
- Another working directory used by Jupyter
- Any connected storage containing the project
Use the notebook’s filename, extension, and modification date to narrow the search.
If you find the file, copy it to a stable project directory and reopen it from Jupyter.
Remember: JupyterLab’s file browser shows files accessible through its server. A notebook stored outside the server’s configured root may not appear, even though it still exists on Windows.
Fix Missing Dataset or Script Paths
Sometimes the notebook itself opens normally, but code fails with FileNotFoundError.
That usually indicates a missing or incorrectly referenced file, not necessarily a deleted notebook.
For example:
df = pd.read_csv("data/sales.csv")
First, check the current kernel working directory:
%pwd
Next, locate sales.csv in File Explorer or Jupyter’s file browser.
If the dataset moved, update the path in the code or restore the intended project directory structure.
Unlike some creative applications, Jupyter does not provide a universal Relink command for external datasets. Instead, you must correct the file path or restore the expected location.
Key distinction: If the notebook or dataset still exists, locate it and fix the reference. If the actual file has disappeared, continue with backup or deletion recovery.
Method 4: Restore Deleted .ipynb Files from Trash and Backups
Best for: Entire notebook files removed from local storage.
If File Explorer cannot find the original .ipynb file, check whether the operating system or a backup service retained a copy.
Check Windows Recycle Bin
JupyterLab includes a Move to Trash command in its modern file browser. However, actual deletion behavior depends on the server and storage configuration.
On Windows:
- Open Recycle Bin.
- Search for the notebook filename.
- Check the original location and deletion date.
- Right-click the correct
.ipynbfile. - Select Restore.
Then return to the original directory and open a copy in Jupyter.
If the file is no longer available in Recycle Bin, see our guide to restoring permanently deleted files.
On macOS or Linux, check the applicable Trash directory instead. Remote Jupyter servers may use a different Trash location.
Restore a Previous Version with Windows File History
If Windows File History protected the notebook folder before deletion, it may contain an earlier copy.
- Open File Explorer and locate the original parent folder.
- Right-click it and select Restore previous versions.
- Find a version from before the notebook disappeared.
- Open the available backup.
- Restore the notebook to a separate location.
Microsoft explains the feature in its File History documentation.
However, File History cannot restore content it never backed up.
Check Git and Cloud Version History
If your notebook belongs to a Git repository, inspect its history:
git log -- notebooks/analysis.ipynb
Then retrieve an earlier committed version:
git show COMMIT:notebooks/analysis.ipynb
Replace COMMIT with the appropriate commit identifier.
Avoid using git reset --hard simply to retrieve a missing notebook because it can discard other working changes.
Additionally, check OneDrive, Google Drive, or Dropbox for deleted files and version history.
Cloud storage may contain a complete earlier notebook, but an online-only file is not necessarily available as a full local copy.
Method 5: Recover a Notebook Deleted from JupyterHub
Best for: Missing notebooks stored in hosted Jupyter environments, university systems, or cloud workspaces.
JupyterHub often stores notebooks on remote server-managed storage rather than your personal computer.
Therefore, check the platform’s available recovery options before attempting local disk scanning.
Look for workspace Trash, snapshots, version history, administrator backups, or previous Git commits.
If those options are unavailable, contact the service administrator. Provide the missing notebook’s filename, original directory, approximate deletion time, and workspace information.
For example, the NOIRLab Data Lab support team explains that deleted-file recovery may be possible in certain cases, but it is not guaranteed.
Limitation: Windows recovery software cannot scan files stored exclusively on an inaccessible remote JupyterHub server.
When Do You Actually Need Data Recovery Software?
Before using recovery software to recover deleted Jupyter notebook files, confirm that the original file is genuinely missing.
Recovery checkpoint | If the answer is yes |
Can File Explorer or Jupyter’s file browser locate the | Open the existing file |
Is the missing content available through Undo or IPython history? | Restore the cells or code |
Does a usable checkpoint exist? | Restore the checkpoint copy |
Is the file available in Recycle Bin or Trash? | Restore it directly |
Does Git, File History, or cloud storage contain an earlier version? | Restore that version |
Does the missing notebook exist only on JupyterHub? | Contact the host or administrator |
Was the file permanently deleted from a stable, accessible Windows drive? | Consider disk recovery |
Only the final situation makes local data recovery software a suitable next step.
If the drive disconnects repeatedly, makes unusual noises, or shows physical damage, stop DIY scanning and seek professional assistance.
Method 6: Recover Deleted Jupyter Notebook Files with Magic Data Recovery
Best for: Permanently deleted .ipynb files on accessible Windows storage when built-in recovery and backups fail.
When Windows permanently deletes a notebook, the file system may mark its storage blocks as available. Some original data may remain until new writes replace it.
Magic Data Recovery scans Windows storage for recoverable deleted files. Unlike checkpoints, Recycle Bin, or File History, it does not require a surviving backup copy.
Therefore, it may help recover an original notebook file after permanent deletion. However, .ipynb detection is not guaranteed, and recovery software cannot reconstruct unsaved cells or repair overwritten content.
How to Use Magic Data Recovery
Step 1: Download and Install Magic Data Recovery
Download Magic Data Recovery and install it on a different drive or partition from the one containing the deleted notebook. Avoid writing installation files to the affected storage.
Supports Windows 7/8/10/11 and Windows Server
Step 2: Select the Drive Where the Jupyter Notebook Was Stored
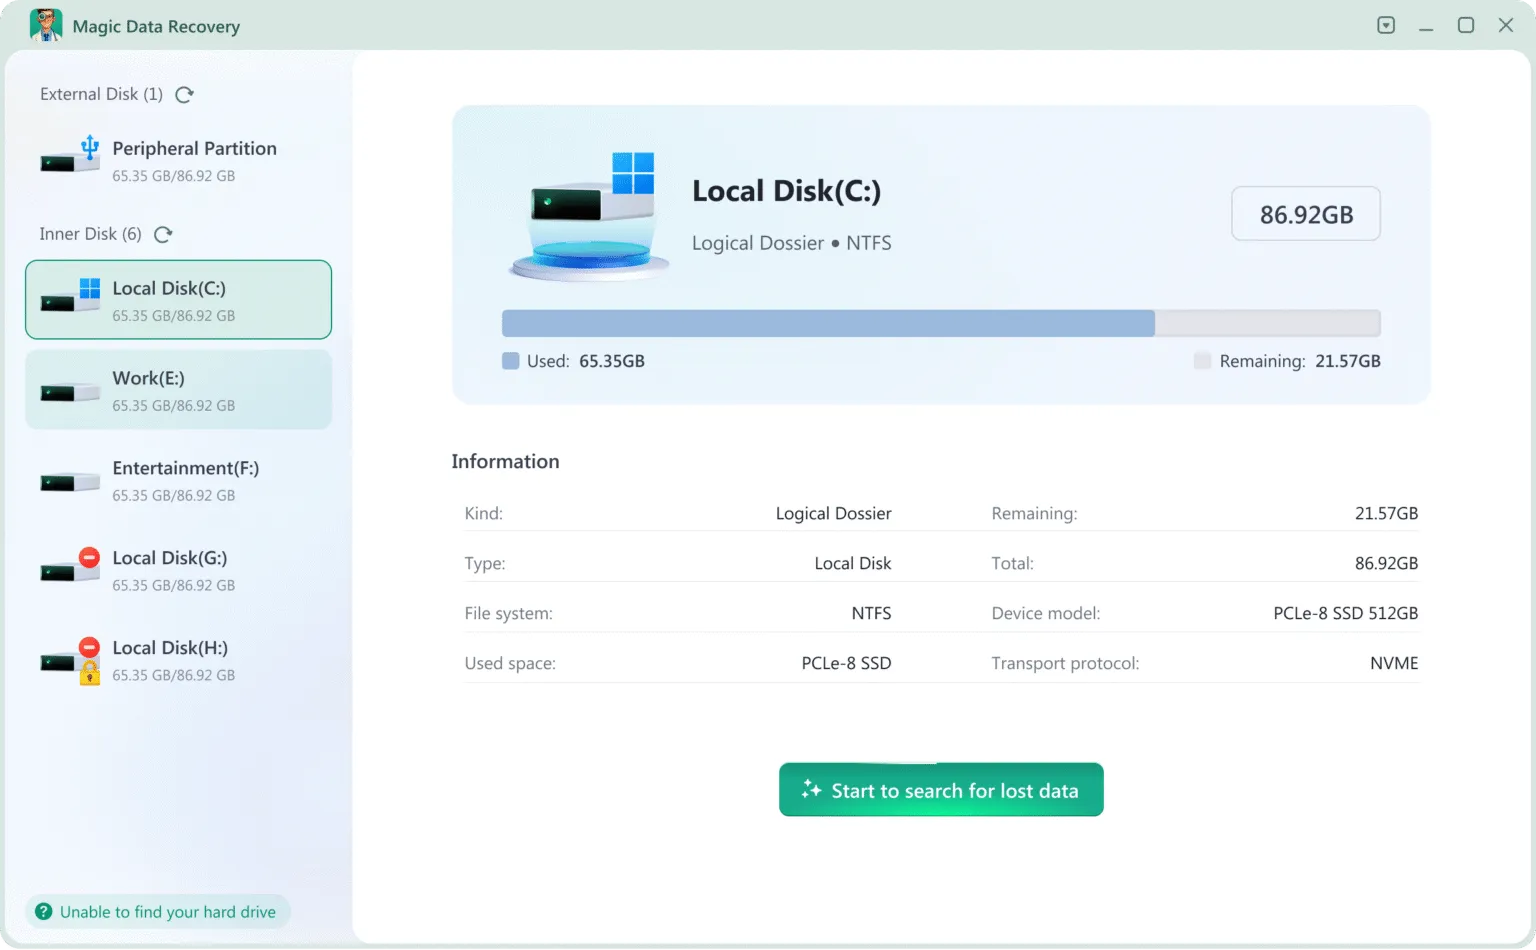
Launch the software and choose the Windows partition that previously contained your .ipynb file. For example, if the notebook was stored under C:\Users\YourName\Documents\Jupyter, select the C: drive and start scanning.
Step 3: Scan for Lost or Deleted Notebook Files
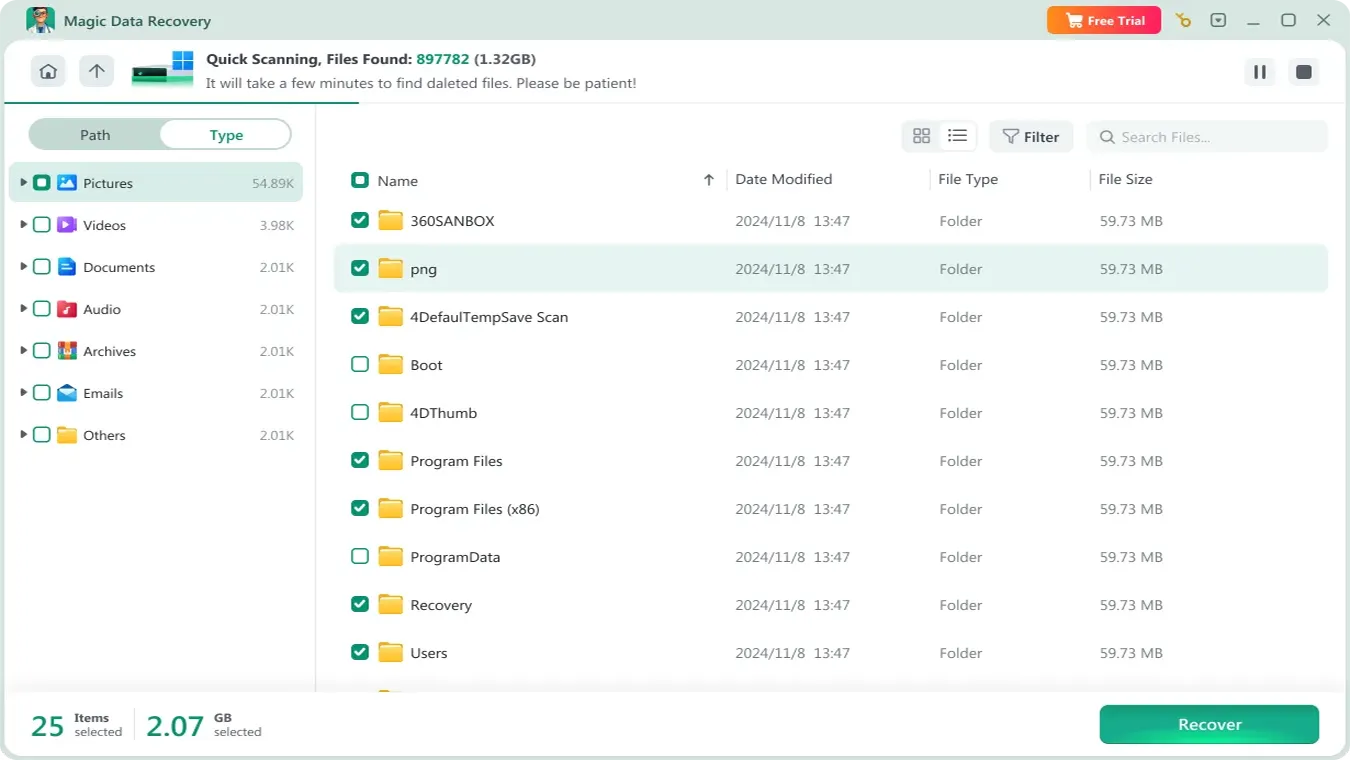
Allow the software to scan the selected storage. Then check the results for the notebook’s filename, original directory, or possible .ipynb files. Some candidates may appear under general document or other-file categories.
Step 4: Recover Files to a Safe Location
Select the required files and click Recover. Save them to a different drive, not the original data-loss location. Finally, open the recovered notebook and confirm that its cells, metadata, and relevant content remain readable.
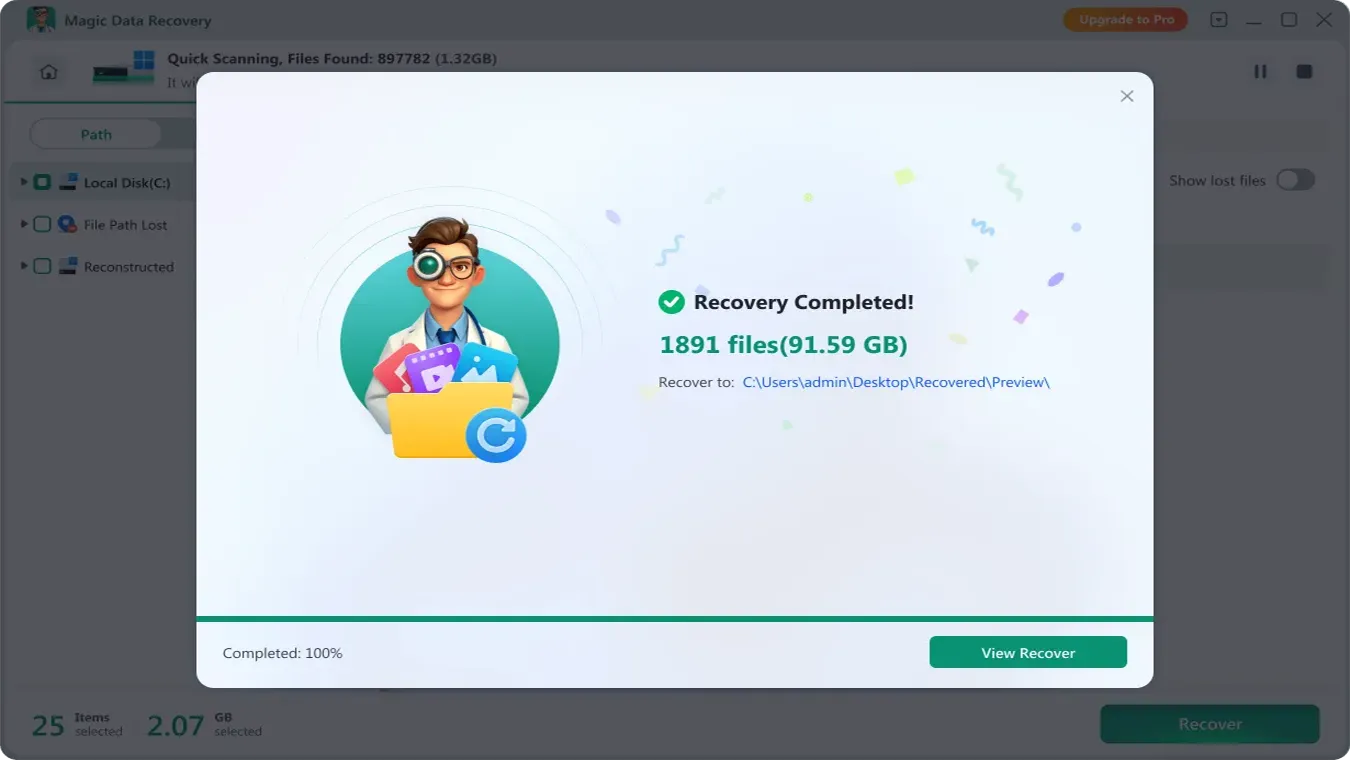
If the built-in recovery options no longer work, you can try Magic Data Recovery before new data overwrites the deleted files.
After Recovery: Make Sure the Jupyter Notebook Actually Works
Finding an .ipynb file does not necessarily mean the entire notebook workflow is restored.
First, copy the recovered file into a stable project directory. Then open it in JupyterLab without immediately running every cell.
Check whether the notebook contains the expected code, Markdown, metadata, and saved outputs.
Next, verify its external dependencies:
- Are referenced CSV, Excel, or other datasets accessible?
- Are imported Python scripts still in their expected locations?
- Does the selected Python environment contain the required libraries?
- Do relative file paths still point to the correct directories?
If the notebook opens but cannot load a dataset, restore the missing source file or correct its path.
Finally, save the working notebook under a new filename. Preserve the recovered original until verification is complete.
What If the Recovered .ipynb File Is Corrupted?
A recovered notebook may contain incomplete or invalid JSON.
In that case, preserve the original recovered copy and inspect a duplicate with a text editor. The official Jupyter notebook format specification explains the structure of .ipynb documents.
However, valid JSON alone does not prove that every cell is intact.
If the file is incomplete, check another checkpoint, Git revision, or backup rather than repeatedly overwriting the recovered copy.
When Further Recovery Is Unlikely to Help
Some situations have firm technical limits:
- Overwriting: Replaced file data cannot be reconstructed by ordinary recovery software.
- SSD TRIM: Deleted blocks may have been discarded by the SSD controller.
- Unsaved changes: Content that never reached persistent storage may not exist in a recoverable file.
- Physical damage: Software cannot repair defective hardware.
Therefore, additional scans do not guarantee a better result, particularly after TRIM or substantial overwriting.
How to Prevent Future Jupyter Notebook Loss
The most effective prevention strategy combines saved notebooks, version history, and independent backups.
For important Jupyter projects:
- Use Git regularly. Commit meaningful notebook versions before major changes.
- Preserve checkpoints. Know where your environment stores recovery copies, but do not rely on them as your only backup.
- Keep datasets organized. Store notebooks, scripts, and required files in a consistent project structure.
- Use separate backups. Maintain copies outside the original storage device.
- Verify cloud versions. Check retention and restore options rather than assuming synchronization provides permanent backups.
- Save before deleting cells. Create a new notebook version before major restructuring.
Most importantly, autosave does not equal permanent backup. It may save an accidental deletion over the previous notebook state.
Conclusion
To recover deleted Jupyter notebook files safely, first determine whether you lost a cell, an earlier version, a linked dataset, or the actual .ipynb file.
If the file still exists, locate it and reopen it. If an earlier copy survives, use Undo, checkpoints, Git, cloud history, or backups. Only when the original file has genuinely disappeared from Windows storage should you consider disk recovery.
For permanent local deletion, Magic Data Recovery provides an additional option when built-in methods cannot restore the notebook. However, the result depends on whether recoverable data remains on the drive. For more recovery methods, explore our deleted file recovery hub.
Supports Windows 7/8/10/11 and Windows Server
FAQ
Can I recover deleted Jupyter notebook files after emptying Recycle Bin?
.ipynb file on an accessible Windows drive. However, successful recovery depends on whether the original data remains intact. Overwriting and SSD TRIM can make recovery impossible.How can I perform Jupyter recover deleted cell operations after saving?
Esc to enter command mode, then press Z to undo the last cell operation. Saving does not necessarily erase undo history while the editing session remains active. However, reopening the notebook may remove that history. If undo fails, inspect available checkpoints or use IPython history for previously executed code.Why is my Jupyter notebook missing from the file browser but still on my computer?
*.ipynb in the expected project folder using File Explorer. If you find the notebook, reopen it through an accessible Jupyter directory.Can Jupyter autosave recover a notebook that was never manually saved?
Where are deleted Jupyter Notebook checkpoint files stored?
.ipynb_checkpoints folder next to the original notebook. For example, analysis.ipynb may have a corresponding analysis-checkpoint.ipynb file. However, server configurations can change or disable checkpoint storage. Additionally, deleting a notebook may remove its checkpoint. Copy any surviving checkpoint before attempting restoration.Can I recover a notebook deleted from JupyterHub or a cloud environment?
Why does a recovered Jupyter notebook open but fail to run correctly?
.ipynb file may be intact while its external dependencies are missing. For example, referenced CSV files, Python modules, or environment packages may no longer exist at the expected paths. First, verify the notebook's cells and outputs. Then restore missing datasets, correct relative paths, and check the Python environment before rerunning the workflow.
Vasilii is a data recovery specialist with around 10 years of hands-on experience in the field. Throughout his career, he has successfully solved thousands of complex cases involving deleted files, formatted drives, lost partitions, and RAW file systems. His expertise covers both manual recovery methods using professional tools like hex editors and advanced automated solutions with recovery software. Vasilii's mission is to make reliable data recovery knowledge accessible to both IT professionals and everyday users, helping them safeguard their valuable digital assets.